No edit summary Tag: rte-source |
No edit summary |
||
| (42 intermediate revisions by 20 users not shown) | |||
| Line 1: | Line 1: | ||
| − | {{Images|Design Gallery}} |
||
{{Infobox vehicles |
{{Infobox vehicles |
||
| − | | |
+ | |name = Rat-Loader |
| + | |front_image = Rat-Loader-GTAV-front.png |
||
| − | | aka = |
||
| + | |rear_image = Rat-Loader-GTAV-rear.png |
||
| − | <code>RLOADER</code> <small>(Rat-Loader; Handling name)</small><br> |
||
| + | |caption = A '''Rat-Loader''' in ''[[Grand Theft Auto V]]''. |
||
| − | | front_image = Rat-Loader-GTAV-front.png |
||
| + | |vehicle_class = Muscle |
||
| − | | rear_image = Rat-Loader-GTAV-rear.png |
||
| + | |vehicle_type = Civilian truck |
||
| − | | image_size = 300 |
||
| + | |body_style = 2-door pickup truck |
||
| − | | caption = A '''Rat-Loader''' in ''[[Grand Theft Auto V]]''. |
||
| + | |capacity = 2 <small>(driver and passenger)</small> |
||
| − | | vehicle_class = Muscle |
||
| + | |manufacturer = [[Bravado]] |
||
| − | | vehicle_type = Civilian truck |
||
| + | |price = [[Money|$]]6,000 <small>([[Grand Theft Auto Online|Online]])</small><br><small>([[Southern San Andreas Super Autos]])</small> |
||
| − | | body_style = 2-door pickup truck |
||
| + | |appearances = ''[[Grand Theft Auto V]]''<br>''[[Grand Theft Auto Online]]'' |
||
| − | | capacity = 2 <small>(driver and passenger)</small> |
||
| + | |variants = [[Rat-Truck]] |
||
| − | | appearances = ''[[Grand Theft Auto V]]''<br>''[[Grand Theft Auto Online]]'' |
||
| + | |related = [[Bison]]<br>[[Duneloader]]<br>[[Walton]] |
||
| − | | variants = [[Rat-Truck]] |
||
| + | |makeyear = 1930's |
||
| − | | related = [[Bison]]<br>[[Duneloader]]<br>[[Walton]] |
||
| + | |swankness = |
||
| − | | manufacturer = [[Bravado]] |
||
| + | |dashtype = |
||
| − | | price = $6,000 <small>([[Grand Theft Auto Online|Online]])</small><br><small>([[Southern San Andreas Super Autos]])</small> |
||
| + | |inttxd = |
||
| + | |carcols ={{Expand|'''GTA V'''| |
||
| + | {{CarColV/Title}} |
||
| + | {{CarColV|no=1|13|0|48|156}} |
||
| + | {{CarColV|no=2|40|0|48|156}} |
||
| + | {{CarColV|no=3|14|0|48|156}} |
||
| + | {{CarColV|no=4|82|0|48|156}} |
||
| + | {{CarColV|no=5|84|0|0|156}} |
||
| + | {{CarColV|no=6|12|0|109|156}} |
||
| + | {{CarColV|no=7|128|0|15|156}} |
||
| + | {{CarColV|no=8|129|0|71|156}} |
||
| + | {{CarColV|no=9|14|0|108|156}}<br> |
||
| + | }} |
||
| + | |wheeltype = |
||
| + | |flags = |
||
| + | |modelsets = <!--null--> |
||
| + | |modelname = ratloader |
||
| + | |handlingname = RLOADER |
||
| + | |textlabelname = RLOADER |
||
| + | |roadspawn = |
||
| + | |roadspawnmaxcol = |
||
| + | |roadspawnfreq = |
||
| + | |roadspawntrailer = <!--null--> |
||
| + | |roadspawnidendis = |
||
| + | |roadspawndrivers = |
||
| + | |roadspawngroups = |
||
| + | |roadspawnlicense = |
||
| + | |engineacceleration = |
||
| + | |exhaustacceleration = |
||
| + | |idle = |
||
| + | |deceleration = |
||
| + | |genpreced = |
||
| + | |gensucced = |
||
}} |
}} |
||
{{quote|Don't think of this as buying a rusty pick-up truck with shoddy brakes; think of it as buying a piece of history. The 1930s look is huge right now, so you'll have to act fast if you want to beat the hipsters to the punch. We know you'll treasure this classic Rat-loader from Bravado just as much as the previous 19 owners did.|[[Southern San Andreas Super Autos]] description.}} |
{{quote|Don't think of this as buying a rusty pick-up truck with shoddy brakes; think of it as buying a piece of history. The 1930s look is huge right now, so you'll have to act fast if you want to beat the hipsters to the punch. We know you'll treasure this classic Rat-loader from Bravado just as much as the previous 19 owners did.|[[Southern San Andreas Super Autos]] description.}} |
||
| − | |||
The [[Bravado]] '''Rat-Loader''' is a pickup truck featured in ''[[Grand Theft Auto V]]'' and ''[[Grand Theft Auto Online]]''. |
The [[Bravado]] '''Rat-Loader''' is a pickup truck featured in ''[[Grand Theft Auto V]]'' and ''[[Grand Theft Auto Online]]''. |
||
==Design== |
==Design== |
||
| + | ===''Grand Theft Auto V''=== |
||
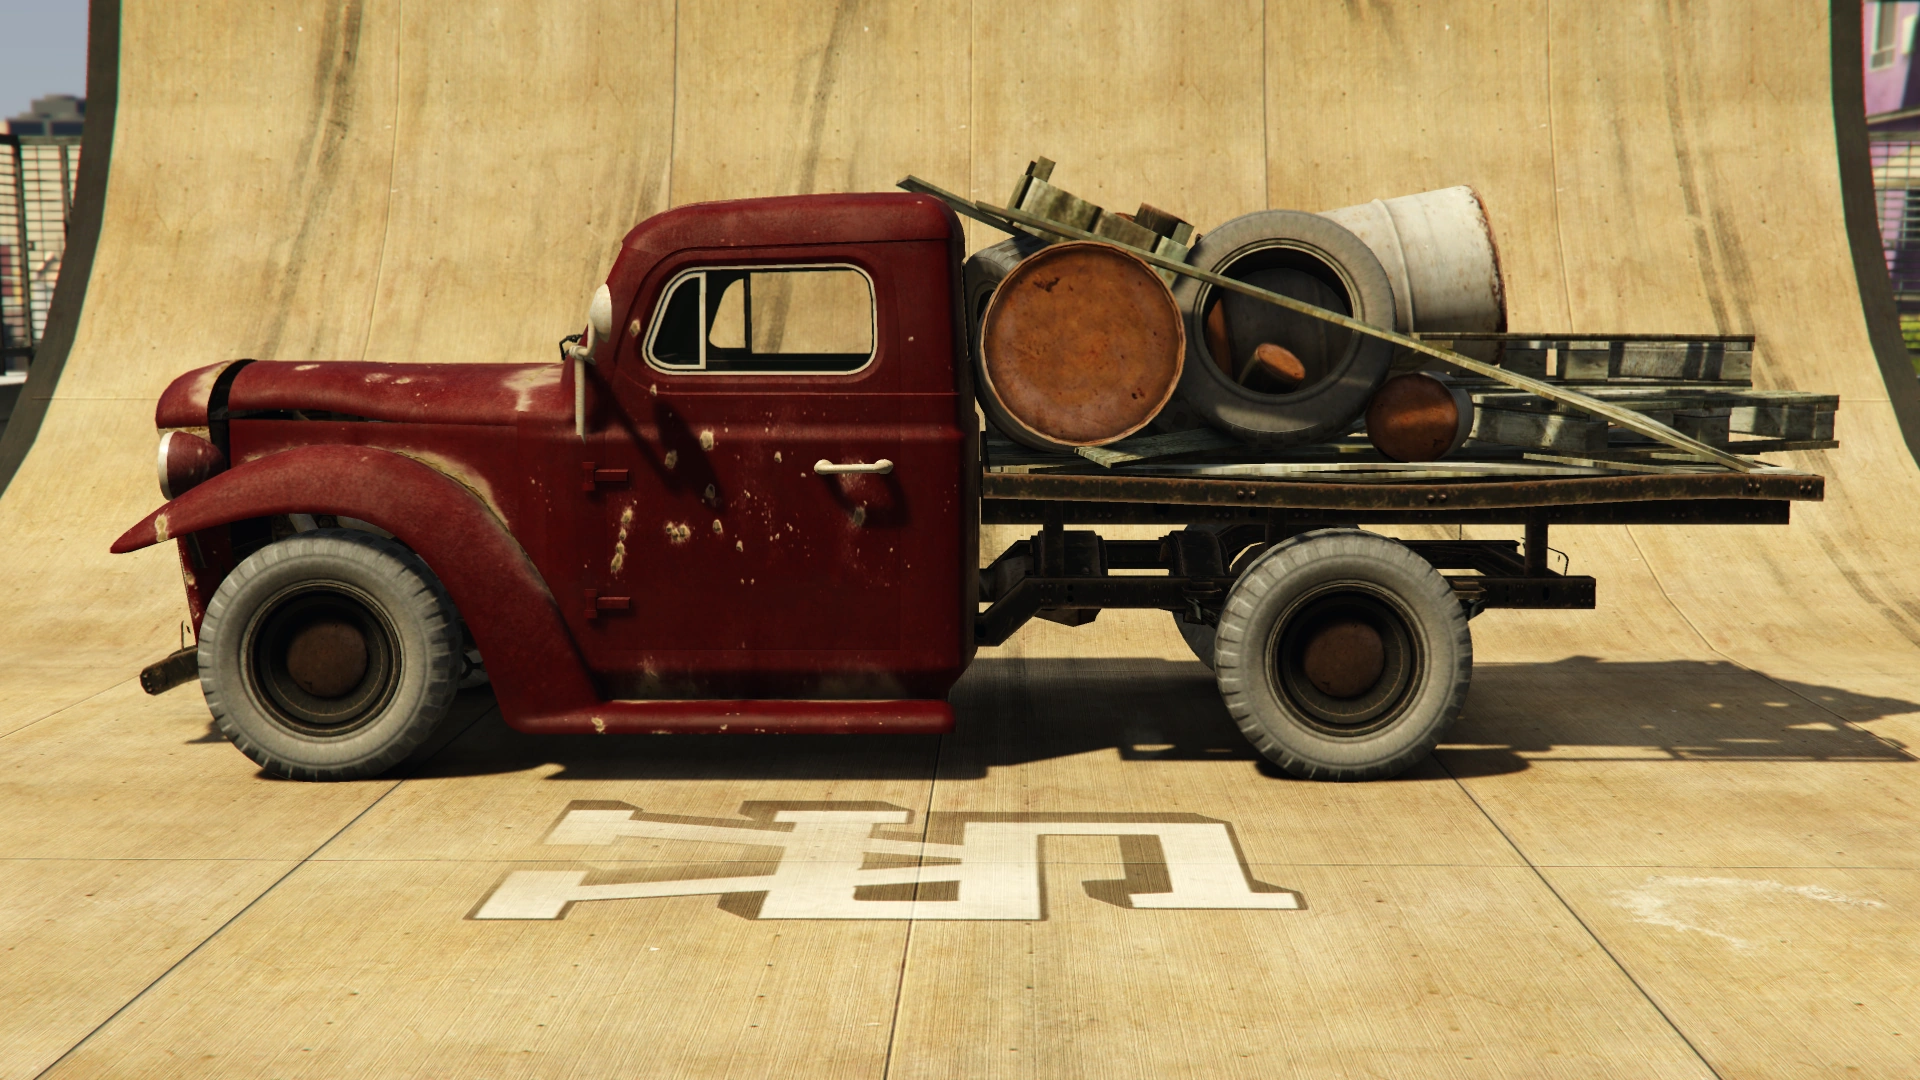
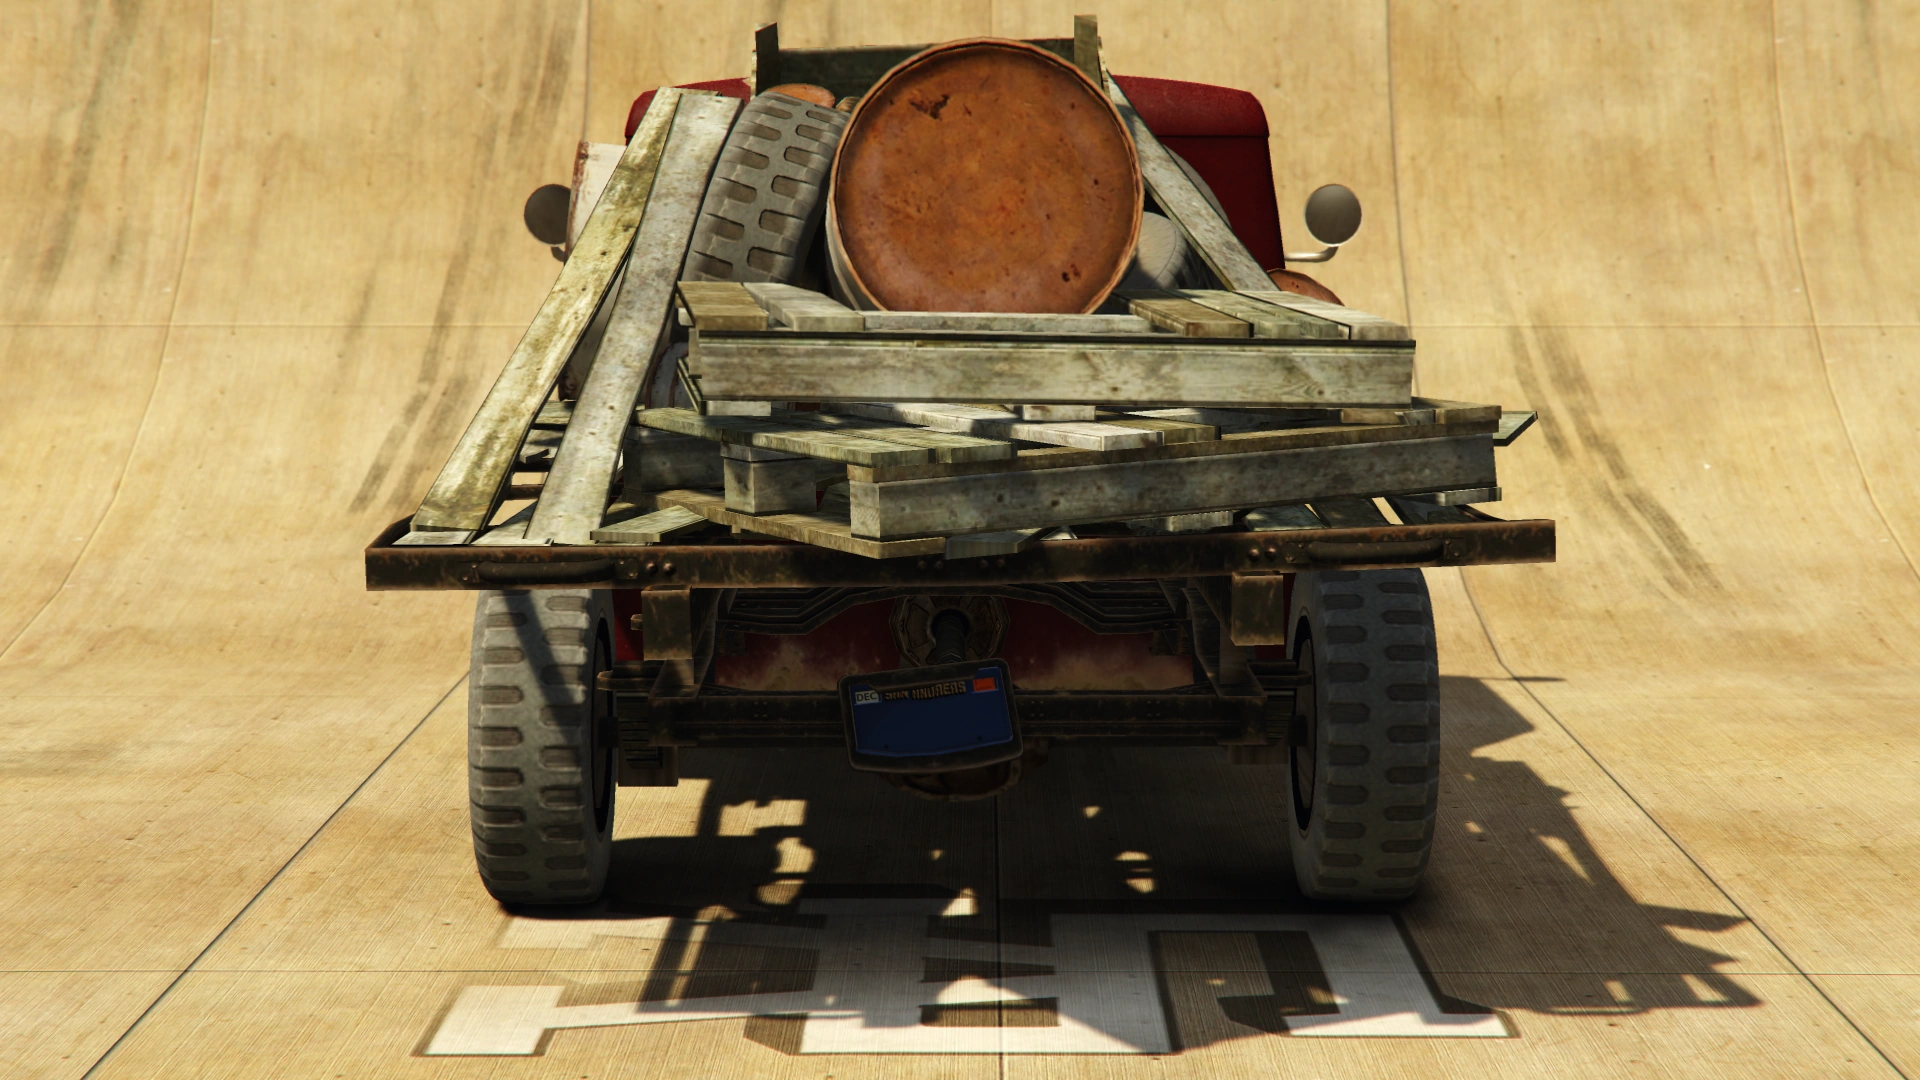
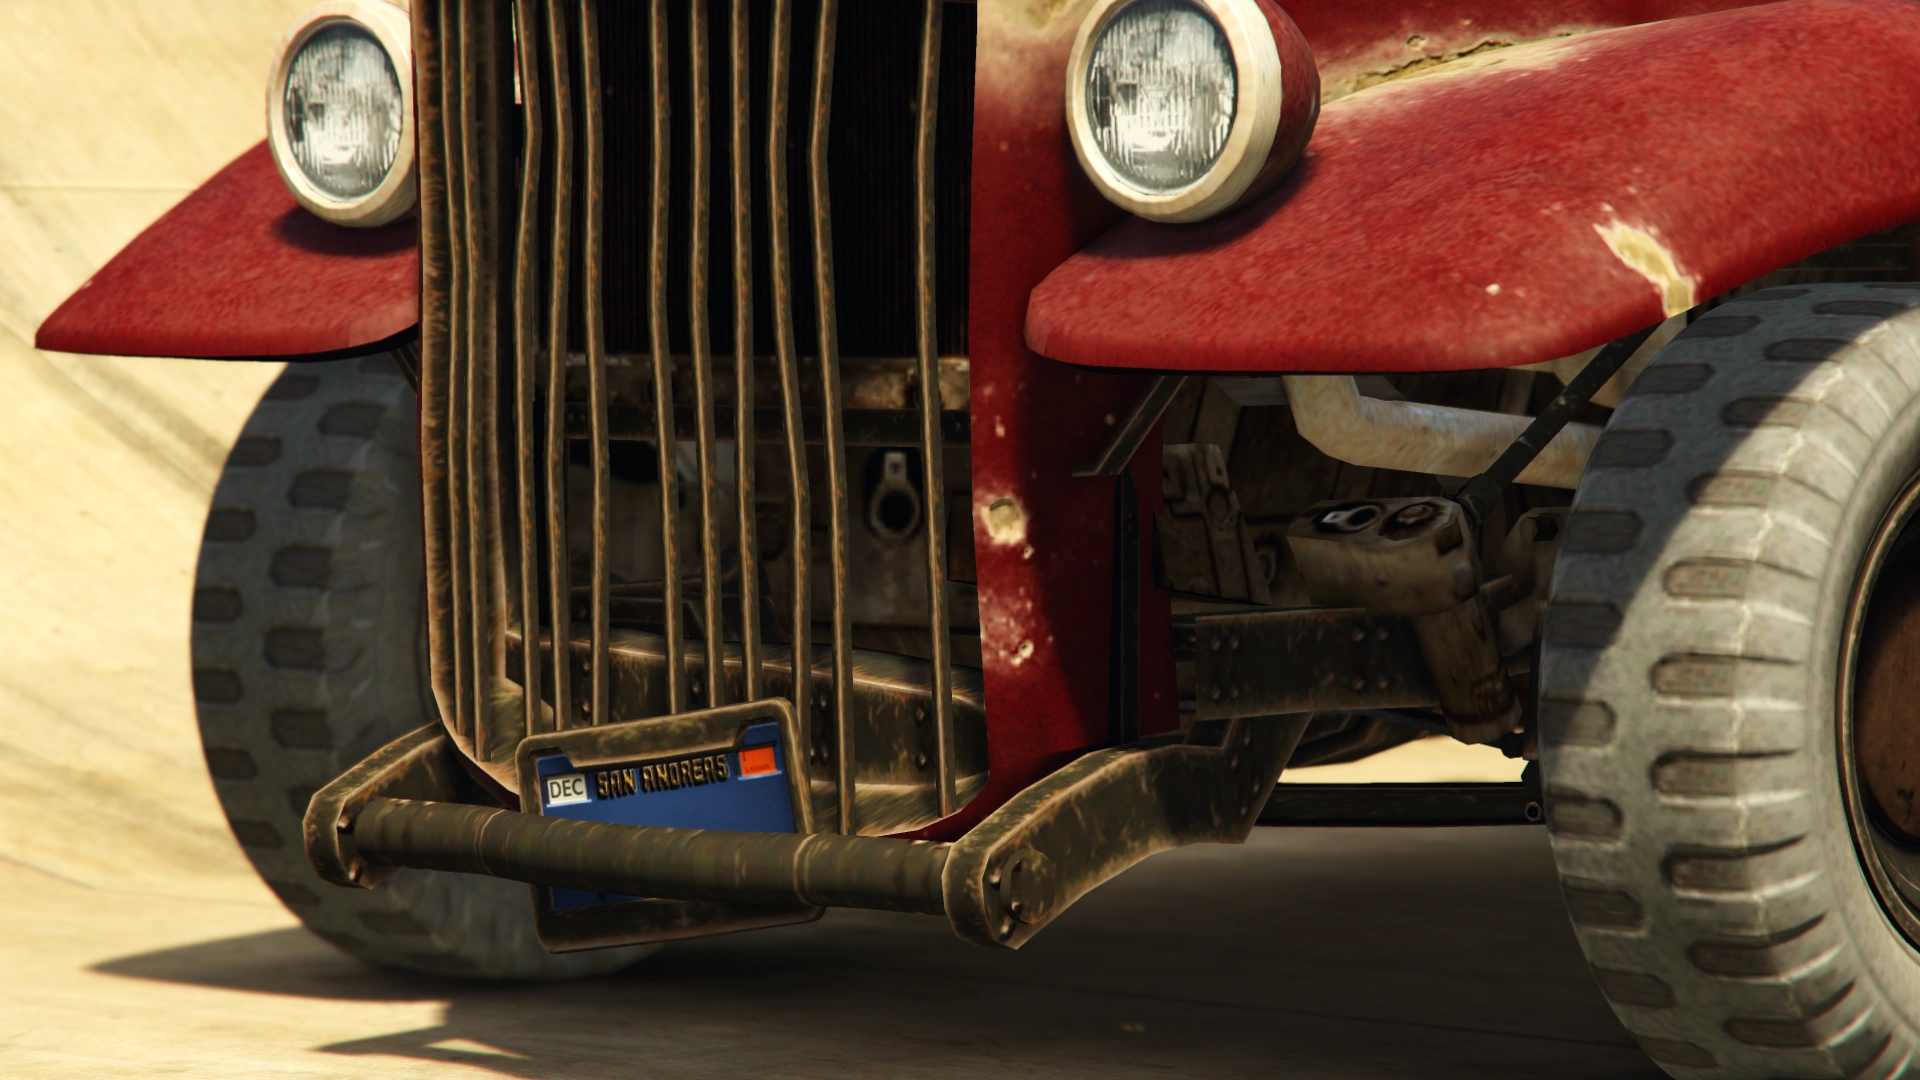
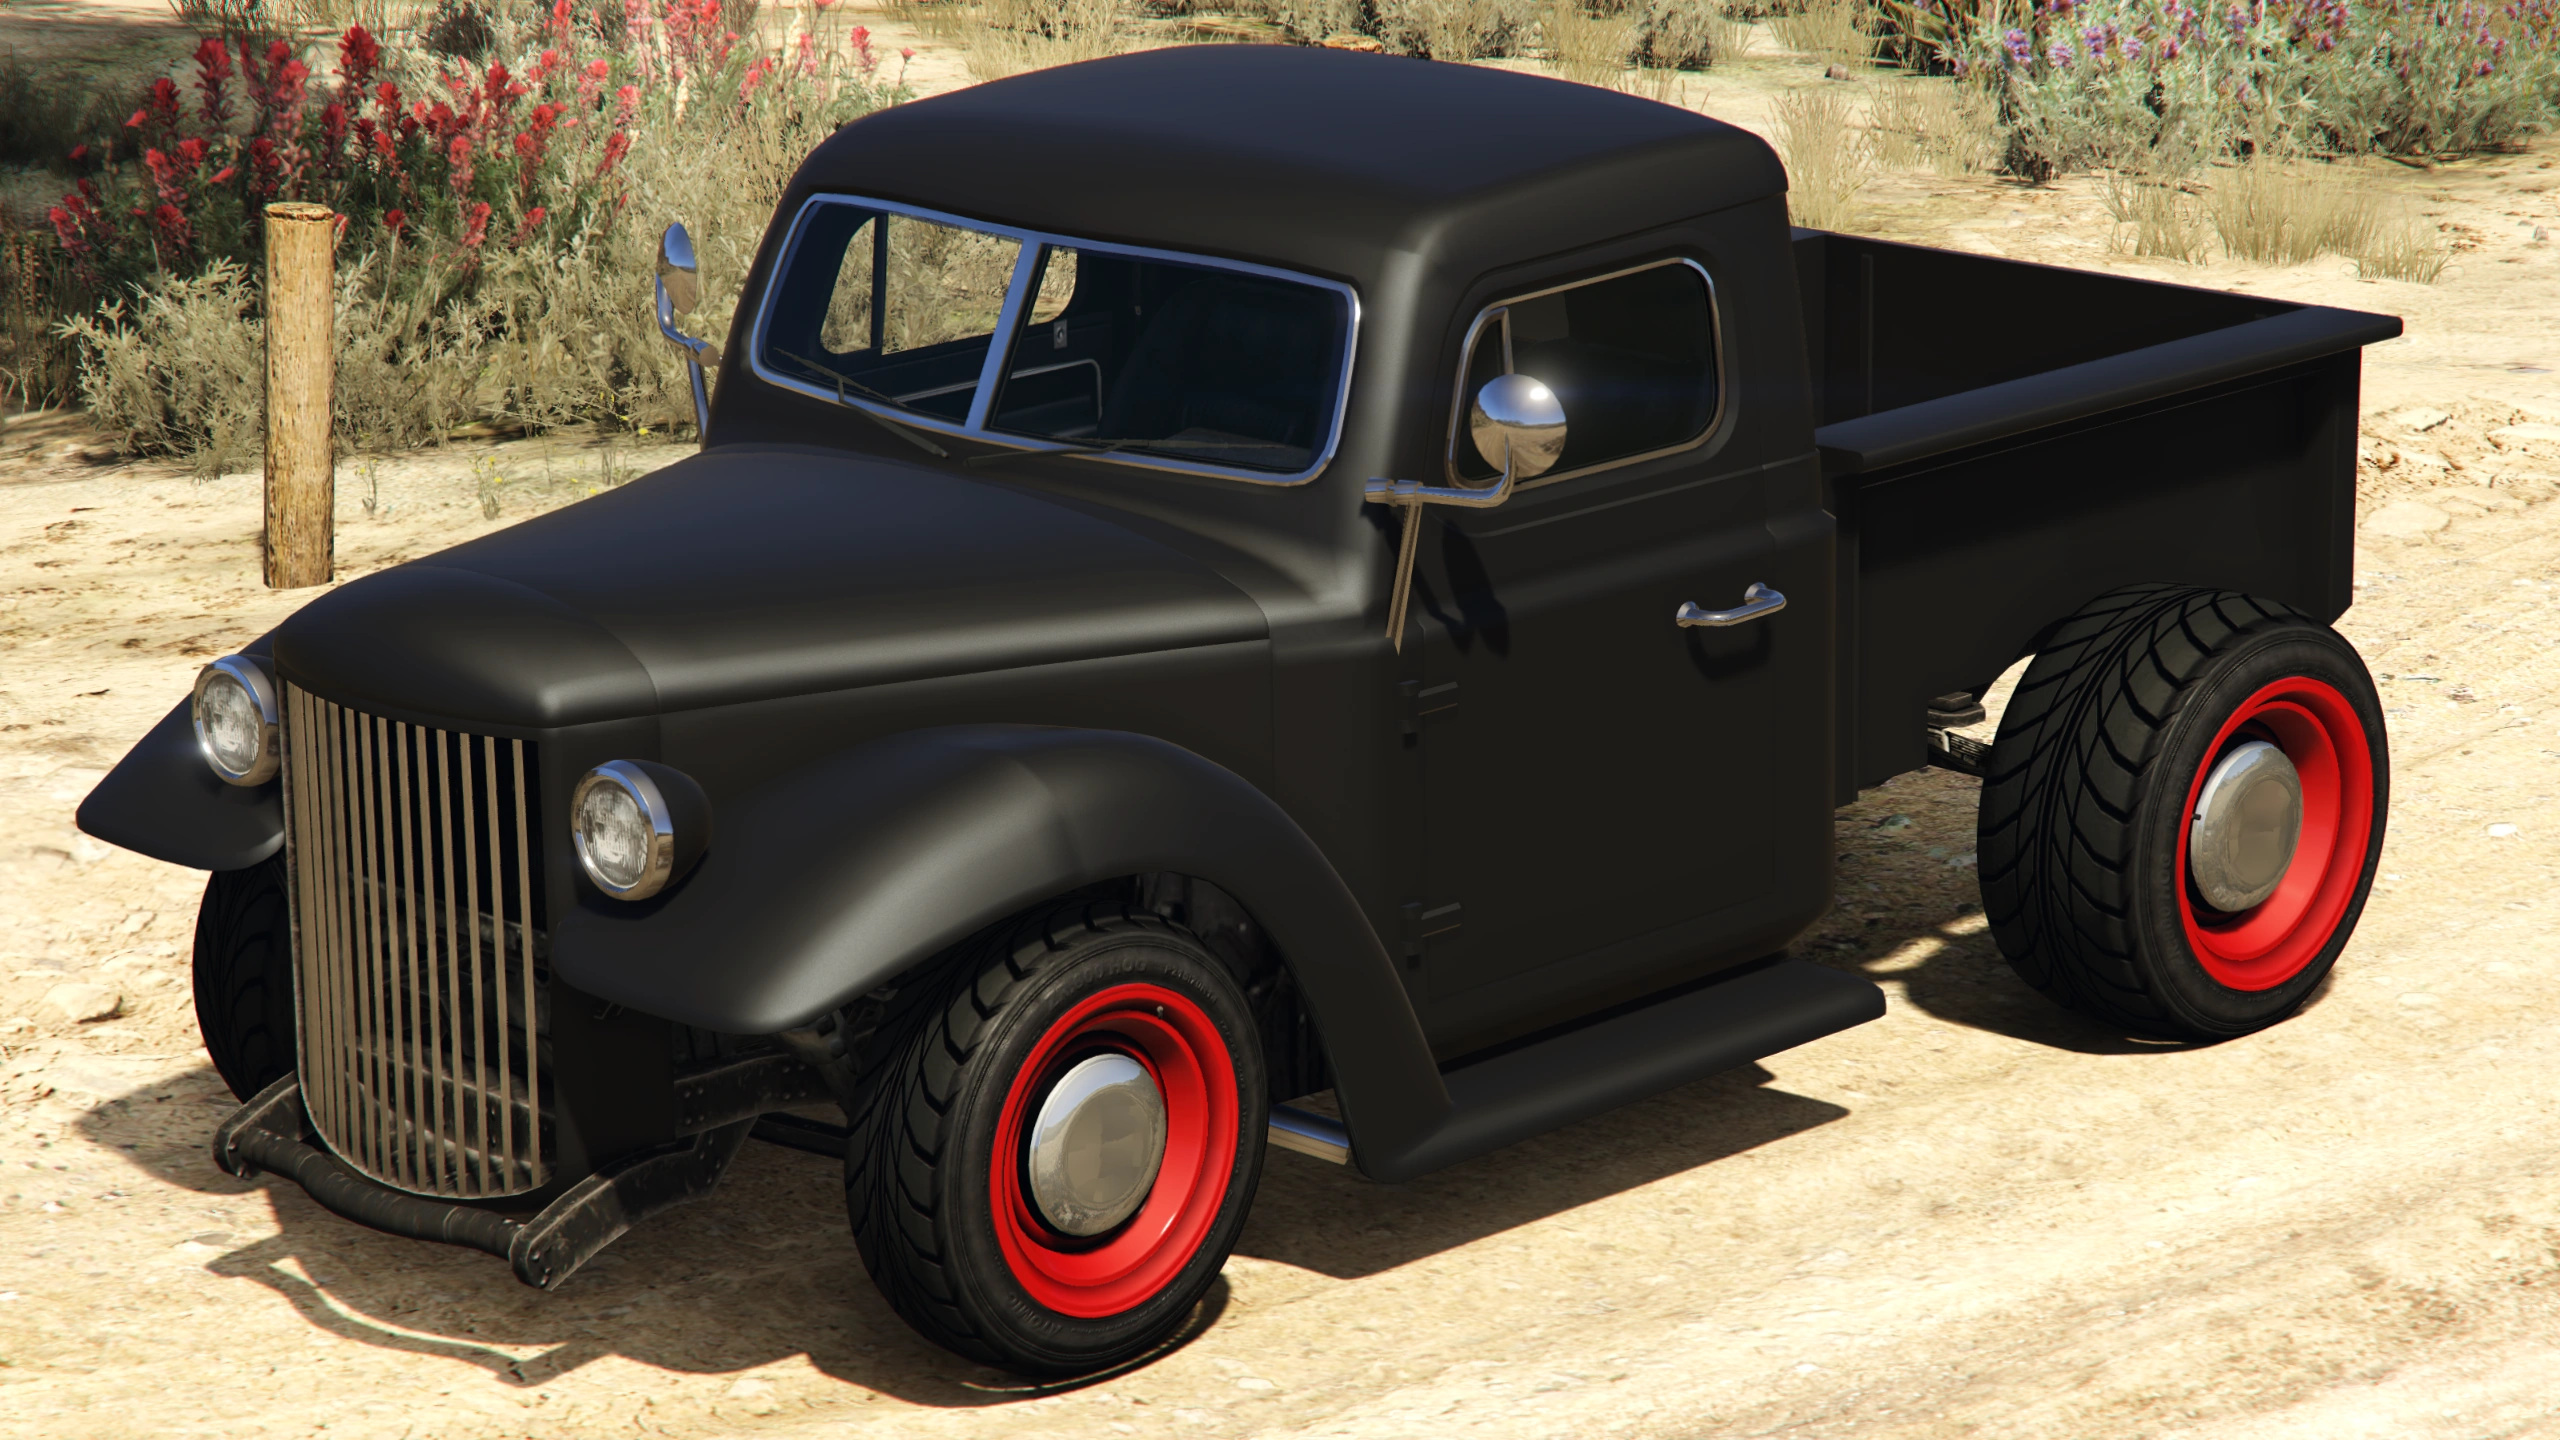
| − | The truck appears to be based on a [https://s-media-cache-ak0.pinimg.com/736x/32/f6/b0/32f6b0a676bf73528b179cd166b87f7a.jpg 1940 Chevrolet Pickup]. It features a ramshackle flat bed covered with random trash, but can be given a standard bed at [[Los Santos Customs]]. The Rat-Loader features crooked and bent front and rear license plates, a crooked front grille with missing and bent bars, and a bent hood. The stock Rat-Loader has rusty "Smoothie" wheels wrapped in discolored offroad tires. The truck has no front or rear bumpers; the license plates are instead mounted on the bars the bumpers would normally connect to. It also features a rusted and faded paint job. The Rat-Loader has no reverse lights, turn signals or brake lights, as it has no tail light cluster. |
||
| + | This vehicle appears to be based on the [[Duneloader]], which resembles a {{WP|Dodge Power Wagon|1946 Dodge Power Wagon}}. |
||
| + | It features a ramshackle flat bed covered with random trash, but can be given a standard bed at [[Los Santos Customs]]. The Rat-Loader features crooked and bent front and rear license plates, a crooked front grille with missing and bent bars, and a bent hood. The stock Rat-Loader has rusty "Smoothie" wheels wrapped in discolored offroad tires. The truck has no front or rear bumpers; the license plates are instead mounted on the bars the bumpers would normally connect to. It also features a rusted and faded paint job. The Rat-Loader has no tail light cluster, and as such does not feature reverse lights, turn signals or brake lights. The vehicle is also equipped with a CB radio, with indistinctive chatter occasionally audible. |
||
| − | Most of the above damage can be repaired at [[Los Santos Customs]], or, if desired, complete removal of the body panels. However, no matter what, the faded and rusted paint job remains. The body modifications available for this vehicle can make it look more like a [[wp:Rat rod|Rat rod]]. |
||
| + | Most of the above damage can be repaired at [[Los Santos Customs]], or, if desired, complete removal of the body panels. However, no matter what, the faded and rusted paint job remains. The body modifications available for this vehicle can make it look more like a {{WP|Rat rod}}. |
||
| + | |||
| + | {{Clr}} |
||
===Current Design Gallery=== |
===Current Design Gallery=== |
||
| + | <!--Please ensure you have read the Manual of Style [GTA_Wiki:Manual_of_Style/Vehicles/Design_Galleries] before uploading and adding images to the Current Design Gallery. Failure to meet these guidelines will result in the images being removed and deleted, and repeated offences may result in a warning.--> |
||
| − | {{Vehicle Design Gallery |
||
| + | |||
| − | | Front_quarter_imagename = Rat-Loader_GTAVe_Front_Quarter.jpg |
||
| + | {{Current Design Gallery |
||
| − | | Top_view_imagename = |
||
| + | |front_quarter_image = RLoader-GTAV-FrontQuarter.png |
||
| − | | Rear_quarter_imagename = Rat-Loader_GTAVe_Rear_Quarter.jpg |
||
| + | |top_image = RLoader-GTAV-Top.png |
||
| − | | Front_view_imagename = |
||
| + | |rear_quarter_image = RLoader-GTAV-RearQuarter.png |
||
| − | | Side_view_imagename = |
||
| + | |front_image = RLoader-GTAV-Front.png |
||
| − | | Rear_view_imagename = |
||
| + | |side_image = RLoader-GTAV-Side.png |
||
| − | | Engine_bay_imagename = Rat-loader,Bravado.jpg |
||
| + | |rear_image = RLoader-GTAV-Rear.png |
||
| − | | Underside_view_imagename = |
||
| + | |engine_image = RLoader-GTAV-Engine.png |
||
| − | | Inside_view_imagename = |
||
| + | |underside_image = RLoader-GTAV-Underside.png |
||
| − | | Badge_texture_imagename = |
||
| + | |inside_image = RLoader-GTAV-Inside.png |
||
| − | | Damage_view_imagename = |
||
| + | |detail_image = RLoader-GTAV-Detail.png |
||
| − | | Dashboard_view_imagename = RatLoader-GTAV-Dashboard.jpg |
||
| + | |open_other_image = RLoader-GTAV-Other.png |
||
| + | |dashboard_image = RLoader-GTAV-Dashboard.png |
||
}} |
}} |
||
==Performance== |
==Performance== |
||
=== ''Grand Theft Auto V'' === |
=== ''Grand Theft Auto V'' === |
||
| − | Although the Rat-Loader |
+ | Although the Rat-Loader comes with a modern V8 engine producing a fair amount of torque, the weight and thin tires make it prone to wheel-spin both off the line and on the way as well as giving it very poor braking. Its acceleration is average for the class, but its top speed is lacking for a Muscle car. The suspension and direction setup also cause it to have a very wide turning radius causing massive under-steer and making maneuverability quite the challenge. Fish tailing is not uncommon due to its engine power. Durabilty for the Rat-Loader itself is much lower, taking only a few collisions for the wheels to get jammed. |
| + | Possibly due to its worn condition, the engine seems to have slow response, at it takes a while to reach its max RPM when accelerating with the handbrake applied. This is also evidenced by its gear shifting ratio. |
||
| − | ==== GTA V Overview ==== |
||
| + | |||
| − | {{GTA V Vehicle Stats |
||
| + | ====GTA V Overview==== |
||
| − | |0-62mph/ 0-100km/h time defined = |
||
| + | {{Vehiclestats-gtav |
||
| − | |Top speed defined = 84 / 135 <small>(Handling.dat)</small> |
||
| + | |handling_top_speed = 84 / 135 |
||
| − | |Engine defined = |
||
| + | |handling_gears = 4 |
||
| − | |Drivetrain defined = RWD <small>(Website)</small> |
||
| + | |handling_drivetrain = RWD |
||
| − | |Gears defined = 4 <small>(Website)</small> |
||
| − | | |
+ | |handling_mass = 1200 / 2646 |
| + | |handling_fuel_tank = 45 |
||
| − | |0-62mph/ 0-100km/h time observed = 8.9 Seconds |
||
| + | |website_acceleration = |
||
| − | |Top speed observed = 85 / 136 |
||
| + | |website_top_speed = |
||
| − | |Engine observed = FR V8 |
||
| + | |website_gears = 4 |
||
| − | |Drivetrain observed = RWD |
||
| + | |website_engine = |
||
| − | |Gears observed = 4 |
||
| + | |website_drivetrain = RWD |
||
| + | |website_mass = 1200 / 2646 |
||
| + | |observed_acceleration = 8.9 Seconds |
||
| + | |observed_top_speed = 85 / 136 |
||
| + | |observed_gears = 4 |
||
| + | |observed_engine = {{H:title|Front-engine, rear wheel drive|FR}} {{H:title|Single Overhead Camshaft|SOHC}} V8 w/ 4 Double-Barrel Downdraft Carburetors <small>(In-game model)</small> |
||
| + | |observed_drivetrain = RWD |
||
| + | |rsc_image = |
||
| + | |rsc_top_speed = |
||
| + | |rsc_acceleration = |
||
| + | |rsc_braking = |
||
| + | |rsc_traction = |
||
}} |
}} |
||
==Modifications== |
==Modifications== |
||
===''Grand Theft Auto V''=== |
===''Grand Theft Auto V''=== |
||
| − | In GTA V, the Rat-Loader can be customized at [[Los Santos Customs]] and [[Beeker's Garage]]. |
||
{| class="wikitable" |
{| class="wikitable" |
||
| + | ! colspan="2" scope="col" |Category |
||
| − | !Type |
||
| + | ! scope="col" |Modification |
||
| − | !Upgrade |
||
| − | !Cost ( |
+ | ! scope="col" |Cost (''GTA V'') |
| − | !Cost ([[Grand Theft Auto Online|Online]]) |
+ | ! scope="col" |Cost ([[Grand Theft Auto Online|''GTA Online'']]) |
| + | ! scope="col" |Image |
||
| + | |- |
||
| + | | colspan="2" rowspan="6" |Armor |
||
| + | |No Armor |
||
| + | | style="text-align: center;" |$250 |
||
| + | | colspan="2" style="text-align: center;" |$500 |
||
|- |
|- |
||
| − | |rowspan="5"|Armor |
||
|Armor Upgrade 20% |
|Armor Upgrade 20% |
||
| style="text-align: center;" |$1,250 |
| style="text-align: center;" |$1,250 |
||
| − | | style="text-align: center;" |$5,250 |
+ | | colspan="2" style="text-align: center;" |$5,250 |
|- |
|- |
||
|Armor Upgrade 40% |
|Armor Upgrade 40% |
||
| style="text-align: center;" |$3,125 |
| style="text-align: center;" |$3,125 |
||
| − | | style="text-align: center;" |$8,750 |
+ | | colspan="2" style="text-align: center;" |$8,750 |
|- |
|- |
||
|Armor Upgrade 60% |
|Armor Upgrade 60% |
||
| style="text-align: center;" |$5,000 |
| style="text-align: center;" |$5,000 |
||
| − | | style="text-align: center;" |$14,000 |
+ | | colspan="2" style="text-align: center;" |$14,000 |
|- |
|- |
||
|Armor Upgrade 80% |
|Armor Upgrade 80% |
||
| style="text-align: center;" |$8,750 |
| style="text-align: center;" |$8,750 |
||
| − | | style="text-align: center;" |$24,500 |
+ | | colspan="2" style="text-align: center;" |$24,500 |
|- |
|- |
||
|Armor Upgrade 100% |
|Armor Upgrade 100% |
||
| style="text-align: center;" |$12,500 |
| style="text-align: center;" |$12,500 |
||
| − | | style="text-align: center;" |$35,000 |
+ | | colspan="2" style="text-align: center;" |$35,000 |
| + | |- |
||
| + | | colspan="2" rowspan="4" |Brakes |
||
| + | |Stock Brakes |
||
| + | | style="text-align: center;" |$250 |
||
| + | | colspan="2" style="text-align: center;" |$500 |
||
|- |
|- |
||
| − | |rowspan="3"|Brakes |
||
|Street Brakes |
|Street Brakes |
||
| style="text-align: center;" |$5,000 |
| style="text-align: center;" |$5,000 |
||
| − | | style="text-align: center;" |$10,000 |
+ | | colspan="2" style="text-align: center;" |$10,000 |
|- |
|- |
||
|Sport Brakes |
|Sport Brakes |
||
| style="text-align: center;" |$6,750 |
| style="text-align: center;" |$6,750 |
||
| − | | style="text-align: center;" |$13,500 |
+ | | colspan="2" style="text-align: center;" |$13,500 |
|- |
|- |
||
|Race Brakes |
|Race Brakes |
||
| style="text-align: center;" |$8,750 |
| style="text-align: center;" |$8,750 |
||
| − | | style="text-align: center;" |$17,500 |
+ | | colspan="2" style="text-align: center;" |$17,500 |
|- |
|- |
||
| − | |rowspan="4"|Engine |
+ | | colspan="2" rowspan="4" |Engine |
|EMS Upgrade, Level 1 |
|EMS Upgrade, Level 1 |
||
| style="text-align: center;" |$2,250 |
| style="text-align: center;" |$2,250 |
||
| − | | style="text-align: center;" |$4,500 |
+ | | colspan="2" style="text-align: center;" |$4,500 |
|- |
|- |
||
|EMS Upgrade, Level 2 |
|EMS Upgrade, Level 2 |
||
| style="text-align: center;" |$3,125 |
| style="text-align: center;" |$3,125 |
||
| − | | style="text-align: center;" |$6,250 |
+ | | colspan="2" style="text-align: center;" |$6,250 |
|- |
|- |
||
|EMS Upgrade, Level 3 |
|EMS Upgrade, Level 3 |
||
| style="text-align: center;" |$4,500 |
| style="text-align: center;" |$4,500 |
||
| − | | style="text-align: center;" |$9,000 |
+ | | colspan="2" style="text-align: center;" |$9,000 |
|- |
|- |
||
|EMS Upgrade, Level 4 |
|EMS Upgrade, Level 4 |
||
| style="text-align: center;" |$8,375 |
| style="text-align: center;" |$8,375 |
||
| − | | style="text-align: center;" |$16,750 |
+ | | colspan="2" style="text-align: center;" |$16,750 |
| + | |- |
||
| + | | colspan="2" rowspan="2" |Engine Bay |
||
| + | |Stock Engine Bay |
||
| + | | style="text-align: center;" |$350 |
||
| + | | style="text-align: center;" |$700 |
||
| + | | |
||
|- |
|- |
||
| − | |Engine Bay |
||
|Chromed V8 |
|Chromed V8 |
||
| style="text-align: center;" |$550 |
| style="text-align: center;" |$550 |
||
| style="text-align: center;" |$1,100 |
| style="text-align: center;" |$1,100 |
||
| + | | |
||
| + | |- |
||
| + | | colspan="2" rowspan="5" |Exhausts |
||
| + | |Stock Exhaust |
||
| + | | style="text-align: center;" |$130 |
||
| + | | style="text-align: center;" |$260 |
||
| + | | |
||
|- |
|- |
||
| − | |rowspan="4"|Exhaust |
||
|Short Exhausts |
|Short Exhausts |
||
| style="text-align: center;" |$375 |
| style="text-align: center;" |$375 |
||
| style="text-align: center;" |$750 |
| style="text-align: center;" |$750 |
||
| + | | |
||
|- |
|- |
||
|Straight Exit Exhausts |
|Straight Exit Exhausts |
||
| style="text-align: center;" |$899 |
| style="text-align: center;" |$899 |
||
| style="text-align: center;" |$1,800 |
| style="text-align: center;" |$1,800 |
||
| + | | |
||
|- |
|- |
||
|Stinger Exhaust |
|Stinger Exhaust |
||
| style="text-align: center;" |$1,499 |
| style="text-align: center;" |$1,499 |
||
| style="text-align: center;" |$3,000 |
| style="text-align: center;" |$3,000 |
||
| + | | |
||
|- |
|- |
||
|Side Exit Exhaust |
|Side Exit Exhaust |
||
| style="text-align: center;" |$4,770 |
| style="text-align: center;" |$4,770 |
||
| style="text-align: center;" |$9,550 |
| style="text-align: center;" |$9,550 |
||
| + | | |
||
| + | |- |
||
| + | | colspan="2" rowspan="2" |[[Car Bomb|Explosives]] |
||
| + | |Ignition Bomb |
||
| + | | style="text-align: center;" |N/A |
||
| + | | colspan="2" style="text-align: center;" |$5,000 |
||
| + | |- |
||
| + | |Remote Bomb |
||
| + | | style="text-align: center;" |N/A |
||
| + | | colspan="2" style="text-align: center;" |$7,500 |
||
| + | |- |
||
| + | | colspan="2" rowspan="3" |Fenders |
||
| + | |Stock Fenders |
||
| + | | style="text-align: center;" |$150 |
||
| + | | style="text-align: center;" |$300 |
||
| + | | |
||
|- |
|- |
||
| − | |rowspan="2"|Fenders |
||
|Remove Fenders |
|Remove Fenders |
||
| style="text-align: center;" |$450 |
| style="text-align: center;" |$450 |
||
| style="text-align: center;" |$900 |
| style="text-align: center;" |$900 |
||
| + | | |
||
|- |
|- |
||
|Cycle Fenders |
|Cycle Fenders |
||
| style="text-align: center;" |$750 |
| style="text-align: center;" |$750 |
||
| style="text-align: center;" |$1,500 |
| style="text-align: center;" |$1,500 |
||
| + | | |
||
| + | |- |
||
| + | | colspan="2" rowspan="5" |Grilles |
||
| + | |Stock Grille |
||
| + | | style="text-align: center;" |$100 |
||
| + | | style="text-align: center;" |$200 |
||
| + | | |
||
|- |
|- |
||
| − | |rowspan="4"|Grille |
||
|Grille with Fixed Bars |
|Grille with Fixed Bars |
||
| style="text-align: center;" |$375 |
| style="text-align: center;" |$375 |
||
| style="text-align: center;" |$750 |
| style="text-align: center;" |$750 |
||
| + | | |
||
|- |
|- |
||
|Grille Bars Removed |
|Grille Bars Removed |
||
| style="text-align: center;" |$670 |
| style="text-align: center;" |$670 |
||
| style="text-align: center;" |$1,340 |
| style="text-align: center;" |$1,340 |
||
| + | | |
||
|- |
|- |
||
|Vintage Grille |
|Vintage Grille |
||
| style="text-align: center;" |$825 |
| style="text-align: center;" |$825 |
||
| style="text-align: center;" |$1,650 |
| style="text-align: center;" |$1,650 |
||
| + | | |
||
|- |
|- |
||
|Grille Cowl Removed |
|Grille Cowl Removed |
||
| style="text-align: center;" |$1,500 |
| style="text-align: center;" |$1,500 |
||
| style="text-align: center;" |$3,000 |
| style="text-align: center;" |$3,000 |
||
| + | | |
||
| + | |- |
||
| + | | colspan="2" rowspan="7" |Hoods |
||
| + | |Stock Hood |
||
| + | | style="text-align: center;" |$450 |
||
| + | | style="text-align: center;" |$900 |
||
| + | | |
||
|- |
|- |
||
| − | |rowspan="6"|Hood |
||
|Remove Hood |
|Remove Hood |
||
| style="text-align: center;" |$850 |
| style="text-align: center;" |$850 |
||
| style="text-align: center;" |$1,700 |
| style="text-align: center;" |$1,700 |
||
| + | | |
||
|- |
|- |
||
|Repaired Hood |
|Repaired Hood |
||
| style="text-align: center;" |$1,200 |
| style="text-align: center;" |$1,200 |
||
| style="text-align: center;" |$2,400 |
| style="text-align: center;" |$2,400 |
||
| + | | |
||
|- |
|- |
||
|Single Scoop With Hood |
|Single Scoop With Hood |
||
| style="text-align: center;" |$1,450 |
| style="text-align: center;" |$1,450 |
||
| style="text-align: center;" |$2,900 |
| style="text-align: center;" |$2,900 |
||
| + | | |
||
|- |
|- |
||
|Single Scoop Without Hood |
|Single Scoop Without Hood |
||
| style="text-align: center;" |$2,225 |
| style="text-align: center;" |$2,225 |
||
| style="text-align: center;" |$4,450 |
| style="text-align: center;" |$4,450 |
||
| + | | |
||
|- |
|- |
||
|Triple Scoop With Hood |
|Triple Scoop With Hood |
||
| style="text-align: center;" |$2,500 |
| style="text-align: center;" |$2,500 |
||
| style="text-align: center;" |$5,000 |
| style="text-align: center;" |$5,000 |
||
| + | | |
||
|- |
|- |
||
| − | | |
+ | |Triple Scoop Without Hood |
| style="text-align: center;" |$2,800 |
| style="text-align: center;" |$2,800 |
||
| style="text-align: center;" |$5,600 |
| style="text-align: center;" |$5,600 |
||
| + | | |
||
| + | |- |
||
| + | | colspan="2" |Horns |
||
| + | |''Main article: [[Los Santos Customs/Horns]]'' |
||
| + | | style="text-align: center;" | - |
||
| + | | colspan="2" style="text-align: center;" | - |
||
| + | |- |
||
| + | | rowspan="3" |Lights |
||
| + | | rowspan="2" |Headlights |
||
| + | |Stock Lights |
||
| + | | style="text-align: center;" |$200 |
||
| + | | colspan="2" style="text-align: center;" |$400 |
||
|- |
|- |
||
| − | |rowspan="2"|Lights |
||
|Xenon Lights |
|Xenon Lights |
||
| style="text-align: center;" |$1,000 |
| style="text-align: center;" |$1,000 |
||
| − | | style="text-align: center;" |$5,000 |
+ | | colspan="2" style="text-align: center;" |$5,000 |
|- |
|- |
||
| + | |Neon Kits |
||
| − | |<div class="mw-collapsible mw-collapsed" style="width:100%"> |
||
| + | |''Main article: [[Los Santos Customs/Lights]]'' |
||
| − | <div class="mw-collapsible-content"> |
||
| − | {{Main|Los Santos Customs/Lights}} |
||
| − | </div> |
||
| − | </div> |
||
| − | | style="text-align: center;" | - |
||
| style="text-align: center;" | - |
| style="text-align: center;" | - |
||
| + | | colspan="2" style="text-align: center;" | - |
||
|- |
|- |
||
| − | |rowspan="2"|Loss/Theft Prevention |
+ | | colspan="2" rowspan="2" |Loss/Theft Prevention |
|Tracker |
|Tracker |
||
| style="text-align: center;" |N/A |
| style="text-align: center;" |N/A |
||
| − | | style="text-align: center;" |$2,000 |
+ | | colspan="2" style="text-align: center;" |$2,000 |
|- |
|- |
||
|Full Coverage |
|Full Coverage |
||
| style="text-align: center;" |N/A |
| style="text-align: center;" |N/A |
||
| − | | style="text-align: center;" |$750 |
+ | | colspan="2" style="text-align: center;" |$750 |
|- |
|- |
||
| − | | |
+ | | colspan="2" |Respray |
| + | |''Main article: [[Los Santos Customs/Respray Colors]]'' |
||
| − | |<div class="mw-collapsible mw-collapsed" style="width:100%"> |
||
| − | <div class="mw-collapsible-content"> |
||
| − | {{ResprayColorsExpand}} |
||
| − | </div> |
||
| − | </div> |
||
| style="text-align: center;" | - |
| style="text-align: center;" | - |
||
| − | | style="text-align: center;" | - |
+ | | colspan="2" style="text-align: center;" | - |
| − | |- |
||
| − | |Crew Emblem |
||
| − | | style="text-align: center;" |N/A |
||
| − | | style="text-align: center;" |$25,000 |
||
|- |
|- |
||
| − | |Sell |
+ | | colspan="2" |Sell |
|Sell Vehicle |
|Sell Vehicle |
||
| style="text-align: center;" |N/A |
| style="text-align: center;" |N/A |
||
| − | | style="text-align: center;" |$600 |
+ | | colspan="2" style="text-align: center;" |$600 |
| + | |- |
||
| + | | colspan="2" rowspan="5" |Suspension |
||
| + | |Stock Suspension |
||
| + | | style="text-align: center;" |$100 |
||
| + | | colspan="2" style="text-align: center;" |$200 |
||
|- |
|- |
||
| − | |rowspan="4"|Suspension |
||
|Lowered Suspension |
|Lowered Suspension |
||
| style="text-align: center;" |$500 |
| style="text-align: center;" |$500 |
||
| − | | style="text-align: center;" |$1,000 |
+ | | colspan="2" style="text-align: center;" |$1,000 |
|- |
|- |
||
|Street Suspension |
|Street Suspension |
||
| style="text-align: center;" |$1,000 |
| style="text-align: center;" |$1,000 |
||
| − | | style="text-align: center;" |$2,000 |
+ | | colspan="2" style="text-align: center;" |$2,000 |
|- |
|- |
||
|Sport Suspension |
|Sport Suspension |
||
| style="text-align: center;" |$1,700 |
| style="text-align: center;" |$1,700 |
||
| − | | style="text-align: center;" |$3,400 |
+ | | colspan="2" style="text-align: center;" |$3,400 |
|- |
|- |
||
|Competition Suspension |
|Competition Suspension |
||
| style="text-align: center;" |$2,200 |
| style="text-align: center;" |$2,200 |
||
| − | | style="text-align: center;" |$4,400 |
+ | | colspan="2" style="text-align: center;" |$4,400 |
| + | |- |
||
| + | | colspan="2" rowspan="4" |Transmission |
||
| + | |Stock Transmission |
||
| + | | style="text-align: center;" |$250 |
||
| + | | colspan="2" style="text-align: center;" |$500 |
||
|- |
|- |
||
| − | |rowspan="3"|Transmission |
||
|Street Transmission |
|Street Transmission |
||
| style="text-align: center;" |$7,375 |
| style="text-align: center;" |$7,375 |
||
| − | | style="text-align: center;" |$14,750 |
+ | | colspan="2" style="text-align: center;" |$14,750 |
|- |
|- |
||
|Sports Transmission |
|Sports Transmission |
||
| style="text-align: center;" |$8,125 |
| style="text-align: center;" |$8,125 |
||
| − | | style="text-align: center;" |$16,250 |
+ | | colspan="2" style="text-align: center;" |$16,250 |
|- |
|- |
||
|Race Transmission |
|Race Transmission |
||
| style="text-align: center;" |$10,000 |
| style="text-align: center;" |$10,000 |
||
| − | | style="text-align: center;" |$20,000 |
+ | | colspan="2" style="text-align: center;" |$20,000 |
| + | |- |
||
| + | | colspan="2" rowspan="5" |Truck Beds |
||
| + | |Stock Truck Bed |
||
| + | | style="text-align: center;" |$100 |
||
| + | | style="text-align: center;" |$200 |
||
| + | | |
||
|- |
|- |
||
| − | |rowspan="4"|Truck Bed |
||
|Basic Truck Bed |
|Basic Truck Bed |
||
| style="text-align: center;" |$350 |
| style="text-align: center;" |$350 |
||
| style="text-align: center;" |$700 |
| style="text-align: center;" |$700 |
||
| + | | |
||
|- |
|- |
||
|Basic Truck Bed With Arches |
|Basic Truck Bed With Arches |
||
| style="text-align: center;" |$575 |
| style="text-align: center;" |$575 |
||
| style="text-align: center;" |$1,150 |
| style="text-align: center;" |$1,150 |
||
| + | | |
||
|- |
|- |
||
|Wooden Sided Truck Bed |
|Wooden Sided Truck Bed |
||
| style="text-align: center;" |$800 |
| style="text-align: center;" |$800 |
||
| style="text-align: center;" |$1,600 |
| style="text-align: center;" |$1,600 |
||
| + | | |
||
|- |
|- |
||
|Chopped Truck Bed |
|Chopped Truck Bed |
||
| style="text-align: center;" |$975 |
| style="text-align: center;" |$975 |
||
| style="text-align: center;" |$1,950 |
| style="text-align: center;" |$1,950 |
||
| + | | |
||
| + | |- |
||
| + | | colspan="2" rowspan="2" |Turbo |
||
| + | |None |
||
| + | | style="text-align: center;" |$1,250 |
||
| + | | colspan="2" style="text-align: center;" |$2,500 |
||
|- |
|- |
||
| − | |Turbo |
||
|Turbo Tuning |
|Turbo Tuning |
||
| style="text-align: center;" |$6,250 |
| style="text-align: center;" |$6,250 |
||
| − | | style="text-align: center;" |$35,000 |
+ | | colspan="2" style="text-align: center;" |$35,000 |
|- |
|- |
||
| − | |Wheels |
+ | | colspan="2" |Wheels |
| + | |''Main article: [[Los Santos Customs/Wheels]]'' |
||
| − | |<div class="mw-collapsible mw-collapsed" style="width:100%"> |
||
| − | <div class="mw-collapsible-content"> |
||
| − | {{WheelsExpand}} |
||
| − | </div> |
||
| − | </div> |
||
| − | | style="text-align: center;" | - |
||
| style="text-align: center;" | - |
| style="text-align: center;" | - |
||
| + | | colspan="2" style="text-align: center;" | - |
||
| + | |- |
||
| + | | colspan="2" rowspan="4" |Windows |
||
| + | |None |
||
| + | | style="text-align: center;" |$100 |
||
| + | | colspan="2" style="text-align: center;" |$500 |
||
|- |
|- |
||
| − | |rowspan="3"|Windows |
||
|Light Smoke |
|Light Smoke |
||
| style="text-align: center;" |$200 |
| style="text-align: center;" |$200 |
||
| − | | style="text-align: center;" |$1,500 |
+ | | colspan="2" style="text-align: center;" |$1,500 |
|- |
|- |
||
|Dark Smoke |
|Dark Smoke |
||
| style="text-align: center;" |$450 |
| style="text-align: center;" |$450 |
||
| − | | style="text-align: center;" |$3,500 |
+ | | colspan="2" style="text-align: center;" |$3,500 |
|- |
|- |
||
|Limo |
|Limo |
||
| style="text-align: center;" |$700 |
| style="text-align: center;" |$700 |
||
| − | | style="text-align: center;" |$5,000 |
+ | | colspan="2" style="text-align: center;" |$5,000 |
|} |
|} |
||
==Image Gallery== |
==Image Gallery== |
||
| + | <gallery position="center" spacing="small" hideaddbutton="true"> |
||
| − | <gallery width="auto" perrow="3" style="font-size:95%; padding:0;" widths="180" position="center"> |
||
RatLoader-GTAV-Front.jpg|Front quarter view. (<small>[[:image:RatLoader-GTAV-Rear.jpg|Rear quarter view]]</small>) |
RatLoader-GTAV-Front.jpg|Front quarter view. (<small>[[:image:RatLoader-GTAV-Rear.jpg|Rear quarter view]]</small>) |
||
RatLoader-GTAV-Wreck.jpg|A Rat-Loader [[Wrecks|wreck]]. |
RatLoader-GTAV-Wreck.jpg|A Rat-Loader [[Wrecks|wreck]]. |
||
| − | Rat-Loader-GTAV-Front-Panelless.jpg|A Rat-Loader with no hood, grille, fenders, stock engine bay and stock |
+ | Rat-Loader-GTAV-Front-Panelless.jpg|A Rat-Loader with no hood, grille, fenders, stock engine bay and stock exhaust. |
Rat-loader-car-bedless-front-GTAV.png|A bedless Rat-Loader, acquired through a glitch. (<small>[[:image:Rat-loader-car-rear-GTAV.png|Rear quarter view]]</small>) |
Rat-loader-car-bedless-front-GTAV.png|A bedless Rat-Loader, acquired through a glitch. (<small>[[:image:Rat-loader-car-rear-GTAV.png|Rear quarter view]]</small>) |
||
| + | Rat-truck-side-to-side-bravado-truck-gtav.png|[[Rat-Truck]] and '''Rat-loader''' comparison. |
||
| − | RatLoader-GTAV-RSC.png|The Rat-Loader on [[Rockstar Games Social Club]]. |
||
| − | Rat-truck-side-to-side-bravado-truck-gtav.png|Rat-truck and Rat-loader comparison. |
||
Rat-Truck_vs_Rat-Loader_GTAV_Wheelbase_and_tires.jpg|View of rear wheels showing wheelbase difference and wide tires. |
Rat-Truck_vs_Rat-Loader_GTAV_Wheelbase_and_tires.jpg|View of rear wheels showing wheelbase difference and wide tires. |
||
| + | RatLoader-GTAV-SSASA.png|The '''Rat-Loader''' on [[Southern San Andreas Super Autos]]. |
||
| + | RatLoader-GTAV-RSC.png|The '''Rat-Loader''' on [[Rockstar Games Social Club]]. |
||
| + | RatLoader-GTAO-RGSC2.jpg|The '''Rat-Loader''' on the updated [[Rockstar Games Social Club]]. |
||
| + | RatLoader-GTAO-RGSC3.jpg|The '''Rat-Loader''' in the cinematic preview on [[Rockstar Games Social Club]]. |
||
</gallery> |
</gallery> |
||
==Variants== |
==Variants== |
||
| + | {{Variant |
||
| − | ===''Grand Theft Auto V''=== |
||
| + | |float = center |
||
| − | {{Main|Rat-Truck}} |
||
| + | |title = Rat-Truck |
||
| − | A clean variant, known as the [[Rat-Truck]], was added in the [[Festive Surprise]] which removes the rusty paint damage, features a tailgate, but has no available modification options for the truck bed, unlike its rusty counterpart. |
||
| + | |games = Grand Theft Auto V |
||
| − | |||
| + | |article_link = Rat-Truck |
||
| − | <gallery position="center"> |
||
| + | |front_image = Rat-Truck-GTAV-front.png |
||
| − | Rat-Truck-GTAV-Front.png|The [[Rat-Truck]] <small>([[:File:Rat-Truck-GTAV-Rear.png|rear quarter view]])</small> |
||
| + | |rear_image = Rat-Truck-GTAV-rear.png |
||
| − | </gallery> |
||
| + | |caption = The '''Rat-Truck''' in ''[[Grand Theft Auto V]]''. |
||
| + | |description = A clean variant, known as the '''Rat-Truck''', was added in the [[Festive Surprise]] which removes the rusty paint damage, features a tailgate, but has no available modification options for the truck bed, unlike its rusty counterpart. |
||
| + | }} |
||
==Locations== |
==Locations== |
||
===''Grand Theft Auto V''=== |
===''Grand Theft Auto V''=== |
||
| − | *Any of the protagonists can spawn a Rat-Loader in [[Sandy Shores]] by first gaining a [[Wanted Level in GTA V|wanted level]], (''confirmed at two stars or above'') then heading to the empty lot on [[Algonquin Boulevard]], between [[Niland Avenue]] and [[Armadillo Avenue]]. It can be found parked next to a [[Caddy|civilian Caddy]]. It's recommended that the player incur the wanted level outside of Sandy Shores to allow the game to spawn the vehicles. |
+ | *Any of the protagonists can spawn a Rat-Loader in [[Sandy Shores]] by first gaining a [[Wanted Level in GTA V|wanted level]], (''confirmed at two stars or above'') then heading to the empty lot on [[Algonquin Boulevard]], between [[Niland Avenue]] and [[Armadillo Avenue]]. It can be found parked next to a [[Caddy|civilian Caddy]]. It's recommended that the player incur the wanted level outside of Sandy Shores to allow the game to spawn the vehicles. Without the prerequisite wanted level, the lot will usually just spawn two other, smaller vehicles. |
| − | *Two more Rat-Loaders may also spawn just off of [[Marina Drive]]: one next to a white trailer with red trim at the corner of [[Panorama Drive]], the other under a pavilion garage attached to a white trailer with a blue tarp on the roof further up [[Lesbos Lane]]. |
+ | *Two more Rat-Loaders may also spawn just off of [[Marina Drive]]: one next to a white trailer with red trim at the corner of [[Panorama Drive]], the other under a pavilion garage attached to a white trailer with a blue tarp on the roof further up [[Lesbos Lane]]. |
| − | *It will sometimes spawn between a beat-up red wooden trailer on eastern side of [[Mountain View Drive]] (across the road from the Sandy Shores [[Ammu-Nation]]) and a teal-and-white double-wide under a white sundeck and flanked by satellite dishes on [[Armadillo Avenue]]. Both trailers are on [[Algonquin Boulevard]], in front of a dirt back alley. |
+ | *It will sometimes spawn between a beat-up red wooden trailer on eastern side of [[Mountain View Drive]] (across the road from the Sandy Shores [[Ammu-Nation]]) and a teal-and-white double-wide under a white sundeck and flanked by satellite dishes on [[Armadillo Avenue]]. Both trailers are on [[Algonquin Boulevard]], in front of a dirt back alley. |
| − | *It may occasionally spawn in a lot one block north and one block west of [[Trevor's Trailer]] in Sandy Shores, where [[Cletus Ewing]] can be met in his [[Strangers and Freaks]] mission, [[Target Practice]]. |
+ | *It may occasionally spawn in a lot one block north and one block west of [[Trevor's Trailer]] in Sandy Shores, where [[Cletus Ewing]] can be met in his [[Strangers and Freaks]] mission, [[Target Practice]]. |
| + | *A heavily modified Rat-Loader will spawn in the parking area outside [[Beeker's Garage]] between 7:00 am and 15:00 pm, on the northern outskirts of [[Paleto Bay|Paleto Bay's]] [[Procopio Drive]].<ref>'''Ymap''': <pre>MyPoint WORLD_VEHICLE_EMPTY: RATLOADER_MODDED: 07:00 - 15:00</pre></ref> |
||
| + | *Another heavily-modified Rat-Loader can be seen leaving an [[LTD Gasoline|LTD]] [[Filling Stations|filling station]] in [[Grapeseed]], commonly heading on [[Union Road]]. |
||
*Driving a [[Hotknife]], a [[Z-Type]] or any type of [[Beaters#HD Universe|Beater]] may cause the Rat-Loader to spawn more frequently. |
*Driving a [[Hotknife]], a [[Z-Type]] or any type of [[Beaters#HD Universe|Beater]] may cause the Rat-Loader to spawn more frequently. |
||
===''Grand Theft Auto Online''=== |
===''Grand Theft Auto Online''=== |
||
| − | *Can be bought for $6,000 (formerly free) on [[Southern San Andreas Super Autos]]. |
+ | *Can be bought for [[Money|$]]6,000 (formerly free) on [[Southern San Andreas Super Autos]]. |
| − | * |
+ | *As in the single-player game, one may spawn at Beeker's Garage in Paleto Bay with various customization options added onto it. It can be kept and stored, or sold for $12,500. (Enhanced version) |
*It can also be found in Sandy Shores. |
*It can also be found in Sandy Shores. |
||
==Trivia== |
==Trivia== |
||
| + | ===''Grand Theft Auto V''=== |
||
| − | {{Cleanup}} |
||
| − | *The Rat-Loader is one of the oldest cars in the game, along with the [[Rat-Truck]], [[Duneloader]], [[Z-Type]], [[Hotknife]], the old [[Tractor]] |
+ | *The Rat-Loader is one of the oldest cars in the game, along with the [[Rat-Truck]], [[Duneloader]], [[Z-Type]], [[Hustler]], [[Hotknife]], the old [[Tractor]], the [[Roosevelt]], and the [[Fränken Stange]]. |
*The default [[Radio Stations in GTA V|radio station]] for the Rat-Loader is [[Rebel Radio]]. |
*The default [[Radio Stations in GTA V|radio station]] for the Rat-Loader is [[Rebel Radio]]. |
||
| + | *When the game was released, the Rat-Loader was classed as a Utility vehicle. Following update 1.07, it was classified as an Off-Road vehicle, and since update 1.10, it has been classified as a Muscle vehicle. |
||
| − | *The Rat-Loader contains a CB radio. When in the car with the radio off, indistinctive chatter can be heard through the radio. This is also the same with the [[Bodhi]] and the [[Tow Truck]]. |
||
| + | **Also, due to a bug following update 1.07, the Rat-Loader could not be stored in a player's garage in ''GTA Online''. This was fixed following update 1.10. |
||
| − | *Before 1.07, it was classified as a "utility" class, after 1.07 it was in the "off-road" class, then in 1.10 it was placed in the "muscle" class. |
||
| + | *When the player enters the vehicle, the manufacturer's name does not appear. Also, despite being a Bravado vehicle, a [[Vapid]] logo can be seen under the steering wheel. |
||
| − | * Even though this vehicle is a pickup truck, it is classed in-game as muscle, likely on account of the more modern, high output V8 and hot-rod like characteristics of the vehicle, making it more closely related to a muscle car than any other class. |
||
| + | *A glitch occured if the vehicle was taken to Los Santos Customs. If the player cycles through all the available truck bed modifications without picking any of them, the truck bed would disappear once the player leaves the shop. |
||
| − | *Due to a bug, after patch 1.07, it couldn't be stored in [[Safehouses in GTA Online|GTA Online garages]]. [[Rockstar]] later fixed this in 1.10, making it completely free to modify at [[Los Santos Customs]] and returning the ability to store it. |
||
| + | *The Rat-Loader can be upgraded to the [[Apocalypse Sasquatch]], [[Future Shock Sasquatch]], or the [[Nightmare Sasquatch]] for $1,530,875 in the [[Arena Workshop]]. |
||
| − | *When getting in the vehicle, it simply says ''Rat-Loader'', despite being manufactured by [[Bravado]]. |
||
| − | *In the interior of the vehicle, under the steering wheel, a [[Vapid]] logo is clearly visible, despite being a Bravado vehicle. This also happens with the [[Duneloader]], and may likely be an oversight, but given the dilapidated nature of both trucks, the Vapid steering wheel may be a replacement for the original wheel. |
||
| − | *A glitch occurred if the vehicle was taken to Los Santos Customs, and cycled through all the available truck bed modifications without picking any of them. When exiting the truck bed menu, the Rat-Loader's truck bed would disappear completely. The vehicle would then remain like this for as long as the player wished, and it could even be stored in a garage without losing this unique trait. However, this has been patched. |
||
| − | *Despite being common around [[Sandy Shores]], the only time it can be seen being driven by an [[pedestrians|NPC]], is a rare yellow custom one, that spawns in Sandy Shores. (enhanced version only). |
||
| − | *Similar to the [[Duneloader]], the cargo in the back of the Rat Loader will not fall out or come out even after sustaining several heavy impacts or being turned upside down. |
||
| − | * If the player drives the Rat-Loader at a high speed and then [[bail out|bails out]], while inspecting closely, the Rat-Loader's engine noise suddenly sounds like that of the [[Sandking]], the same thing can be heard in the rusty [[Rebel]]. |
||
==See Also== |
==See Also== |
||
*[[Rat-Truck]]- Clean variant. |
*[[Rat-Truck]]- Clean variant. |
||
| + | |||
==Navigation== |
==Navigation== |
||
{{Navboxes |
{{Navboxes |
||
| Line 366: | Line 498: | ||
{{vehicles|state=collapsed}} |
{{vehicles|state=collapsed}} |
||
{{Gtav vehicles|state=collapsed}} |
{{Gtav vehicles|state=collapsed}} |
||
| + | }}[[de:Rat-Loader (V)]] |
||
| − | }} |
||
| − | |||
| − | [[de:Rat-Loader (V)]] |
||
[[es:Rat Loader]] |
[[es:Rat Loader]] |
||
[[pt:Rat-Loader]] |
[[pt:Rat-Loader]] |
||
Revision as of 19:53, 1 April 2020
Template:Infobox vehicles
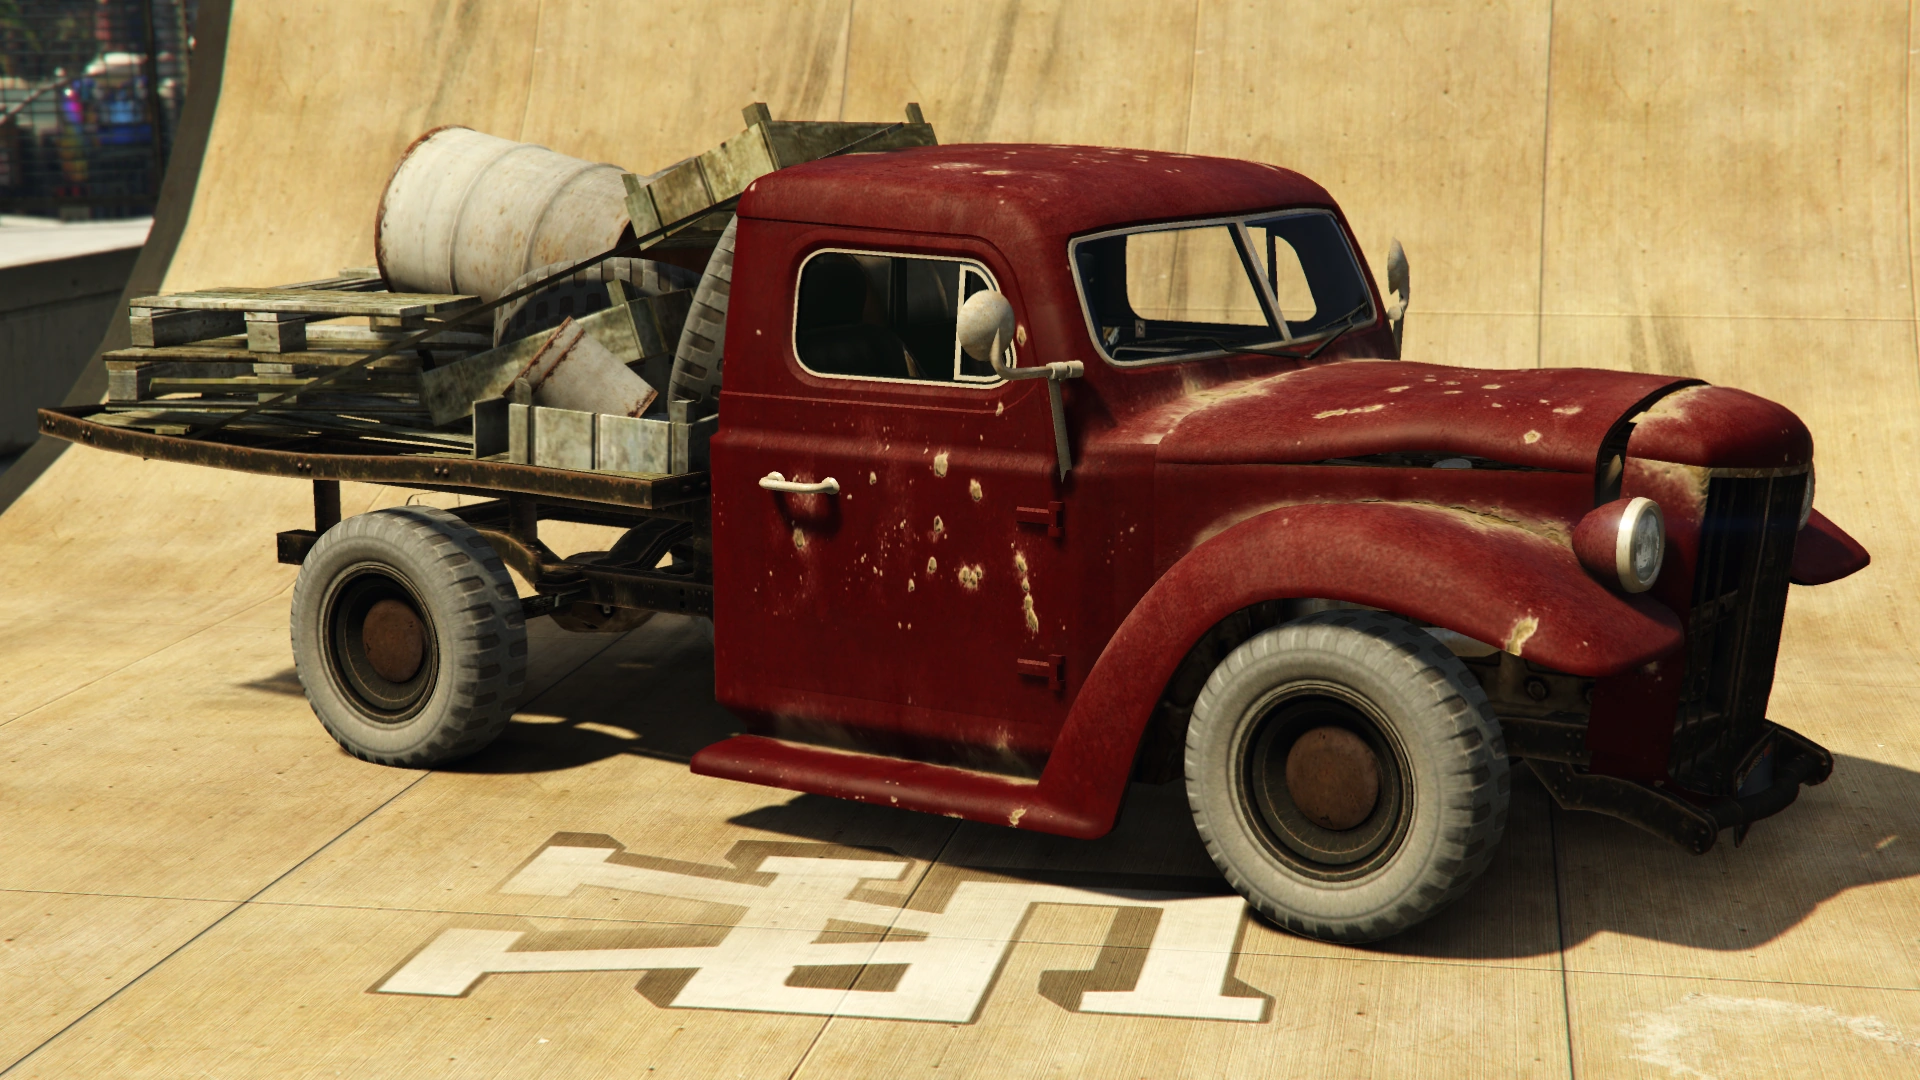
The Bravado Rat-Loader is a pickup truck featured in Grand Theft Auto V and Grand Theft Auto Online.
Design
Grand Theft Auto V
This vehicle appears to be based on the Duneloader, which resembles a 1946 Dodge Power Wagon.
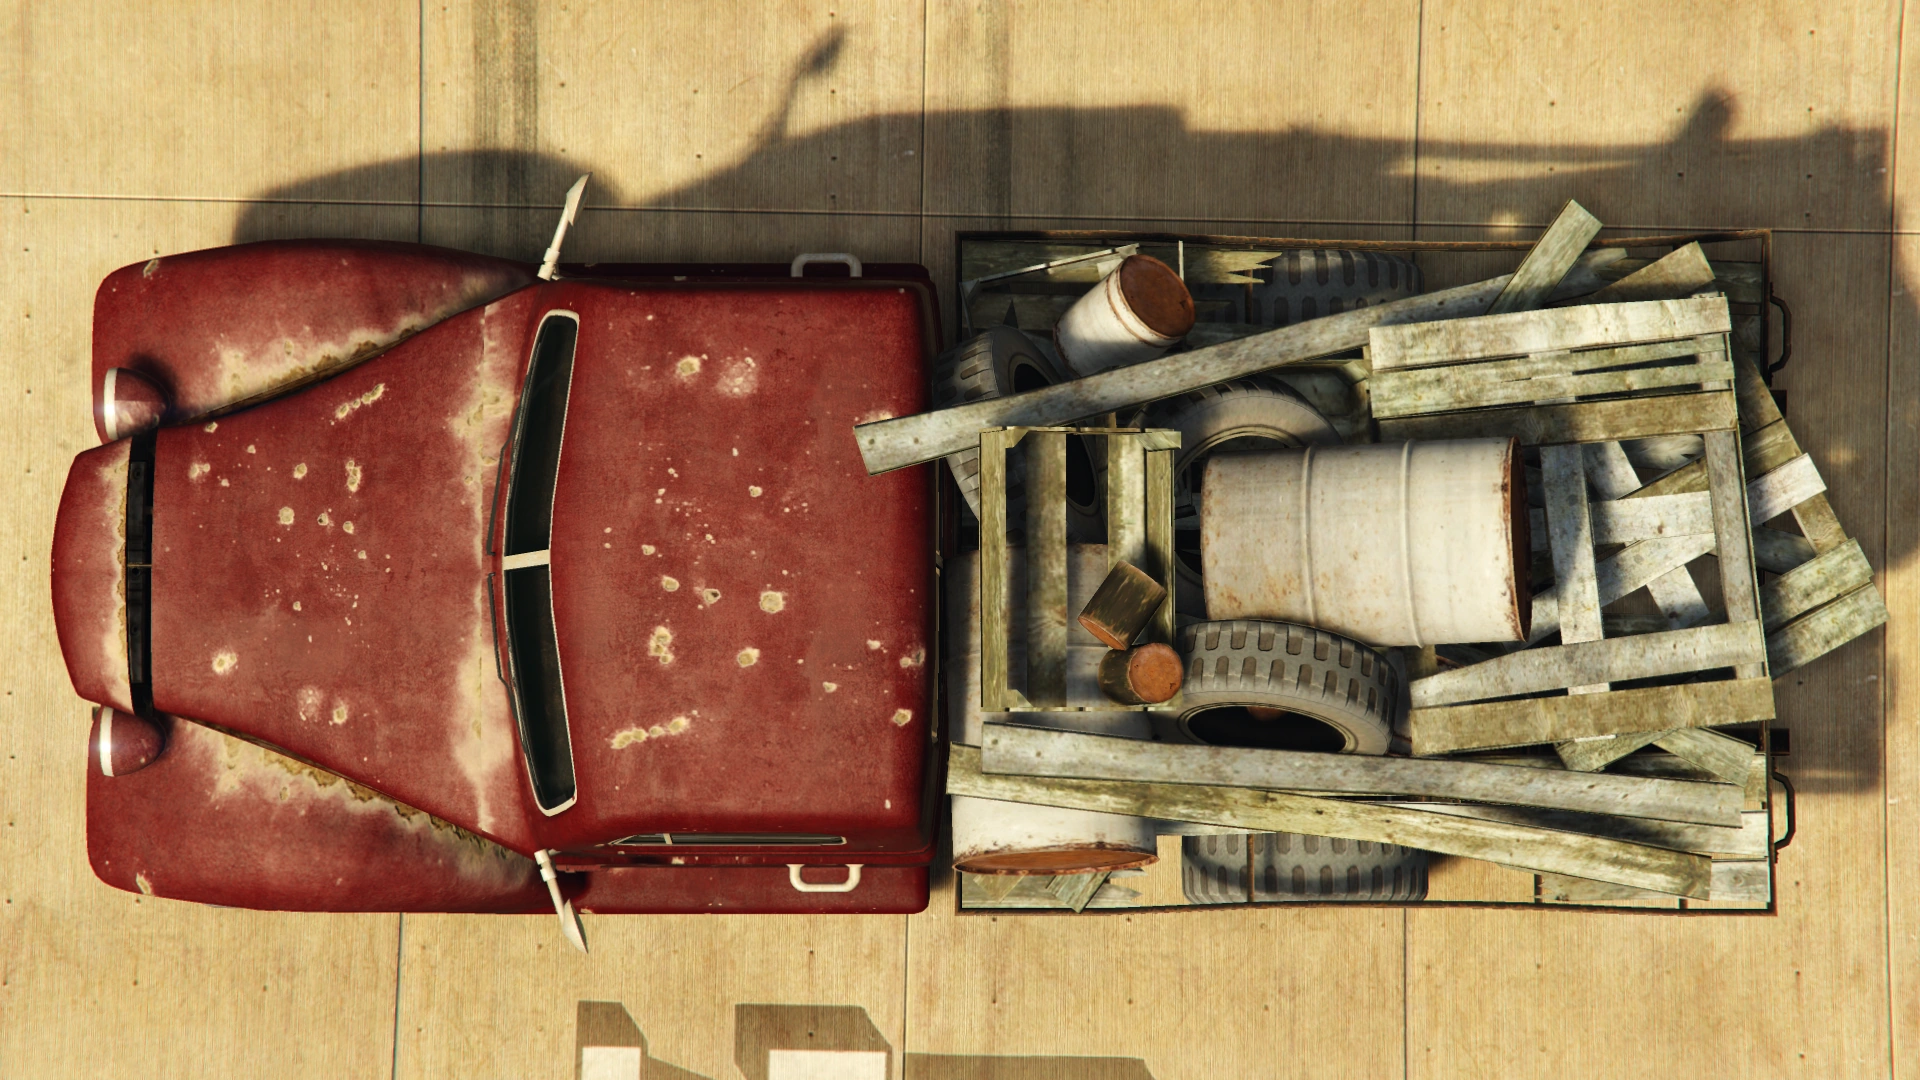
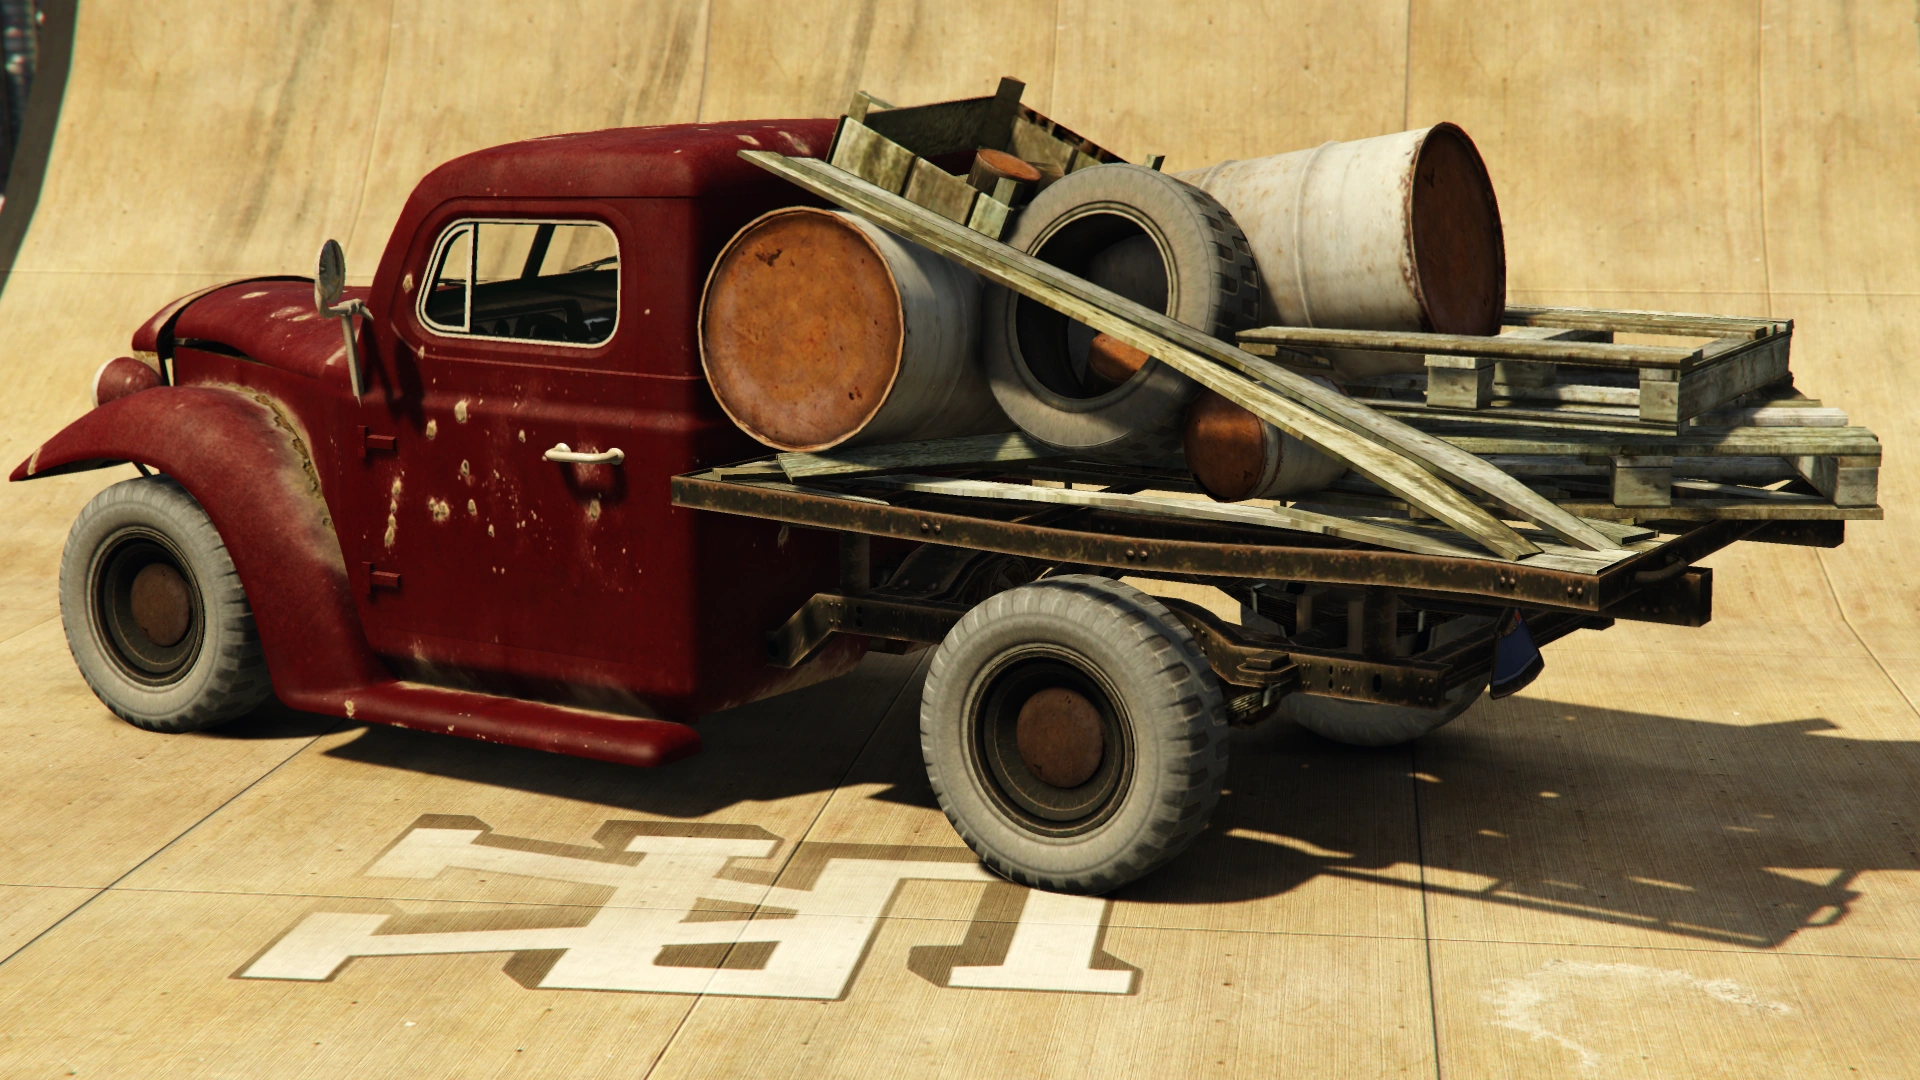
It features a ramshackle flat bed covered with random trash, but can be given a standard bed at Los Santos Customs. The Rat-Loader features crooked and bent front and rear license plates, a crooked front grille with missing and bent bars, and a bent hood. The stock Rat-Loader has rusty "Smoothie" wheels wrapped in discolored offroad tires. The truck has no front or rear bumpers; the license plates are instead mounted on the bars the bumpers would normally connect to. It also features a rusted and faded paint job. The Rat-Loader has no tail light cluster, and as such does not feature reverse lights, turn signals or brake lights. The vehicle is also equipped with a CB radio, with indistinctive chatter occasionally audible.
Most of the above damage can be repaired at Los Santos Customs, or, if desired, complete removal of the body panels. However, no matter what, the faded and rusted paint job remains. The body modifications available for this vehicle can make it look more like a Rat rod.
Current Design Gallery


Performance
Grand Theft Auto V
Although the Rat-Loader comes with a modern V8 engine producing a fair amount of torque, the weight and thin tires make it prone to wheel-spin both off the line and on the way as well as giving it very poor braking. Its acceleration is average for the class, but its top speed is lacking for a Muscle car. The suspension and direction setup also cause it to have a very wide turning radius causing massive under-steer and making maneuverability quite the challenge. Fish tailing is not uncommon due to its engine power. Durabilty for the Rat-Loader itself is much lower, taking only a few collisions for the wheels to get jammed.
Possibly due to its worn condition, the engine seems to have slow response, at it takes a while to reach its max RPM when accelerating with the handbrake applied. This is also evidenced by its gear shifting ratio.
GTA V Overview
| Acceleration (0-60 mph in Seconds) |
Top Speed (mph / kmh) |
Gears | Engine | Drivetrain (FWD / RWD / AWD) |
Mass (kg / lbs) |
Fuel Tank Size (litres) |
|---|---|---|---|---|---|---|
| N/A | 84 / 135 | 4 | N/A | RWD | 1200 / 2646 | 45 |
| N/A | N/A | 4 | N/A | RWD | 1200 / 2646 | N/A |
| 8.9 Seconds | 85 / 136 | 4 | FR SOHC V8 w/ 4 Double-Barrel Downdraft Carburetors (In-game model) | RWD | Cannot be observed | Cannot be observed |
Modifications
Grand Theft Auto V
| Category | Modification | Cost (GTA V) | Cost (GTA Online) | Image | |
|---|---|---|---|---|---|
| Armor | No Armor | $250 | $500 | ||
| Armor Upgrade 20% | $1,250 | $5,250 | |||
| Armor Upgrade 40% | $3,125 | $8,750 | |||
| Armor Upgrade 60% | $5,000 | $14,000 | |||
| Armor Upgrade 80% | $8,750 | $24,500 | |||
| Armor Upgrade 100% | $12,500 | $35,000 | |||
| Brakes | Stock Brakes | $250 | $500 | ||
| Street Brakes | $5,000 | $10,000 | |||
| Sport Brakes | $6,750 | $13,500 | |||
| Race Brakes | $8,750 | $17,500 | |||
| Engine | EMS Upgrade, Level 1 | $2,250 | $4,500 | ||
| EMS Upgrade, Level 2 | $3,125 | $6,250 | |||
| EMS Upgrade, Level 3 | $4,500 | $9,000 | |||
| EMS Upgrade, Level 4 | $8,375 | $16,750 | |||
| Engine Bay | Stock Engine Bay | $350 | $700 | ||
| Chromed V8 | $550 | $1,100 | |||
| Exhausts | Stock Exhaust | $130 | $260 | ||
| Short Exhausts | $375 | $750 | |||
| Straight Exit Exhausts | $899 | $1,800 | |||
| Stinger Exhaust | $1,499 | $3,000 | |||
| Side Exit Exhaust | $4,770 | $9,550 | |||
| Explosives | Ignition Bomb | N/A | $5,000 | ||
| Remote Bomb | N/A | $7,500 | |||
| Fenders | Stock Fenders | $150 | $300 | ||
| Remove Fenders | $450 | $900 | |||
| Cycle Fenders | $750 | $1,500 | |||
| Grilles | Stock Grille | $100 | $200 | ||
| Grille with Fixed Bars | $375 | $750 | |||
| Grille Bars Removed | $670 | $1,340 | |||
| Vintage Grille | $825 | $1,650 | |||
| Grille Cowl Removed | $1,500 | $3,000 | |||
| Hoods | Stock Hood | $450 | $900 | ||
| Remove Hood | $850 | $1,700 | |||
| Repaired Hood | $1,200 | $2,400 | |||
| Single Scoop With Hood | $1,450 | $2,900 | |||
| Single Scoop Without Hood | $2,225 | $4,450 | |||
| Triple Scoop With Hood | $2,500 | $5,000 | |||
| Triple Scoop Without Hood | $2,800 | $5,600 | |||
| Horns | Main article: Los Santos Customs/Horns | - | - | ||
| Lights | Headlights | Stock Lights | $200 | $400 | |
| Xenon Lights | $1,000 | $5,000 | |||
| Neon Kits | Main article: Los Santos Customs/Lights | - | - | ||
| Loss/Theft Prevention | Tracker | N/A | $2,000 | ||
| Full Coverage | N/A | $750 | |||
| Respray | Main article: Los Santos Customs/Respray Colors | - | - | ||
| Sell | Sell Vehicle | N/A | $600 | ||
| Suspension | Stock Suspension | $100 | $200 | ||
| Lowered Suspension | $500 | $1,000 | |||
| Street Suspension | $1,000 | $2,000 | |||
| Sport Suspension | $1,700 | $3,400 | |||
| Competition Suspension | $2,200 | $4,400 | |||
| Transmission | Stock Transmission | $250 | $500 | ||
| Street Transmission | $7,375 | $14,750 | |||
| Sports Transmission | $8,125 | $16,250 | |||
| Race Transmission | $10,000 | $20,000 | |||
| Truck Beds | Stock Truck Bed | $100 | $200 | ||
| Basic Truck Bed | $350 | $700 | |||
| Basic Truck Bed With Arches | $575 | $1,150 | |||
| Wooden Sided Truck Bed | $800 | $1,600 | |||
| Chopped Truck Bed | $975 | $1,950 | |||
| Turbo | None | $1,250 | $2,500 | ||
| Turbo Tuning | $6,250 | $35,000 | |||
| Wheels | Main article: Los Santos Customs/Wheels | - | - | ||
| Windows | None | $100 | $500 | ||
| Light Smoke | $200 | $1,500 | |||
| Dark Smoke | $450 | $3,500 | |||
| Limo | $700 | $5,000 | |||
Image Gallery
")
")
")
")
")
")
")
")
")
")
Variants
Rat-TruckGrand Theft Auto V |
 (Rear quarter view) |
A clean variant, known as the Rat-Truck, was added in the Festive Surprise which removes the rusty paint damage, features a tailgate, but has no available modification options for the truck bed, unlike its rusty counterpart. |
Locations
Grand Theft Auto V
- Any of the protagonists can spawn a Rat-Loader in Sandy Shores by first gaining a wanted level, (confirmed at two stars or above) then heading to the empty lot on Algonquin Boulevard, between Niland Avenue and Armadillo Avenue. It can be found parked next to a civilian Caddy. It's recommended that the player incur the wanted level outside of Sandy Shores to allow the game to spawn the vehicles. Without the prerequisite wanted level, the lot will usually just spawn two other, smaller vehicles.
- Two more Rat-Loaders may also spawn just off of Marina Drive: one next to a white trailer with red trim at the corner of Panorama Drive, the other under a pavilion garage attached to a white trailer with a blue tarp on the roof further up Lesbos Lane.
- It will sometimes spawn between a beat-up red wooden trailer on eastern side of Mountain View Drive (across the road from the Sandy Shores Ammu-Nation) and a teal-and-white double-wide under a white sundeck and flanked by satellite dishes on Armadillo Avenue. Both trailers are on Algonquin Boulevard, in front of a dirt back alley.
- It may occasionally spawn in a lot one block north and one block west of Trevor's Trailer in Sandy Shores, where Cletus Ewing can be met in his Strangers and Freaks mission, Target Practice.
- A heavily modified Rat-Loader will spawn in the parking area outside Beeker's Garage between 7:00 am and 15:00 pm, on the northern outskirts of Paleto Bay's Procopio Drive.[1]
- Another heavily-modified Rat-Loader can be seen leaving an LTD filling station in Grapeseed, commonly heading on Union Road.
- Driving a Hotknife, a Z-Type or any type of Beater may cause the Rat-Loader to spawn more frequently.
Grand Theft Auto Online
- Can be bought for $6,000 (formerly free) on Southern San Andreas Super Autos.
- As in the single-player game, one may spawn at Beeker's Garage in Paleto Bay with various customization options added onto it. It can be kept and stored, or sold for $12,500. (Enhanced version)
- It can also be found in Sandy Shores.
Trivia
Grand Theft Auto V
- The Rat-Loader is one of the oldest cars in the game, along with the Rat-Truck, Duneloader, Z-Type, Hustler, Hotknife, the old Tractor, the Roosevelt, and the Fränken Stange.
- The default radio station for the Rat-Loader is Rebel Radio.
- When the game was released, the Rat-Loader was classed as a Utility vehicle. Following update 1.07, it was classified as an Off-Road vehicle, and since update 1.10, it has been classified as a Muscle vehicle.
- Also, due to a bug following update 1.07, the Rat-Loader could not be stored in a player's garage in GTA Online. This was fixed following update 1.10.
- When the player enters the vehicle, the manufacturer's name does not appear. Also, despite being a Bravado vehicle, a Vapid logo can be seen under the steering wheel.
- A glitch occured if the vehicle was taken to Los Santos Customs. If the player cycles through all the available truck bed modifications without picking any of them, the truck bed would disappear once the player leaves the shop.
- The Rat-Loader can be upgraded to the Apocalypse Sasquatch, Future Shock Sasquatch, or the Nightmare Sasquatch for $1,530,875 in the Arena Workshop.
See Also
- Rat-Truck- Clean variant.
- ↑ Ymap:
MyPoint WORLD_VEHICLE_EMPTY: RATLOADER_MODDED: 07:00 - 15:00