Noirlime4L (talk | contribs) No edit summary |
m (→Modifications) |
||
| (3 intermediate revisions by the same user not shown) | |||
| Line 12: | Line 12: | ||
|appearances = ''[[Grand Theft Auto 2]]''<br>''[[Grand Theft Auto III]]'' {{UN|cutcontent=1}}<br>''[[Grand Theft Auto V]]'' {{DLC|"I'm Not a Hipster" Update}}<br>''[[Grand Theft Auto Online]]'' {{DLC|"I'm Not a Hipster" Update}} |
|appearances = ''[[Grand Theft Auto 2]]''<br>''[[Grand Theft Auto III]]'' {{UN|cutcontent=1}}<br>''[[Grand Theft Auto V]]'' {{DLC|"I'm Not a Hipster" Update}}<br>''[[Grand Theft Auto Online]]'' {{DLC|"I'm Not a Hipster" Update}} |
||
|manufacturer = [[Benefactor]] <small>([[HD Universe]])</small> |
|manufacturer = [[Benefactor]] <small>([[HD Universe]])</small> |
||
| + | |dashtype = Cavalcade <small>(needle)</small><br>[[File:Cavalcade-Dials-GTAV.png|thumb|center|170px]]Cavalcade <small>(dial texture)</small><br>[[File:Cavalcade-GTAV-DialSet.png|thumb|center|170px]] |
||
| − | |dashtype = Cavalcade |
||
|inttxd = Cavalcade <small>(''GTA V'')</small> |
|inttxd = Cavalcade <small>(''GTA V'')</small> |
||
|roadspawn = |
|roadspawn = |
||
| Line 52: | Line 52: | ||
}} |
}} |
||
{{Quote|The giant German carmaker's leap into the micro market. Designed for the narrow, parking space deprived roads of Europe, this is sure to stick out on the eight lane freeways, and in the mile-wide parking lots of Los Santos, until you get crushed by an SUV driven by an over-medicated housewife.|[[Southern San Andreas Super Autos]] description.}} |
{{Quote|The giant German carmaker's leap into the micro market. Designed for the narrow, parking space deprived roads of Europe, this is sure to stick out on the eight lane freeways, and in the mile-wide parking lots of Los Santos, until you get crushed by an SUV driven by an over-medicated housewife.|[[Southern San Andreas Super Autos]] description.}} |
||
| − | The '''Panto''' is a two-door hatchback featured in ''[[Grand Theft Auto 2]]'', ''[[Grand Theft Auto V]] |
+ | The '''Panto''' is a two-door hatchback featured in ''[[Grand Theft Auto 2]]'', ''[[Grand Theft Auto V]]'' and ''[[Grand Theft Auto Online]]'' as part of the [["I'm Not a Hipster" Update]]. It is manufactured by [[Benefactor]] in the [[HD Universe]]. |
==Design== |
==Design== |
||
===''Grand Theft Auto 2''=== |
===''Grand Theft Auto 2''=== |
||
| − | The Panto name first debuted in ''[[Grand Theft Auto 2]]'' in the form of a two-door microcar (occasionally confused as a van) akin to the [[Dementia]], but significantly larger. Its appearance alone makes the car generally unappealing, in contrast to larger, better designed cars in the game. The internal name given to the Panto is <code>FIAT</code>, implying the car's name originates from that of a similarly named |
+ | The Panto name first debuted in ''[[Grand Theft Auto 2]]'' in the form of a two-door microcar (occasionally confused as a van) akin to the [[Dementia]], but significantly larger. Its appearance alone makes the car generally unappealing, in contrast to larger, better designed cars in the game. The internal name given to the Panto is <code>FIAT</code>, implying the car's name originates from that of a similarly named {{WP|Fiat Punto}}, but may otherwise be comparable to a {{WP|Tempo (car)|1949-1967 Tempo Matador Kleinbus}}. It best resembles the {{WP|Fiat 500|Fiat 500 K}} estate. |
===''Grand Theft Auto III''=== |
===''Grand Theft Auto III''=== |
||
| + | {{cutcontent||GTA3}} |
||
| − | {{Cutcontent}} |
||
| − | The Panto was planned to reappear as a four-door compact sedan in ''[[Grand Theft Auto III]]'', but was cut for unknown reasons. The car, like the Panto in ''Grand Theft Auto 2'', bears some resemblance to a Fiat, specifically, a |
+ | The Panto was planned to reappear as a four-door compact sedan in ''[[Grand Theft Auto III]]'', but was cut for unknown reasons. The car, like the Panto in ''Grand Theft Auto 2'', bears some resemblance to a Fiat, specifically, a {{WP|Fiat 128}}, Zastava Skala or a Lada Riva; little else is known about the car. A picture of the car can be found on the "Capital Auto Sale$" teaser website, along with many other beta vehicles <ref>[http://www.rockstargames.com/grandtheftauto3/flash/capitalAutos/] Capital Auto Sale$ website.</ref> |
| + | {{cutcontent|end|GTA3}} |
||
===''Grand Theft Auto V''=== |
===''Grand Theft Auto V''=== |
||
| − | The Panto reappears in ''[[Grand Theft Auto V]]'' |
+ | The Panto reappears in ''[[Grand Theft Auto V]]'' retaining its microcar design, surpassing the [[Weeny]] [[Issi]]'s already small size. It is manufactured by [[Benefactor]] and resembles a {{WP|Smart Fortwo#Second generation (Build series W451, 2007–2014)|2007-2014 Smart Fortwo}}. However, it has different shaped headlights resembling upside down hearts. The overall design is inspired by {{WP|T.25|Gordon Murray T.25}} and {{URL|http://insideevs.com/wp-content/uploads/2013/08/murray-design-t27-production-main.jpg|Gordon Murray T27}}. The {{WP|Volkswagen Up|Volkswagen Up!}} is the base for the rear fascia, the {{WP|Mitsubishi i}} for the frontal fascia, and the {{WP|Toyota iQ|Toyota iQ/Scion iQ/Aston Martin Cygnet}} for the side profile. |
| + | |||
| + | The Panto has "El Quatro" tuner rims that are also available at [[Los Santos Customs]] and its interior is very simple, with the "Cavalcade" dashboard, dials and interior (usually employed by SUVs). |
||
{{Clr}} |
{{Clr}} |
||
| Line 94: | Line 97: | ||
===''Grand Theft Auto V''=== |
===''Grand Theft Auto V''=== |
||
| − | The Panto in ''Grand Theft Auto V'' is a small, light car with quick acceleration. It is powered by a model of a 3-cylinder engine, coupled to a 6 speed gearbox in an RR layout. Its acceleration is average, owing to its incredibly light weight, and its top speed is quite high, but caution should be taken when driving at high speeds because its short wheelbase makes it very unstable and prone to spinning out of control, and its wheelbase is much shorter than the [[Issi]]. This could make driving at high speeds quite problematic. The handling is rather poor despite its size, as the vehicle suffers from understeer, and its durability is unremarkable, as it can only take a few head-on crashes before its axle breaks and its engine stalls, although it is completely immune to any form of crash deformation. The Panto is very maneuverable when airborne, able to do multiple spins with ease. Nevertheless, this is a great commuter car if |
+ | The Panto in ''Grand Theft Auto V'' is a small, light car with quick acceleration. It is powered by a model of a 3-cylinder engine, coupled to a 6 speed gearbox in an RR layout. Its acceleration is average, owing to its incredibly light weight, and its top speed is quite high, but caution should be taken when driving at high speeds because its short wheelbase makes it very unstable and prone to spinning out of control, and its wheelbase is much shorter than the [[Issi]]. This could make driving at high speeds quite problematic. The handling is rather poor despite its size, as the vehicle suffers from understeer, and its durability is unremarkable, as it can only take a few head-on crashes before its axle breaks and its engine stalls, although it is completely immune to any form of crash deformation. The Panto is very maneuverable when airborne, able to do multiple spins with ease. Nevertheless, this is a great commuter car if one does not want to risk paying the insurance premium on one of their super cars. This vehicle has the best acceleration in its class. |
Owing to the vehicle's small size and lack of crumple zones, even a moderate impact to the rear of the Panto will kill any [[Pedestrians|NPC]] occupants inside, making obtaining one relatively easy if the player is prepared to drive the damaged vehicle to [[Los Santos Customs]] and have it repaired. Due to the Panto not suffering from body deformation, this can lead into unusual situations where the player can come across seemingly-intact Pantos with the driver dead inside due to an off-screen collision. |
Owing to the vehicle's small size and lack of crumple zones, even a moderate impact to the rear of the Panto will kill any [[Pedestrians|NPC]] occupants inside, making obtaining one relatively easy if the player is prepared to drive the damaged vehicle to [[Los Santos Customs]] and have it repaired. Due to the Panto not suffering from body deformation, this can lead into unusual situations where the player can come across seemingly-intact Pantos with the driver dead inside due to an off-screen collision. |
||
| Line 117: | Line 120: | ||
|observed_drivetrain = RWD |
|observed_drivetrain = RWD |
||
|rsc_image = Panto-GTAV-StatsRSC.png |
|rsc_image = Panto-GTAV-StatsRSC.png |
||
| − | |rsc_top_speed = 70.824776 |
+ | |rsc_top_speed = {{PercentBar|70.824776|width=150}} |
| − | |rsc_acceleration = 67.5 |
+ | |rsc_acceleration = {{PercentBar|67.5|width=150}} |
| − | |rsc_braking = 20 |
+ | |rsc_braking = {{PercentBar|20|width=150}} |
| − | |rsc_traction = 59.696972 |
+ | |rsc_traction = {{PercentBar|59.696972|width=150}} |
}} |
}} |
||
| Line 126: | Line 129: | ||
===''Grand Theft Auto V''=== |
===''Grand Theft Auto V''=== |
||
{| class="wikitable" |
{| class="wikitable" |
||
| + | ! colspan="2" scope="col" |Category |
||
| − | !Type |
||
| + | ! scope="col" |Modification |
||
| − | !Upgrade |
||
| − | !Cost (''GTA V'') |
+ | ! scope="col" |Cost (''GTA V'') |
| − | !Cost (''GTA Online'') |
+ | ! scope="col" |Cost ([[Grand Theft Auto Online|''GTA Online'']]) |
| + | ! scope="col" |Image |
||
| ⚫ | |||
| ⚫ | |||
| + | |No Armor |
||
| ⚫ | |||
| ⚫ | |||
|- |
|- |
||
| ⚫ | |||
|Armor Upgrade 20% |
|Armor Upgrade 20% |
||
| style="text-align: center;" |$500 |
| style="text-align: center;" |$500 |
||
| − | | style="text-align: center;" |$ |
+ | | colspan="2" style="text-align: center;" |$7,500 |
|- |
|- |
||
|Armor Upgrade 40% |
|Armor Upgrade 40% |
||
| style="text-align: center;" |$1,250 |
| style="text-align: center;" |$1,250 |
||
| − | | style="text-align: center;" |$ |
+ | | colspan="2" style="text-align: center;" |$12,000 |
|- |
|- |
||
|Armor Upgrade 60% |
|Armor Upgrade 60% |
||
| style="text-align: center;" |$2,000 |
| style="text-align: center;" |$2,000 |
||
| − | | style="text-align: center;" |$ |
+ | | colspan="2" style="text-align: center;" |$20,000 |
|- |
|- |
||
|Armor Upgrade 80% |
|Armor Upgrade 80% |
||
| style="text-align: center;" |$3,500 |
| style="text-align: center;" |$3,500 |
||
| − | | style="text-align: center;" |$ |
+ | | colspan="2" style="text-align: center;" |$35,000 |
|- |
|- |
||
|Armor Upgrade 100% |
|Armor Upgrade 100% |
||
| style="text-align: center;" |$5,000 |
| style="text-align: center;" |$5,000 |
||
| − | | style="text-align: center;" |$ |
+ | | colspan="2" style="text-align: center;" |$50,000 |
|- |
|- |
||
| ⚫ | |||
| ⚫ | |||
| + | |Stock Brakes |
||
| ⚫ | |||
| − | | style="text-align: center;" |$ |
+ | | style="text-align: center;" |$100 |
| − | | style="text-align: center;" |$ |
+ | | colspan="2" style="text-align: center;" |$1,000 |
| ⚫ | |||
| ⚫ | |||
| ⚫ | |||
| ⚫ | |||
|- |
|- |
||
| ⚫ | |||
|Street Brakes |
|Street Brakes |
||
| style="text-align: center;" |$2,000 |
| style="text-align: center;" |$2,000 |
||
| − | | style="text-align: center;" |$ |
+ | | colspan="2" style="text-align: center;" |$20,000 |
|- |
|- |
||
|Sport Brakes |
|Sport Brakes |
||
| style="text-align: center;" |$2,700 |
| style="text-align: center;" |$2,700 |
||
| − | | style="text-align: center;" |$ |
+ | | colspan="2" style="text-align: center;" |$27,000 |
|- |
|- |
||
|Race Brakes |
|Race Brakes |
||
| style="text-align: center;" |$3,500 |
| style="text-align: center;" |$3,500 |
||
| − | | style="text-align: center;" |$ |
+ | | colspan="2" style="text-align: center;" |$35,000 |
| + | |- |
||
| + | | colspan="2" rowspan="3" |Bodywork |
||
| + | |Stock Bodywork |
||
| ⚫ | |||
| + | | style="text-align: center;" |$300 |
||
| + | | |
||
| + | |- |
||
| ⚫ | |||
| + | | style="text-align: center;" |$450 |
||
| + | | style="text-align: center;" |$900 |
||
| + | | |
||
| + | |- |
||
| ⚫ | |||
| + | | style="text-align: center;" |$750 |
||
| + | | style="text-align: center;" |$1,500 |
||
| + | | |
||
| + | |- |
||
| ⚫ | |||
| + | |Stock Front Bumper |
||
| + | | style="text-align: center;" |$250 |
||
| + | | style="text-align: center;" |$2,200 |
||
| + | | |
||
|- |
|- |
||
| ⚫ | |||
|Custom Front Splitter |
|Custom Front Splitter |
||
| style="text-align: center;" |$500 |
| style="text-align: center;" |$500 |
||
| − | | style="text-align: center;" |$ |
+ | | style="text-align: center;" |$4,600 |
| + | | |
||
|- |
|- |
||
|Carbon Front Splitter |
|Carbon Front Splitter |
||
| style="text-align: center;" |$750 |
| style="text-align: center;" |$750 |
||
| − | | style="text-align: center;" |$ |
+ | | style="text-align: center;" |$7,400 |
| + | | |
||
|- |
|- |
||
|Extreme Aero Front Bumper |
|Extreme Aero Front Bumper |
||
| style="text-align: center;" |$1,000 |
| style="text-align: center;" |$1,000 |
||
| − | | style="text-align: center;" |$ |
+ | | style="text-align: center;" |$11,700 |
| + | | |
||
|- |
|- |
||
|Stickerbomb Front Bumper |
|Stickerbomb Front Bumper |
||
| style="text-align: center;" |$1,300 |
| style="text-align: center;" |$1,300 |
||
| − | | style="text-align: center;" |$ |
+ | | style="text-align: center;" |$14,500 |
| + | | |
||
| + | |- |
||
| + | |Stock Rear Bumper |
||
| + | | style="text-align: center;" |$250 |
||
| + | | style="text-align: center;" |$2,200 |
||
| + | | |
||
|- |
|- |
||
|Carbon Rear Bumper |
|Carbon Rear Bumper |
||
| style="text-align: center;" |$500 |
| style="text-align: center;" |$500 |
||
| − | | style="text-align: center;" |$ |
+ | | style="text-align: center;" |$4,600 |
| + | | |
||
|- |
|- |
||
|Stickerbomb Rear Bumper |
|Stickerbomb Rear Bumper |
||
| style="text-align: center;" |$750 |
| style="text-align: center;" |$750 |
||
| − | | style="text-align: center;" |$ |
+ | | style="text-align: center;" |$7,500 |
| + | | |
||
|- |
|- |
||
| − | |rowspan="4"|Engine |
+ | | colspan="2" rowspan="4" |Engine |
|EMS Upgrade, Level 1 |
|EMS Upgrade, Level 1 |
||
| style="text-align: center;" |$900 |
| style="text-align: center;" |$900 |
||
| − | | style="text-align: center;" |$ |
+ | | colspan="2" style="text-align: center;" |$9,000 |
|- |
|- |
||
|EMS Upgrade, Level 2 |
|EMS Upgrade, Level 2 |
||
| style="text-align: center;" |$1,250 |
| style="text-align: center;" |$1,250 |
||
| − | | style="text-align: center;" |$ |
+ | | colspan="2" style="text-align: center;" |$12,500 |
|- |
|- |
||
|EMS Upgrade, Level 3 |
|EMS Upgrade, Level 3 |
||
| style="text-align: center;" |$1,800 |
| style="text-align: center;" |$1,800 |
||
| − | | style="text-align: center;" |$ |
+ | | colspan="2" style="text-align: center;" |$18,000 |
|- |
|- |
||
|EMS Upgrade, Level 4 |
|EMS Upgrade, Level 4 |
||
| style="text-align: center;" |$3,350 |
| style="text-align: center;" |$3,350 |
||
| − | | style="text-align: center;" |$ |
+ | | colspan="2" style="text-align: center;" |$33,500 |
| + | |- |
||
| + | | colspan="2" rowspan="6" |Exhausts |
||
| + | |Stock Exhaust |
||
| + | | style="text-align: center;" |$130 |
||
| + | | style="text-align: center;" |$260 |
||
| + | | |
||
|- |
|- |
||
| ⚫ | |||
|Titanium Exhaust |
|Titanium Exhaust |
||
| style="text-align: center;" |$375 |
| style="text-align: center;" |$375 |
||
| − | | style="text-align: center;" |$ |
+ | | style="text-align: center;" |$750 |
| + | | |
||
|- |
|- |
||
|Chrome Tip Exhaust |
|Chrome Tip Exhaust |
||
| style="text-align: center;" |$899 |
| style="text-align: center;" |$899 |
||
| − | | style="text-align: center;" |$ |
+ | | style="text-align: center;" |$1,800 |
| + | | |
||
|- |
|- |
||
|Titanium Tuner Exhaust |
|Titanium Tuner Exhaust |
||
| style="text-align: center;" |$1,499 |
| style="text-align: center;" |$1,499 |
||
| − | | style="text-align: center;" |$ |
+ | | style="text-align: center;" |$3,000 |
| + | | |
||
|- |
|- |
||
|Shakotan Exhaust |
|Shakotan Exhaust |
||
| style="text-align: center;" |$4,770 |
| style="text-align: center;" |$4,770 |
||
| − | | style="text-align: center;" |$ |
+ | | style="text-align: center;" |$9,550 |
| + | | |
||
|- |
|- |
||
|Side Mounted Carbon Can |
|Side Mounted Carbon Can |
||
| style="text-align: center;" |$4,870 |
| style="text-align: center;" |$4,870 |
||
| − | | style="text-align: center;" |$ |
+ | | style="text-align: center;" |$9,750 |
| + | | |
||
| + | |- |
||
| + | | colspan="2" rowspan="2" |[[Car Bomb|Explosives]] |
||
| + | |Ignition Bomb |
||
| + | | style="text-align: center;" |N/A |
||
| + | | colspan="2" style="text-align: center;" |$5,000 |
||
| + | |- |
||
| + | |Remote Bomb |
||
| + | | style="text-align: center;" |N/A |
||
| + | | colspan="2" style="text-align: center;" |$7,500 |
||
| + | |- |
||
| + | | colspan="2" rowspan="4" |Grilles |
||
| + | |Stock Grille |
||
| + | | style="text-align: center;" |$100 |
||
| + | | style="text-align: center;" |$200 |
||
| + | | |
||
|- |
|- |
||
| − | |rowspan="3"|Grille |
||
|Bullbars |
|Bullbars |
||
| style="text-align: center;" |$375 |
| style="text-align: center;" |$375 |
||
| − | | style="text-align: center;" |$ |
+ | | style="text-align: center;" |$750 |
| + | | |
||
|- |
|- |
||
|Stickerbomb Bullbars |
|Stickerbomb Bullbars |
||
| style="text-align: center;" |$670 |
| style="text-align: center;" |$670 |
||
| − | | style="text-align: center;" |$ |
+ | | style="text-align: center;" |$1,340 |
| + | | |
||
|- |
|- |
||
|Enforcer Pushbar |
|Enforcer Pushbar |
||
| style="text-align: center;" |$825 |
| style="text-align: center;" |$825 |
||
| − | | style="text-align: center;" |$ |
+ | | style="text-align: center;" |$1,650 |
| + | | |
||
| + | |- |
||
| + | | colspan="2" |Horns |
||
| + | |''Main article: [[Los Santos Customs/Horns]]'' |
||
| + | | style="text-align: center;" | - |
||
| + | | colspan="2" style="text-align: center;" | - |
||
| + | |- |
||
| ⚫ | |||
| ⚫ | |||
| + | |Stock Lights |
||
| + | | style="text-align: center;" |$100 |
||
| + | | colspan="2" style="text-align: center;" |$200 |
||
|- |
|- |
||
| − | |rowspan="2"|Lights |
||
|Xenon Lights |
|Xenon Lights |
||
| style="text-align: center;" |$300 |
| style="text-align: center;" |$300 |
||
| − | | style="text-align: center;" |$ |
+ | | colspan="2" style="text-align: center;" |$3,000 |
|- |
|- |
||
| + | |Neon Kits |
||
| − | |<div class="mw-collapsible mw-collapsed" style="width:100%"> |
||
| − | + | |''Main article: [[Los Santos Customs/Lights]]'' |
|
| ⚫ | |||
| style="text-align: center;" | - |
| style="text-align: center;" | - |
||
| + | | colspan="2" style="text-align: center;" | - |
||
| − | |||
|- |
|- |
||
| − | |rowspan="2"|Loss/Theft Prevention |
+ | | colspan="2" rowspan="2" |Loss/Theft Prevention |
|Tracker |
|Tracker |
||
| style="text-align: center;" |N/A |
| style="text-align: center;" |N/A |
||
| − | | style="text-align: center;" | |
+ | | colspan="2" style="background-color:black;text-align: center;" |Too Hot |
|- |
|- |
||
|Full Coverage |
|Full Coverage |
||
| style="text-align: center;" |N/A |
| style="text-align: center;" |N/A |
||
| − | | style="text-align: center;" | |
+ | | colspan="2" style="background-color:black;text-align: center;" |Too Hot |
|- |
|- |
||
| − | |Respray |
+ | | colspan="2" |Respray |
|''Main article: [[Los Santos Customs/Respray Colors]]'' |
|''Main article: [[Los Santos Customs/Respray Colors]]'' |
||
| style="text-align: center;" | - |
| style="text-align: center;" | - |
||
| − | | style="text-align: center;" | - |
+ | | colspan="2" style="text-align: center;" | - |
| + | |- |
||
| + | | colspan="2" rowspan="2" |Roll Cages |
||
| ⚫ | |||
| + | | style="text-align: center;" |$350 |
||
| + | | style="text-align: center;" |$700 |
||
| + | | |
||
|- |
|- |
||
| ⚫ | |||
|Roll Cage and Chassis Upgrade |
|Roll Cage and Chassis Upgrade |
||
| style="text-align: center;" |$550 |
| style="text-align: center;" |$550 |
||
| − | | style="text-align: center;" |$ |
+ | | style="text-align: center;" |$1,100 |
| + | | |
||
| + | |- |
||
| + | | colspan="2" rowspan="5" |Roofs |
||
| + | |Stock Roof |
||
| + | | style="text-align: center;" |$100 |
||
| + | | style="text-align: center;" |$200 |
||
| + | | |
||
|- |
|- |
||
| − | |rowspan="4"|Roof |
||
|Carbon Roof |
|Carbon Roof |
||
| style="text-align: center;" |$350 |
| style="text-align: center;" |$350 |
||
| − | | style="text-align: center;" |$ |
+ | | style="text-align: center;" |$700 |
| + | | |
||
|- |
|- |
||
|Carbon Roof & Tailgate |
|Carbon Roof & Tailgate |
||
| style="text-align: center;" |$575 |
| style="text-align: center;" |$575 |
||
| − | | style="text-align: center;" |$ |
+ | | style="text-align: center;" |$1,150 |
| + | | |
||
|- |
|- |
||
|Stickerbomb Roof |
|Stickerbomb Roof |
||
| style="text-align: center;" |$800 |
| style="text-align: center;" |$800 |
||
| − | | style="text-align: center;" |$ |
+ | | style="text-align: center;" |$1,600 |
| + | | |
||
|- |
|- |
||
|Stickerbomb Roof & Tailgate |
|Stickerbomb Roof & Tailgate |
||
| style="text-align: center;" |$975 |
| style="text-align: center;" |$975 |
||
| − | | style="text-align: center;" |$ |
+ | | style="text-align: center;" |$1,950 |
| + | | |
||
|- |
|- |
||
| − | |Sell |
+ | | colspan="2" |Sell |
|Sell Vehicle |
|Sell Vehicle |
||
| style="text-align: center;" |N/A |
| style="text-align: center;" |N/A |
||
| − | | style="text-align: center;" | |
+ | | colspan="2" style="background-color:black;text-align: center;" |Too Hot |
| + | |- |
||
| ⚫ | |||
| + | |Stock Skirts |
||
| + | | style="text-align: center;" |$300 |
||
| + | | style="text-align: center;" |$2,500 |
||
| + | | |
||
|- |
|- |
||
| ⚫ | |||
|Low Skirts |
|Low Skirts |
||
| style="text-align: center;" |$415 |
| style="text-align: center;" |$415 |
||
| − | | style="text-align: center;" |$ |
+ | | style="text-align: center;" |$5,500 |
| + | | |
||
|- |
|- |
||
|Sport Skirts |
|Sport Skirts |
||
| style="text-align: center;" |$500 |
| style="text-align: center;" |$500 |
||
| − | | style="text-align: center;" |$ |
+ | | style="text-align: center;" |$8,000 |
| + | | |
||
|- |
|- |
||
|Stickerbomb Skirts |
|Stickerbomb Skirts |
||
| style="text-align: center;" |$750 |
| style="text-align: center;" |$750 |
||
| − | | style="text-align: center;" |$ |
+ | | style="text-align: center;" |$10,500 |
| + | | |
||
|- |
|- |
||
|Carbon Skirts |
|Carbon Skirts |
||
| style="text-align: center;" |$1,000 |
| style="text-align: center;" |$1,000 |
||
| − | | style="text-align: center;" |$ |
+ | | style="text-align: center;" |$14,000 |
| + | | |
||
| + | |- |
||
| + | | colspan="2" rowspan="6" |Spoilers |
||
| + | |None |
||
| + | | style="text-align: center;" |$150 |
||
| + | | style="text-align: center;" |$6,000 |
||
| + | | |
||
|- |
|- |
||
| − | |rowspan="5"|Spoiler |
||
|Color Coded Wing |
|Color Coded Wing |
||
| style="text-align: center;" |$275 |
| style="text-align: center;" |$275 |
||
| − | | style="text-align: center;" |$ |
+ | | style="text-align: center;" |$7,050 |
| + | | |
||
|- |
|- |
||
|Carbon Wing |
|Carbon Wing |
||
| style="text-align: center;" |$350 |
| style="text-align: center;" |$350 |
||
| − | | style="text-align: center;" |$ |
+ | | style="text-align: center;" |$10,000 |
| + | | |
||
|- |
|- |
||
|Drift Wing |
|Drift Wing |
||
| style="text-align: center;" |$525 |
| style="text-align: center;" |$525 |
||
| − | | style="text-align: center;" |$ |
+ | | style="text-align: center;" |$13,000 |
| + | | |
||
|- |
|- |
||
|Roof Rack |
|Roof Rack |
||
| style="text-align: center;" |$750 |
| style="text-align: center;" |$750 |
||
| − | | style="text-align: center;" |$ |
+ | | style="text-align: center;" |$14,000 |
| + | | |
||
|- |
|- |
||
|Roof Rack o' Crap |
|Roof Rack o' Crap |
||
| style="text-align: center;" |$1,000 |
| style="text-align: center;" |$1,000 |
||
| − | | style="text-align: center;" |$ |
+ | | style="text-align: center;" |$16,000 |
| + | | |
||
| + | |- |
||
| ⚫ | |||
| + | |Stock Suspension |
||
| + | | style="text-align: center;" |$100 |
||
| + | | colspan="2" style="text-align: center;" |$200 |
||
|- |
|- |
||
| ⚫ | |||
|Lowered Suspension |
|Lowered Suspension |
||
| style="text-align: center;" |$500 |
| style="text-align: center;" |$500 |
||
| − | | style="text-align: center;" |$ |
+ | | colspan="2" style="text-align: center;" |$1,000 |
|- |
|- |
||
|Street Suspension |
|Street Suspension |
||
| style="text-align: center;" |$1,000 |
| style="text-align: center;" |$1,000 |
||
| − | | style="text-align: center;" |$ |
+ | | colspan="2" style="text-align: center;" |$2,000 |
|- |
|- |
||
|Sport Suspension |
|Sport Suspension |
||
| style="text-align: center;" |$1,700 |
| style="text-align: center;" |$1,700 |
||
| − | | style="text-align: center;" |$ |
+ | | colspan="2" style="text-align: center;" |$3,400 |
|- |
|- |
||
|Competition Suspension |
|Competition Suspension |
||
| style="text-align: center;" |$2,200 |
| style="text-align: center;" |$2,200 |
||
| − | | style="text-align: center;" |$ |
+ | | colspan="2" style="text-align: center;" |$4,400 |
|- |
|- |
||
|Race Suspension |
|Race Suspension |
||
| style="text-align: center;" |$2,300 |
| style="text-align: center;" |$2,300 |
||
| − | | style="text-align: center;" |$ |
+ | | colspan="2" style="text-align: center;" |$4,600 |
| + | |- |
||
| ⚫ | |||
| + | |Stock Transmission |
||
| + | | style="text-align: center;" |$100 |
||
| + | | colspan="2" style="text-align: center;" |$1,000 |
||
|- |
|- |
||
| ⚫ | |||
|Street Transmission |
|Street Transmission |
||
| style="text-align: center;" |$2,950 |
| style="text-align: center;" |$2,950 |
||
| − | | style="text-align: center;" |$ |
+ | | colspan="2" style="text-align: center;" |$29,500 |
|- |
|- |
||
|Sports Transmission |
|Sports Transmission |
||
| style="text-align: center;" |$3,250 |
| style="text-align: center;" |$3,250 |
||
| − | | style="text-align: center;" |$ |
+ | | colspan="2" style="text-align: center;" |$32,500 |
|- |
|- |
||
|Race Transmission |
|Race Transmission |
||
| style="text-align: center;" |$4,000 |
| style="text-align: center;" |$4,000 |
||
| − | | style="text-align: center;" |$ |
+ | | colspan="2" style="text-align: center;" |$40,000 |
| + | |- |
||
| + | | colspan="2" rowspan="2" |Turbo |
||
| + | |None |
||
| + | | style="text-align: center;" |$500 |
||
| + | | colspan="2" style="text-align: center;" |$5,000 |
||
|- |
|- |
||
| − | |Turbo |
||
|Turbo Tuning |
|Turbo Tuning |
||
| style="text-align: center;" |$2,500 |
| style="text-align: center;" |$2,500 |
||
| − | | style="text-align: center;" |$ |
+ | | colspan="2" style="text-align: center;" |$50,000 |
|- |
|- |
||
| − | |Wheels |
+ | | colspan="2" |Wheels |
| + | |''Main article: [[Los Santos Customs/Wheels]]'' |
||
| − | |<div class="mw-collapsible mw-collapsed" style="width:100%"> |
||
| − | <div class="mw-collapsible-content">{{WheelsExpand}}</div></div> |
||
| style="text-align: center;" | - |
| style="text-align: center;" | - |
||
| − | | style="text-align: center;" | - |
+ | | colspan="2" style="text-align: center;" | - |
| + | |- |
||
| − | |||
| ⚫ | |||
| + | |None |
||
| + | | style="text-align: center;" |$100 |
||
| + | | colspan="2" style="text-align: center;" |$500 |
||
|- |
|- |
||
| ⚫ | |||
|Light Smoke |
|Light Smoke |
||
| style="text-align: center;" |$200 |
| style="text-align: center;" |$200 |
||
| − | | style="text-align: center;" |$ |
+ | | colspan="2" style="text-align: center;" |$1,500 |
|- |
|- |
||
|Dark Smoke |
|Dark Smoke |
||
| style="text-align: center;" |$450 |
| style="text-align: center;" |$450 |
||
| − | | style="text-align: center;" |$ |
+ | | colspan="2" style="text-align: center;" |$3,500 |
|- |
|- |
||
|Limo |
|Limo |
||
| style="text-align: center;" |$700 |
| style="text-align: center;" |$700 |
||
| − | | style="text-align: center;" |$ |
+ | | colspan="2" style="text-align: center;" |$5,000 |
|} |
|} |
||
| Line 416: | Line 535: | ||
IssiAndPantoSizeComparison.jpg|Size comparison between the [[Issi]] and the '''Panto'''. |
IssiAndPantoSizeComparison.jpg|Size comparison between the [[Issi]] and the '''Panto'''. |
||
Panto-GTAV-InsideMichael'sHouse.png|A '''Panto''' inside The [[De Santa Residence]] in ''GTA V'', demonstrating the vehicle's ability to enter buildings with little effort. |
Panto-GTAV-InsideMichael'sHouse.png|A '''Panto''' inside The [[De Santa Residence]] in ''GTA V'', demonstrating the vehicle's ability to enter buildings with little effort. |
||
| − | Panto-GTAV- |
+ | Panto-GTAV-SSASA.png|The '''Panto''' on [[Southern San Andreas Super Autos]]. |
| + | Panto-GTAV-RSC.png|The '''Panto''' on [[Rockstar Games Social Club]]. |
||
</gallery> |
</gallery> |
||
| Line 596: | Line 716: | ||
===''Grand Theft Auto V''=== |
===''Grand Theft Auto V''=== |
||
*The Panto in ''GTA V'' does not dent and deform when crashed, similar to motorcycles. |
*The Panto in ''GTA V'' does not dent and deform when crashed, similar to motorcycles. |
||
| − | *This is the only [[Benefactor]] vehicle that doesn't resemble a |
+ | *This is the only [[Benefactor]] vehicle that doesn't resemble a {{WP|Mercedes-Benz}} model. However, Smart is part of the Daimler AG group, which is also the parent company of Mercedes-Benz, and the real life Smart Fortwo also contains parts that are also used on some Mercedes-Benz models. There are several cars that look similar to the Panto Made by Mercedes-Benz, but are not as small as the Panto. |
*When the Stickerbomb livery is added to the tailgate, the license plate will be shifted at a slight angle. |
*When the Stickerbomb livery is added to the tailgate, the license plate will be shifted at a slight angle. |
||
*Like the [[Sabre Turbo]], when the Panto is modified with a Roll Cage, it will have the fuel tank on the trunk. |
*Like the [[Sabre Turbo]], when the Panto is modified with a Roll Cage, it will have the fuel tank on the trunk. |
||
| Line 602: | Line 722: | ||
*Because the engine cannot be viewed by normal means, there are no camshafts or other vital engine parts other than 3 cylinders. Furthermore, the engine is transversely laid out of line with the rear wheels. Note the 3-Cylinder engine can only be viewed using the [[Rockstar Editor]] Camera. |
*Because the engine cannot be viewed by normal means, there are no camshafts or other vital engine parts other than 3 cylinders. Furthermore, the engine is transversely laid out of line with the rear wheels. Note the 3-Cylinder engine can only be viewed using the [[Rockstar Editor]] Camera. |
||
| + | ==Bugs/Glitches== |
||
| − | ===''Grand Theft Auto |
+ | ===''Grand Theft Auto V''=== |
| ⚫ | *There is currently a [[glitch]] that allows the player to turn the roof and/or trunk invisible based on the chosen modification. This can be done by buying a roof modification in Los Santos Customs, then scrolling through the roofs quickly until it lands on the stock option without visible roof and/or trunk. Depending on how much of the car is covered by the chosen modification, only the roof can be invisible but some modifications also make the trunk together with the roof invisible. If the trunk is invisible the badge will also appear floating in the air. While using this glitch, the player can still apply a spoiler which will appear floating in the air. The glitch works similar to how some cars can have their stock spoilers removed. |
||
| + | *Installing the "Roll Cage and Chassis Upgrade" modification may cause the exhausts to stop emmiting fumes. This seem to only happen with short exhausts, being the stock and the titanium exhausts. |
||
| ⚫ | *There is currently a [[glitch]] that allows the player to turn the roof and/or trunk invisible based on the chosen modification. This can be done by buying a roof modification in Los Santos Customs, then scrolling through the roofs quickly until it lands on the stock option without visible roof and/or trunk. Depending on how much of the car is covered by the chosen modification, only the roof can be invisible but some modifications also make the trunk together with the roof invisible. If the trunk is invisible, the badge will also appear floating in the air. While using this glitch, the player can still apply a spoiler which will appear floating in the air. The glitch works similar to how some cars can have their stock spoilers removed. |
||
==See Also== |
==See Also== |
||
Revision as of 01:25, 17 July 2019
Template:Infobox vehicles
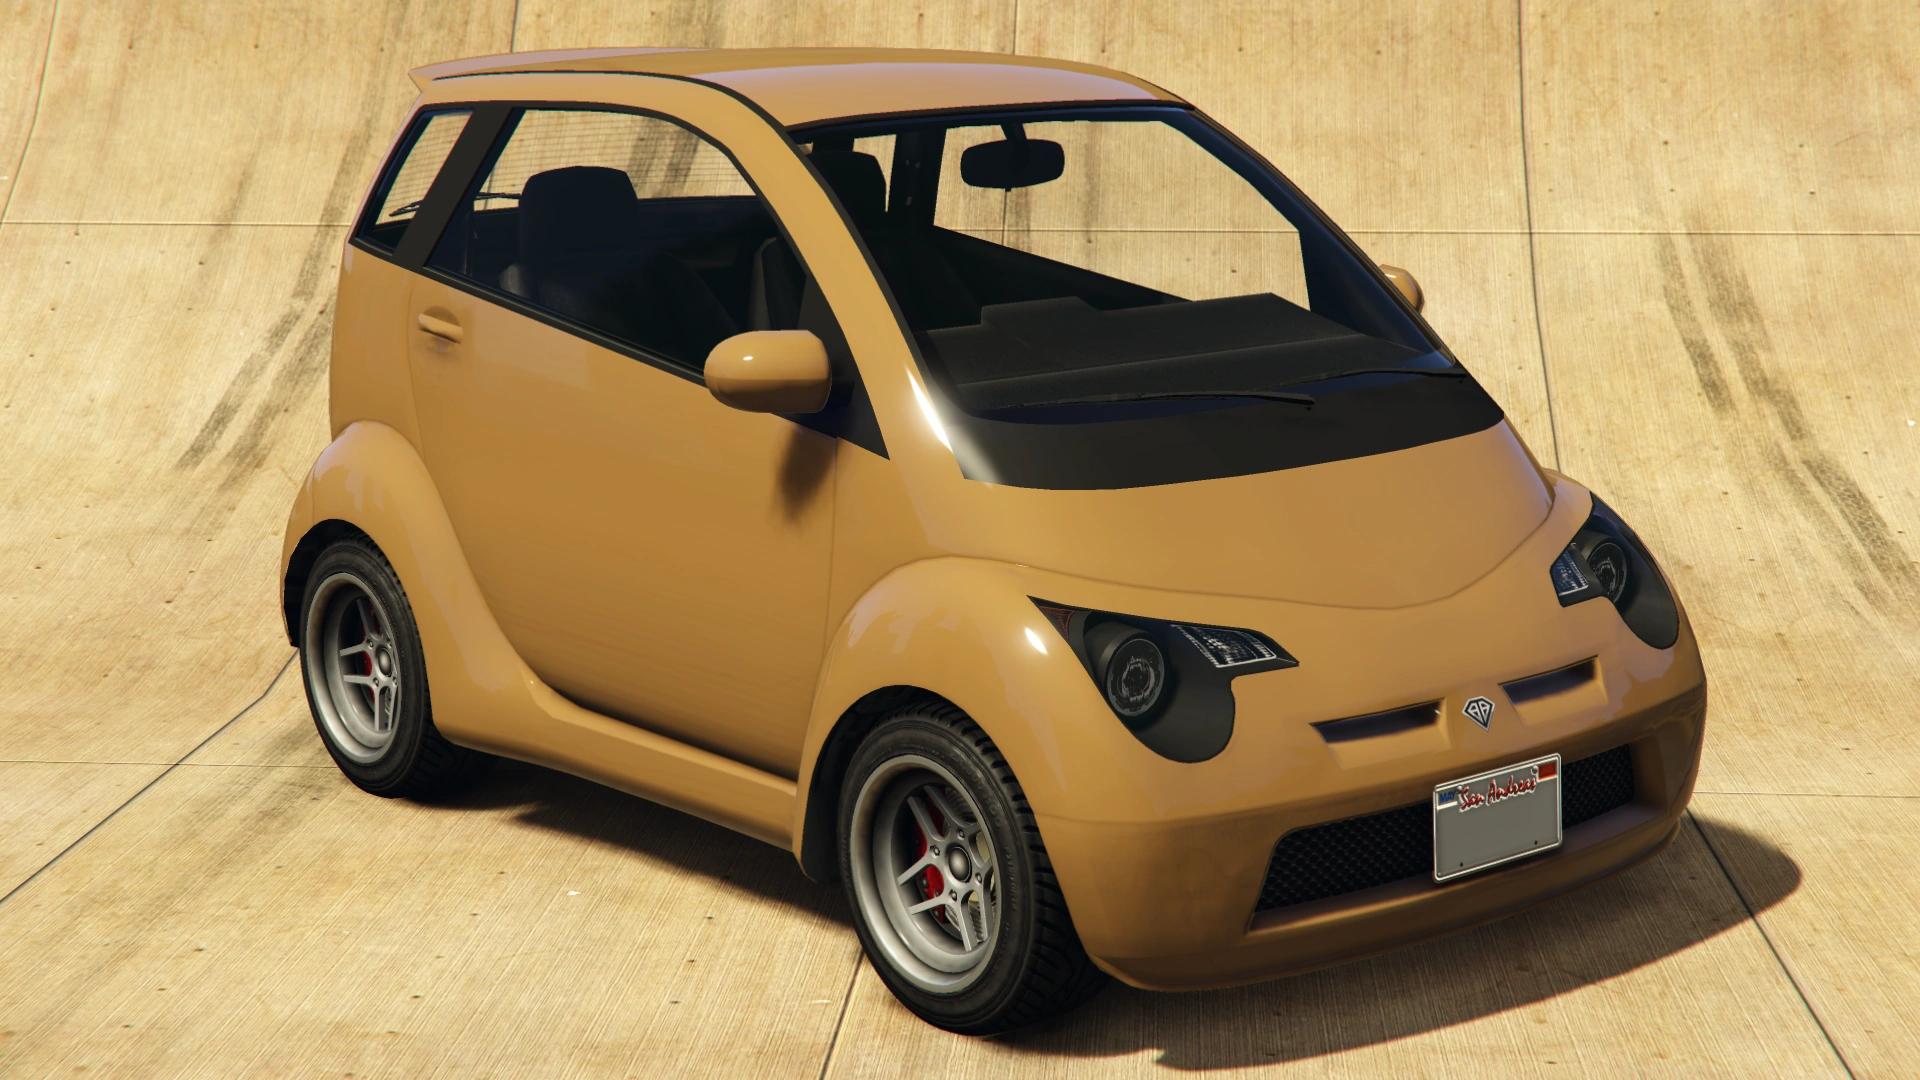
The Panto is a two-door hatchback featured in Grand Theft Auto 2, Grand Theft Auto V and Grand Theft Auto Online as part of the "I'm Not a Hipster" Update. It is manufactured by Benefactor in the HD Universe.
Design
Grand Theft Auto 2
The Panto name first debuted in Grand Theft Auto 2 in the form of a two-door microcar (occasionally confused as a van) akin to the Dementia, but significantly larger. Its appearance alone makes the car generally unappealing, in contrast to larger, better designed cars in the game. The internal name given to the Panto is FIAT, implying the car's name originates from that of a similarly named Fiat Punto, but may otherwise be comparable to a 1949-1967 Tempo Matador Kleinbus. It best resembles the Fiat 500 K estate.
Grand Theft Auto III
Template:Cutcontent The Panto was planned to reappear as a four-door compact sedan in Grand Theft Auto III, but was cut for unknown reasons. The car, like the Panto in Grand Theft Auto 2, bears some resemblance to a Fiat, specifically, a Fiat 128, Zastava Skala or a Lada Riva; little else is known about the car. A picture of the car can be found on the "Capital Auto Sale$" teaser website, along with many other beta vehicles [1] Template:Cutcontent
Grand Theft Auto V
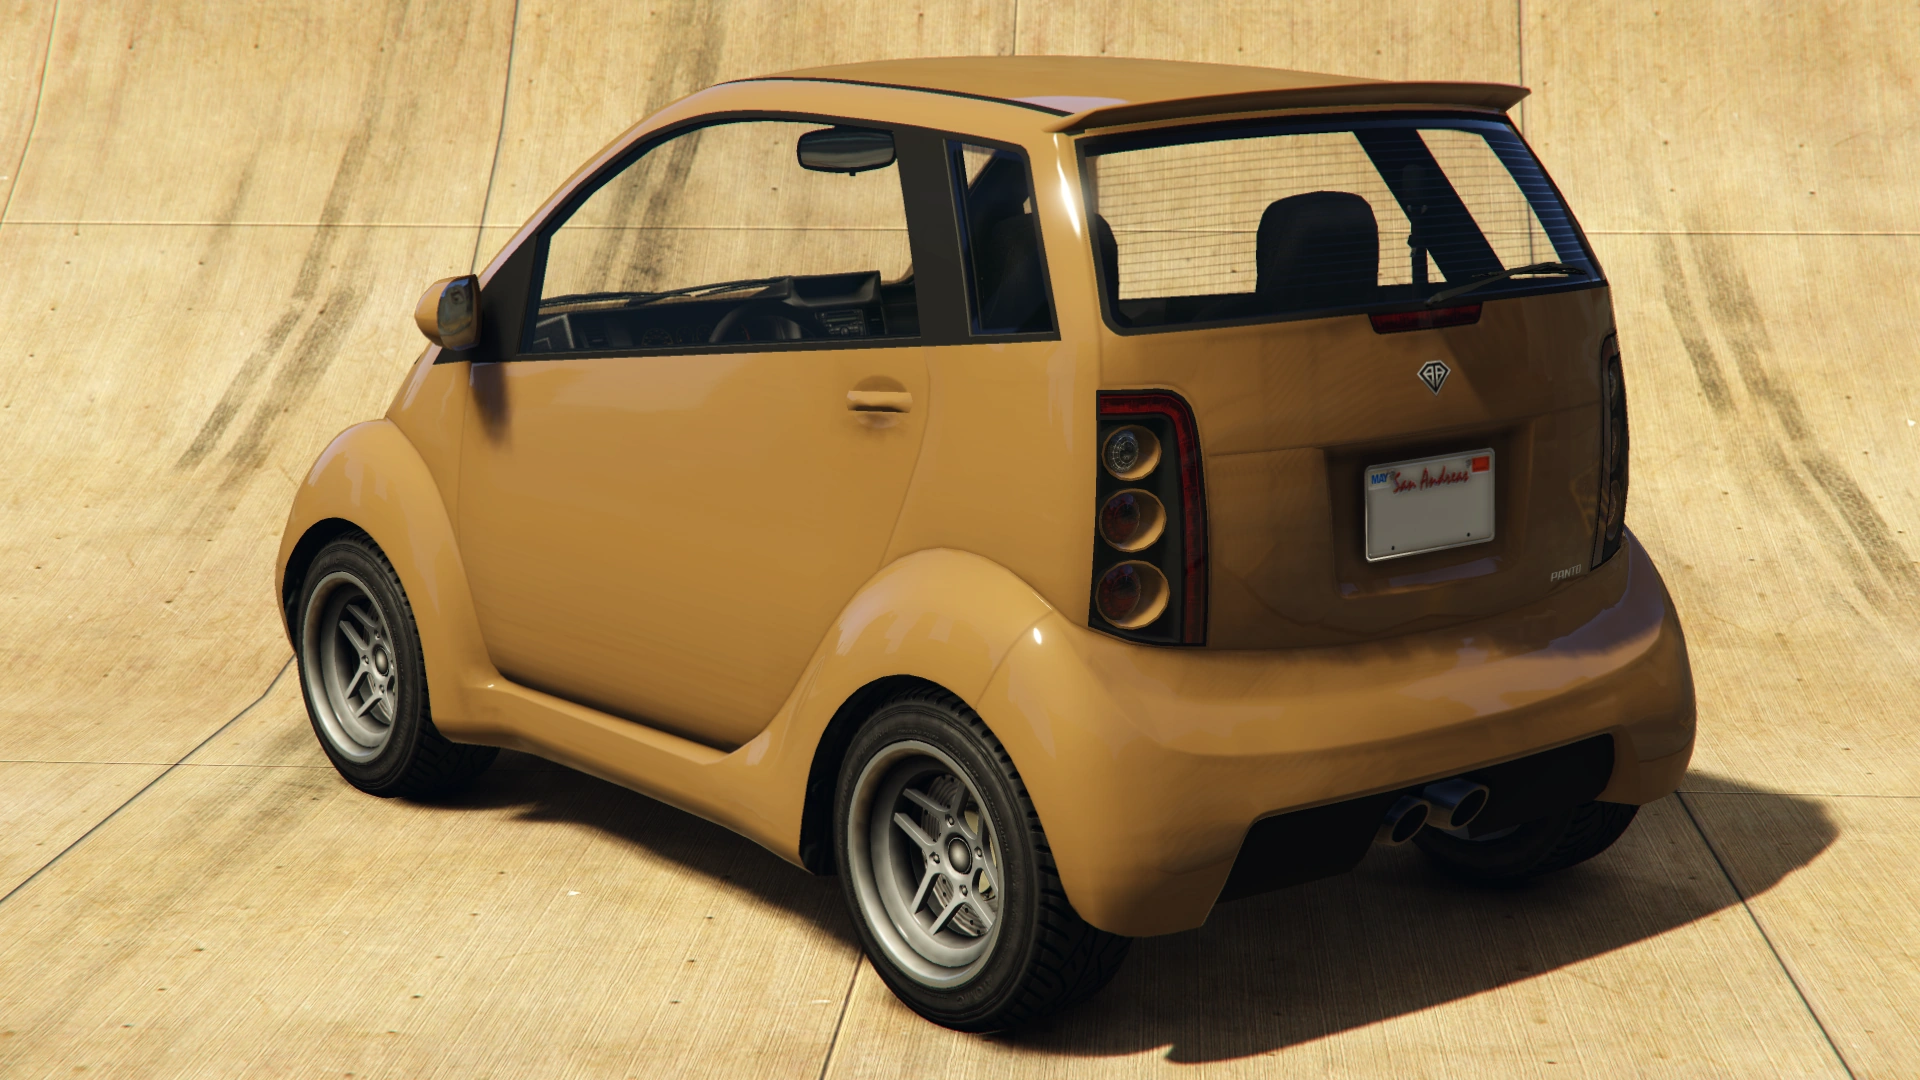
The Panto reappears in Grand Theft Auto V retaining its microcar design, surpassing the Weeny Issi's already small size. It is manufactured by Benefactor and resembles a 2007-2014 Smart Fortwo. However, it has different shaped headlights resembling upside down hearts. The overall design is inspired by Gordon Murray T.25 and Gordon Murray T27. The Volkswagen Up! is the base for the rear fascia, the Mitsubishi i for the frontal fascia, and the Toyota iQ/Scion iQ/Aston Martin Cygnet for the side profile.
The Panto has "El Quatro" tuner rims that are also available at Los Santos Customs and its interior is very simple, with the "Cavalcade" dashboard, dials and interior (usually employed by SUVs).
Current Design Gallery


Version History Gallery
")
Performance
Grand Theft Auto 2
The Panto's performance in Grand Theft Auto 2 mirrors its generally undesirable appearance. The car suffers from an underpowered engine, which results in a poor top speed and below average acceleration. However, helped largely by its speed, the Panto's steering is still acceptable, but its brakes are mediocre, being slightly below average. Even so, the vehicle is not practical when evading gunfire and hostile enemies, such as law enforcement. It takes less damage than a usual car, the same applies to the Schmidt.
Grand Theft Auto V
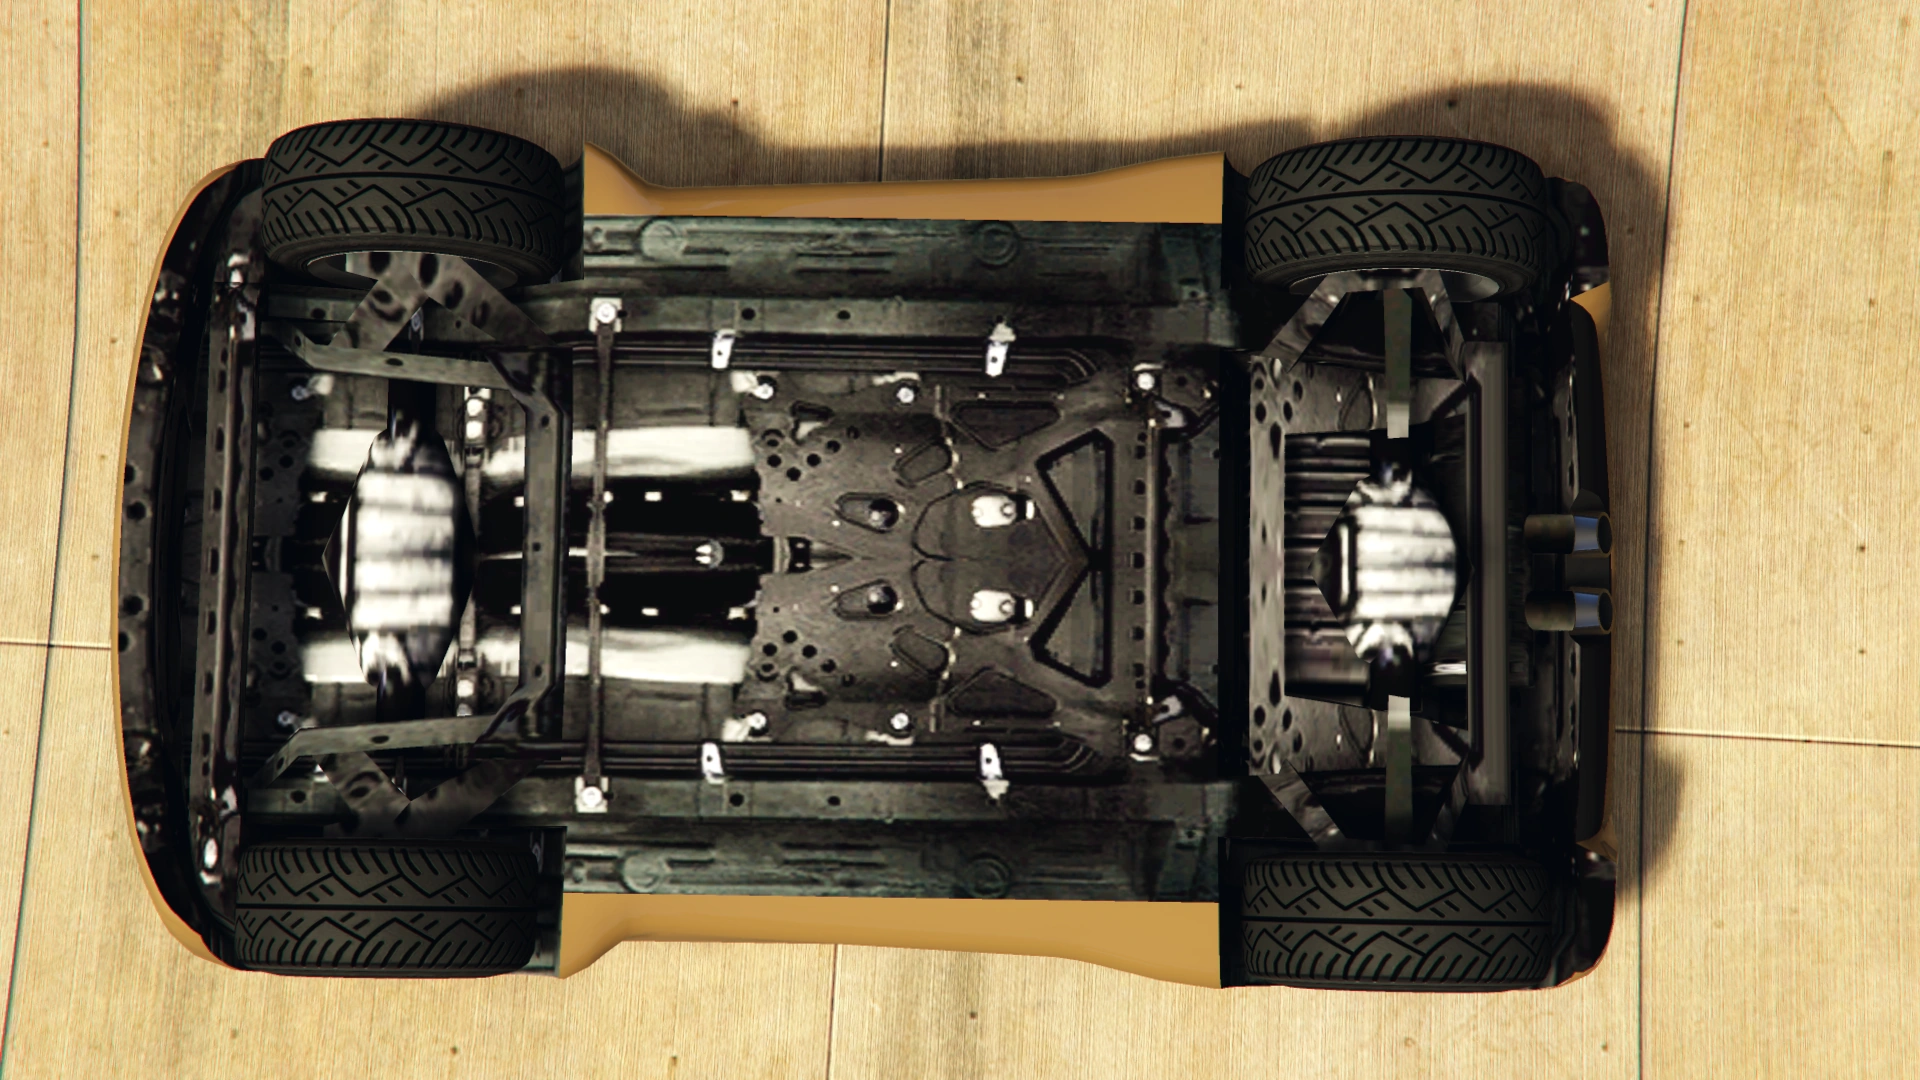
The Panto in Grand Theft Auto V is a small, light car with quick acceleration. It is powered by a model of a 3-cylinder engine, coupled to a 6 speed gearbox in an RR layout. Its acceleration is average, owing to its incredibly light weight, and its top speed is quite high, but caution should be taken when driving at high speeds because its short wheelbase makes it very unstable and prone to spinning out of control, and its wheelbase is much shorter than the Issi. This could make driving at high speeds quite problematic. The handling is rather poor despite its size, as the vehicle suffers from understeer, and its durability is unremarkable, as it can only take a few head-on crashes before its axle breaks and its engine stalls, although it is completely immune to any form of crash deformation. The Panto is very maneuverable when airborne, able to do multiple spins with ease. Nevertheless, this is a great commuter car if one does not want to risk paying the insurance premium on one of their super cars. This vehicle has the best acceleration in its class.
Owing to the vehicle's small size and lack of crumple zones, even a moderate impact to the rear of the Panto will kill any NPC occupants inside, making obtaining one relatively easy if the player is prepared to drive the damaged vehicle to Los Santos Customs and have it repaired. Due to the Panto not suffering from body deformation, this can lead into unusual situations where the player can come across seemingly-intact Pantos with the driver dead inside due to an off-screen collision.
GTA V Overview
| Acceleration (0-60 mph in Seconds) |
Top Speed (mph / kmh) |
Gears | Engine | Drivetrain (FWD / RWD / AWD) |
Mass (kg / lbs) |
Fuel Tank Size (litres) |
|---|---|---|---|---|---|---|
| N/A | 82 / 132 | 6 | N/A | RWD | 800 / 1764 | 65 |
| N/A | 132 / 212 | 6 | N/A | RWD | 800 / 1764 | N/A |
| 5.1 seconds | 100 / 161 | 6 | RR 3-cylinder (In-game model) | RWD | Cannot be observed | Cannot be observed |
Modifications
Grand Theft Auto V
| Category | Modification | Cost (GTA V) | Cost (GTA Online) | Image | |
|---|---|---|---|---|---|
| Armor | No Armor | $100 | $1,000 | ||
| Armor Upgrade 20% | $500 | $7,500 | |||
| Armor Upgrade 40% | $1,250 | $12,000 | |||
| Armor Upgrade 60% | $2,000 | $20,000 | |||
| Armor Upgrade 80% | $3,500 | $35,000 | |||
| Armor Upgrade 100% | $5,000 | $50,000 | |||
| Brakes | Stock Brakes | $100 | $1,000 | ||
| Street Brakes | $2,000 | $20,000 | |||
| Sport Brakes | $2,700 | $27,000 | |||
| Race Brakes | $3,500 | $35,000 | |||
| Bodywork | Stock Bodywork | $150 | $300 | ||
| Carbon Fenders | $450 | $900 | |||
| Stickerbomb Fenders | $750 | $1,500 | |||
| Bumpers | Stock Front Bumper | $250 | $2,200 | ||
| Custom Front Splitter | $500 | $4,600 | |||
| Carbon Front Splitter | $750 | $7,400 | |||
| Extreme Aero Front Bumper | $1,000 | $11,700 | |||
| Stickerbomb Front Bumper | $1,300 | $14,500 | |||
| Stock Rear Bumper | $250 | $2,200 | |||
| Carbon Rear Bumper | $500 | $4,600 | |||
| Stickerbomb Rear Bumper | $750 | $7,500 | |||
| Engine | EMS Upgrade, Level 1 | $900 | $9,000 | ||
| EMS Upgrade, Level 2 | $1,250 | $12,500 | |||
| EMS Upgrade, Level 3 | $1,800 | $18,000 | |||
| EMS Upgrade, Level 4 | $3,350 | $33,500 | |||
| Exhausts | Stock Exhaust | $130 | $260 | ||
| Titanium Exhaust | $375 | $750 | |||
| Chrome Tip Exhaust | $899 | $1,800 | |||
| Titanium Tuner Exhaust | $1,499 | $3,000 | |||
| Shakotan Exhaust | $4,770 | $9,550 | |||
| Side Mounted Carbon Can | $4,870 | $9,750 | |||
| Explosives | Ignition Bomb | N/A | $5,000 | ||
| Remote Bomb | N/A | $7,500 | |||
| Grilles | Stock Grille | $100 | $200 | ||
| Bullbars | $375 | $750 | |||
| Stickerbomb Bullbars | $670 | $1,340 | |||
| Enforcer Pushbar | $825 | $1,650 | |||
| Horns | Main article: Los Santos Customs/Horns | - | - | ||
| Lights | Headlights | Stock Lights | $100 | $200 | |
| Xenon Lights | $300 | $3,000 | |||
| Neon Kits | Main article: Los Santos Customs/Lights | - | - | ||
| Loss/Theft Prevention | Tracker | N/A | Too Hot | ||
| Full Coverage | N/A | Too Hot | |||
| Respray | Main article: Los Santos Customs/Respray Colors | - | - | ||
| Roll Cages | No Roll Cage | $350 | $700 | ||
| Roll Cage and Chassis Upgrade | $550 | $1,100 | |||
| Roofs | Stock Roof | $100 | $200 | ||
| Carbon Roof | $350 | $700 | |||
| Carbon Roof & Tailgate | $575 | $1,150 | |||
| Stickerbomb Roof | $800 | $1,600 | |||
| Stickerbomb Roof & Tailgate | $975 | $1,950 | |||
| Sell | Sell Vehicle | N/A | Too Hot | ||
| Skirts | Stock Skirts | $300 | $2,500 | ||
| Low Skirts | $415 | $5,500 | |||
| Sport Skirts | $500 | $8,000 | |||
| Stickerbomb Skirts | $750 | $10,500 | |||
| Carbon Skirts | $1,000 | $14,000 | |||
| Spoilers | None | $150 | $6,000 | ||
| Color Coded Wing | $275 | $7,050 | |||
| Carbon Wing | $350 | $10,000 | |||
| Drift Wing | $525 | $13,000 | |||
| Roof Rack | $750 | $14,000 | |||
| Roof Rack o' Crap | $1,000 | $16,000 | |||
| Suspension | Stock Suspension | $100 | $200 | ||
| Lowered Suspension | $500 | $1,000 | |||
| Street Suspension | $1,000 | $2,000 | |||
| Sport Suspension | $1,700 | $3,400 | |||
| Competition Suspension | $2,200 | $4,400 | |||
| Race Suspension | $2,300 | $4,600 | |||
| Transmission | Stock Transmission | $100 | $1,000 | ||
| Street Transmission | $2,950 | $29,500 | |||
| Sports Transmission | $3,250 | $32,500 | |||
| Race Transmission | $4,000 | $40,000 | |||
| Turbo | None | $500 | $5,000 | ||
| Turbo Tuning | $2,500 | $50,000 | |||
| Wheels | Main article: Los Santos Customs/Wheels | - | - | ||
| Windows | None | $100 | $500 | ||
| Light Smoke | $200 | $1,500 | |||
| Dark Smoke | $450 | $3,500 | |||
| Limo | $700 | $5,000 | |||
Image Gallery
Grand Theft Auto 2
")
Grand Theft Auto III
")
")
Grand Theft Auto V
")
")
")
Special Variants
Template:Next-Gen
Running Back
A Pre-modified variant of the Panto appears in the Adversary Mode, Running Back with a white and blue color scheme and several modifications applied.
")
Moving Target
Pre-modified variants of the Panto can appear as a random Moving Target vehicle in the Freemode Event, Moving Target, as part of the Freemode Events Update. The second set cannot be recreated in Los Santos Customs or any other mod shop as it has a unique pearlescent color.
| File | Color Set | Window Tint? | Livery? | Mod Kit | |||||||||||||||||||||||||||||||||||||||||||||||||||||||||
|---|---|---|---|---|---|---|---|---|---|---|---|---|---|---|---|---|---|---|---|---|---|---|---|---|---|---|---|---|---|---|---|---|---|---|---|---|---|---|---|---|---|---|---|---|---|---|---|---|---|---|---|---|---|---|---|---|---|---|---|---|---|
Vehicle's pearlescent and wheel colors are randomly picked from the car's regular traffic color sets. |
No | No |
| ||||||||||||||||||||||||||||||||||||||||||||||||||||||||||
| File | Color Set | Window Tint? | Livery? | Mod Kit | |||||||||||||||||||||||||||||||||||||||||||||||||||||||||||
|---|---|---|---|---|---|---|---|---|---|---|---|---|---|---|---|---|---|---|---|---|---|---|---|---|---|---|---|---|---|---|---|---|---|---|---|---|---|---|---|---|---|---|---|---|---|---|---|---|---|---|---|---|---|---|---|---|---|---|---|---|---|---|---|
Vehicle's pearlescent and wheel colors are randomly picked from the car's regular traffic color sets. |
No | No |
| ||||||||||||||||||||||||||||||||||||||||||||||||||||||||||||
| File | Color Set | Window Tint? | Livery? | Mod Kit | ||||||||||||||||||||||||||||||||||||||||||||||||||||||||||||||
|---|---|---|---|---|---|---|---|---|---|---|---|---|---|---|---|---|---|---|---|---|---|---|---|---|---|---|---|---|---|---|---|---|---|---|---|---|---|---|---|---|---|---|---|---|---|---|---|---|---|---|---|---|---|---|---|---|---|---|---|---|---|---|---|---|---|---|
|
No | No |
| |||||||||||||||||||||||||||||||||||||||||||||||||||||||||||||||
")
")
")
Prominent Appearances in Missions
Grand Theft Auto Online
- Freemode Events
- May appear in one of three different modified variations as a random vehicle in the Freemode Event Moving Target.
- Adversary Modes
- It is used in the Running Back Adversary mode, as the runner's vehicle. It is in modified form, having front bullbars, a rollcage, off-road tyres and twin exhausts.
Locations
Grand Theft Auto 2
- The Residential and Industrial Districts of Anywhere City.
- A green Panto is parked in the lot by the train station near the church in the Residential District, Anywhere City.
Grand Theft Auto V
- Original version
- Can be found in the player's garage in single player.
- Enhanced version
- Commonly spawns in traffic and inside parking lots (enhanced version only).
- Can be rarely found parked in Los Santos Customs in Burton (pre-modified).
- Spawns pre-modified in front of The Archipelago in Rockford Hills just South of the Los Santos Golf Club.
Grand Theft Auto Online
- Can be bought from Southern San Andreas Super Autos for $85,000.
- Rarely spawns in traffic. It cannot be sold or modified due to it being considered too hot. (enhanced version only)
- Can be found as a cargo-holding vehicle in the Parking Lot Business Battle.
Rewards
Grand Theft Auto 2
- When crushed in the Residential and Industrial districts, the Panto awards the player with Grenades.
Trivia
General
- The default radio station for the Panto is:
- GTA 2: Osmosis Radio (Residential) or Lo-Fi FM (Industrial)
- GTA V: Lowdown 91.1 and Space 103.2.
Grand Theft Auto V
- The Panto in GTA V does not dent and deform when crashed, similar to motorcycles.
- This is the only Benefactor vehicle that doesn't resemble a Mercedes-Benz model. However, Smart is part of the Daimler AG group, which is also the parent company of Mercedes-Benz, and the real life Smart Fortwo also contains parts that are also used on some Mercedes-Benz models. There are several cars that look similar to the Panto Made by Mercedes-Benz, but are not as small as the Panto.
- When the Stickerbomb livery is added to the tailgate, the license plate will be shifted at a slight angle.
- Like the Sabre Turbo, when the Panto is modified with a Roll Cage, it will have the fuel tank on the trunk.
- The Panto shares its engine sound with the Dilettante but with a clearer tone, partly due to the lack of electric motor.
- Because the engine cannot be viewed by normal means, there are no camshafts or other vital engine parts other than 3 cylinders. Furthermore, the engine is transversely laid out of line with the rear wheels. Note the 3-Cylinder engine can only be viewed using the Rockstar Editor Camera.
Bugs/Glitches
Grand Theft Auto V
- Installing the "Roll Cage and Chassis Upgrade" modification may cause the exhausts to stop emmiting fumes. This seem to only happen with short exhausts, being the stock and the titanium exhausts.
- There is currently a glitch that allows the player to turn the roof and/or trunk invisible based on the chosen modification. This can be done by buying a roof modification in Los Santos Customs, then scrolling through the roofs quickly until it lands on the stock option without visible roof and/or trunk. Depending on how much of the car is covered by the chosen modification, only the roof can be invisible but some modifications also make the trunk together with the roof invisible. If the trunk is invisible, the badge will also appear floating in the air. While using this glitch, the player can still apply a spoiler which will appear floating in the air. The glitch works similar to how some cars can have their stock spoilers removed.
See Also
- Dementia - A similarly designed compact car in Grand Theft Auto 2.
References
- ↑ [1] Capital Auto Sale$ website.
- ↑ Panto case 1.
case joaat("panto"): if (iVar0 == 0) { vehicle::set_vehicle_mod(network::net_to_veh(Local_99.f_2), 0, 2, false); vehicle::set_vehicle_mod(network::net_to_veh(Local_99.f_2), 1, 1, false); vehicle::set_vehicle_mod(network::net_to_veh(Local_99.f_2), 3, 3, false); vehicle::set_vehicle_mod(network::net_to_veh(Local_99.f_2), 4, 4, false); vehicle::set_vehicle_mod(network::net_to_veh(Local_99.f_2), 6, 2, false); vehicle::set_vehicle_mod(network::net_to_veh(Local_99.f_2), 11, 3, false); vehicle::set_vehicle_mod(network::net_to_veh(Local_99.f_2), 12, 2, false); vehicle::set_vehicle_mod(network::net_to_veh(Local_99.f_2), 13, 2, false); vehicle::set_vehicle_mod(network::net_to_veh(Local_99.f_2), 15, 4, false); vehicle::set_vehicle_mod(network::net_to_veh(Local_99.f_2), 23, 20, false); vehicle::set_vehicle_colours(network::net_to_veh(Local_99.f_2), 30, 30); } - ↑ Panto case 2.
else if (iVar0 == 1) { vehicle::set_vehicle_mod(network::net_to_veh(Local_99.f_2), 0, 4, false); vehicle::set_vehicle_mod(network::net_to_veh(Local_99.f_2), 1, 3, false); vehicle::set_vehicle_mod(network::net_to_veh(Local_99.f_2), 2, 1, false); vehicle::set_vehicle_mod(network::net_to_veh(Local_99.f_2), 3, 2, false); vehicle::set_vehicle_mod(network::net_to_veh(Local_99.f_2), 4, 2, false); vehicle::set_vehicle_mod(network::net_to_veh(Local_99.f_2), 6, 1, false); vehicle::set_vehicle_mod(network::net_to_veh(Local_99.f_2), 11, 3, false); vehicle::set_vehicle_mod(network::net_to_veh(Local_99.f_2), 12, 2, false); vehicle::set_vehicle_mod(network::net_to_veh(Local_99.f_2), 13, 2, false); vehicle::set_vehicle_mod(network::net_to_veh(Local_99.f_2), 15, 4, false); vehicle::set_vehicle_mod(network::net_to_veh(Local_99.f_2), 23, 20, false); vehicle::set_vehicle_colours(network::net_to_veh(Local_99.f_2), 88, 24); } - ↑ Panto case 3.
else
{
vehicle::set_vehicle_mod(network::net_to_veh(Local_99.f_2), 0, 1, false);
vehicle::set_vehicle_mod(network::net_to_veh(Local_99.f_2), 1, 1, false);
vehicle::set_vehicle_mod(network::net_to_veh(Local_99.f_2), 2, 0, false);
vehicle::set_vehicle_mod(network::net_to_veh(Local_99.f_2), 3, 3, false);
vehicle::set_vehicle_mod(network::net_to_veh(Local_99.f_2), 4, 3, false);
vehicle::set_vehicle_mod(network::net_to_veh(Local_99.f_2), 6, 2, false);
vehicle::set_vehicle_mod(network::net_to_veh(Local_99.f_2), 11, 3, false);
vehicle::set_vehicle_mod(network::net_to_veh(Local_99.f_2), 12, 2, false);
vehicle::set_vehicle_mod(network::net_to_veh(Local_99.f_2), 13, 2, false);
vehicle::set_vehicle_mod(network::net_to_veh(Local_99.f_2), 15, 4, false);
vehicle::set_vehicle_mod(network::net_to_veh(Local_99.f_2), 16, 4, false);
vehicle::set_vehicle_mod(network::net_to_veh(Local_99.f_2), 23, 13, false);
vehicle::set_vehicle_mod_color_1(network::net_to_veh(Local_99.f_2), 3, 0, 0);
vehicle::set_vehicle_mod_color_2(network::net_to_veh(Local_99.f_2), 3, 0);
}