Tag: Visual edit |
m (→Modifications) |
||
| (26 intermediate revisions by 11 users not shown) | |||
| Line 10: | Line 10: | ||
|price = [[Money|$]]249,000 <small>([[Warstock Cache & Carry]])</small> |
|price = [[Money|$]]249,000 <small>([[Warstock Cache & Carry]])</small> |
||
|appearances = ''[[Grand Theft Auto V]]'' {{DLC|"I'm Not a Hipster" Update (Xbox 360 and PlayStation 3 only)}}<br>''[[Grand Theft Auto Online]]'' {{DLC|"I'm Not a Hipster" Update (Xbox 360 and PlayStation 3 only)}} |
|appearances = ''[[Grand Theft Auto V]]'' {{DLC|"I'm Not a Hipster" Update (Xbox 360 and PlayStation 3 only)}}<br>''[[Grand Theft Auto Online]]'' {{DLC|"I'm Not a Hipster" Update (Xbox 360 and PlayStation 3 only)}} |
||
| − | |related = [[Dubsta]] |
+ | |related = [[Dubsta]]<br>[[Kamacho]]<br>[[Caracara]] |
|dashtype = Cavalcade |
|dashtype = Cavalcade |
||
|inttxd = Cavalcade |
|inttxd = Cavalcade |
||
| Line 16: | Line 16: | ||
|carcols = |
|carcols = |
||
{{Expand|| |
{{Expand|| |
||
| ⚫ | |||
| − | <center>COLOR SET 1</center> |
||
| − | {{CarColV|0|3|6|156}} |
+ | {{CarColV|no=1|0|3|6|156}} |
| ⚫ | |||
| − | <center>COLOR SET 2</center> |
||
| − | {{CarColV| |
+ | {{CarColV|no=3|6|6|11|156}} |
| ⚫ | |||
| − | <center>COLOR SET 3</center> |
||
| − | {{CarColV| |
+ | {{CarColV|no=5|27|27|27|156}} |
| ⚫ | |||
| − | <center>COLOR SET 4</center> |
||
| − | {{CarColV| |
+ | {{CarColV|no=7|9|1|5|156}} |
| ⚫ | |||
| − | <center>COLOR SET 5</center> |
||
| − | {{CarColV| |
+ | {{CarColV|no=9|56|0|60|156}} |
| ⚫ | |||
| − | <center>COLOR SET 6</center> |
||
| − | {{CarColV| |
+ | {{CarColV|no=11|103|103|107|156}} |
| ⚫ | |||
| − | <center>COLOR SET 7</center> |
||
| − | {{CarColV| |
+ | {{CarColV|no=13|5|1|111|156}} |
| + | {{CarColV|no=14|6|2|111|156}}<br> |
||
| − | <center>COLOR SET 8</center> |
||
| ⚫ | |||
| − | <center>COLOR SET 9</center> |
||
| ⚫ | |||
| − | <center>COLOR SET 10</center> |
||
| ⚫ | |||
| − | <center>COLOR SET 11</center> |
||
| ⚫ | |||
| − | <center>COLOR SET 12</center> |
||
| ⚫ | |||
| − | <center>COLOR SET 13</center> |
||
| ⚫ | |||
| − | <center>COLOR SET 14</center> |
||
| ⚫ | |||
}} |
}} |
||
|wheeltype = Off-Road |
|wheeltype = Off-Road |
||
| Line 67: | Line 54: | ||
==Design== |
==Design== |
||
=== ''Grand Theft Auto V'' === |
=== ''Grand Theft Auto V'' === |
||
| − | The Dubsta 6x6 closely resembles the 6x6 variant of the |
+ | The Dubsta 6x6 closely resembles the {{WP|Mercedes-Benz G63 AMG 6x6}}, the 6x6 variant of the {{WP|Mercedes-Benz G-Class|Mercedes-Benz G63}}. The vehicle may also draw some inspirations from the Mercedes-Benz G Class models modified by the aftermarket tuning company {{WP|Brabus}}. |
In contrast to the stock Dubsta, the 6x6 comes equipped with a large skid plate at the front and rear. The stock wheel design for the 6x6 also differs from that of the standard Dubsta. |
In contrast to the stock Dubsta, the 6x6 comes equipped with a large skid plate at the front and rear. The stock wheel design for the 6x6 also differs from that of the standard Dubsta. |
||
Just like the G63 6x6, the Dubsta 6x6 has a truck bed along with an extended chassis to accommodate the extra rear axle. Like the real-life counterpart, the Dubsta 6x6 comes with load bed roll bars as standard (albeit a smaller group). The truck also has a higher ground clearance to make way for the bigger off-road purpose tires. |
Just like the G63 6x6, the Dubsta 6x6 has a truck bed along with an extended chassis to accommodate the extra rear axle. Like the real-life counterpart, the Dubsta 6x6 comes with load bed roll bars as standard (albeit a smaller group). The truck also has a higher ground clearance to make way for the bigger off-road purpose tires. |
||
| + | |||
| ⚫ | |||
| + | |||
{{Clr}} |
{{Clr}} |
||
===Current Design Gallery=== |
===Current Design Gallery=== |
||
| − | <!--Please ensure you have read the Manual of Style [GTA_Wiki:Manual_of_Style/Vehicles/Design_Galleries] before uploading and adding images to the Current Design Gallery. Failure to meet these guidelines will result in the images being removed and deleted, and repeated offences may result in a warning.--> |
+ | <!--Please ensure you have read the Manual of Style [GTA_Wiki:Manual_of_Style/Vehicles/Design_Galleries] before uploading and adding images to the Current Design Gallery. Failure to meet these guidelines will result in the images being removed and deleted, and repeated offences may result in a warning.--> |
| + | |||
| + | {{Current Design Gallery |
||
|front_quarter_image = Dubsta6x6-GTAV-FrontQuarter.png |
|front_quarter_image = Dubsta6x6-GTAV-FrontQuarter.png |
||
|top_image = Dubsta6x6-GTAV-Top.png |
|top_image = Dubsta6x6-GTAV-Top.png |
||
| Line 92: | Line 84: | ||
==Performance== |
==Performance== |
||
===''Grand Theft Auto V''=== |
===''Grand Theft Auto V''=== |
||
| − | As expected from a large 6-wheeled truck, the Dubsta 6x6 is exceptionally heavy, however it is a very stable vehicle. The Dubsta 6x6 retains the same engine used in the regular Dubsta. It is stated to be powered by a large supercharged |
+ | As expected from a large 6-wheeled truck, the Dubsta 6x6 is exceptionally heavy, however it is a very stable vehicle. The Dubsta 6x6 retains the same engine used in the regular Dubsta. It is stated to be powered by a large supercharged V12 engine, however it is fitted with a modelled turbocharged straight-4, coupled to a 6-speed transmission, which is capable of powering the vehicle up steep slopes with relative ease. Just like the [[Seminole]], [[Habanero]] and [[Huntley S]], the Dubsta 6x6's engine features a modeled turbocharger. This is purely cosmetic and does not affect performance, unless the player purchases a Turbo modification at [[Los Santos Customs]]. |
Its top speed and acceleration are quite impressive (being superior to all Off-Road classed vehicles), but handling leaves much to be desired, as it has a large turning radius due to its long wheelbase. It understeers when off-road and/or when at high speed. Braking is also sub par, with upgrades doing little to improve it. |
Its top speed and acceleration are quite impressive (being superior to all Off-Road classed vehicles), but handling leaves much to be desired, as it has a large turning radius due to its long wheelbase. It understeers when off-road and/or when at high speed. Braking is also sub par, with upgrades doing little to improve it. |
||
| Line 118: | Line 110: | ||
|observed_engine = {{H:title|Front-engine, all wheel drive|F6}} {{H:title|Double Overhead Camshaft|DOHC}} Turbocharged Inline-4 <small>(In-game model)</small> |
|observed_engine = {{H:title|Front-engine, all wheel drive|F6}} {{H:title|Double Overhead Camshaft|DOHC}} Turbocharged Inline-4 <small>(In-game model)</small> |
||
|observed_drivetrain = AWD |
|observed_drivetrain = AWD |
||
| − | |rsc_image =Dubsta6x6-GTAV-RSCStats.PNG |
+ | |rsc_image = Dubsta6x6-GTAV-RSCStats.PNG |
| − | |rsc_top_speed ={{PercentBar|73.507538|width=150}} |
+ | |rsc_top_speed = {{PercentBar|73.507538|width=150}} |
| − | |rsc_acceleration ={{PercentBar|70|width=150}} |
+ | |rsc_acceleration = {{PercentBar|70|width=150}} |
| − | |rsc_braking ={{PercentBar|20|width=150}} |
+ | |rsc_braking = {{PercentBar|20|width=150}} |
| − | |rsc_traction ={{PercentBar|60.606064|width=150}} |
+ | |rsc_traction = {{PercentBar|60.606064|width=150}} |
}} |
}} |
||
| Line 128: | Line 120: | ||
===''Grand Theft Auto V''=== |
===''Grand Theft Auto V''=== |
||
{| class="wikitable" |
{| class="wikitable" |
||
| + | ! colspan="2" scope="col" |Category |
||
| − | !Type |
||
| + | ! scope="col" |Modification |
||
| − | !Upgrade |
||
| − | !Cost ( |
+ | ! scope="col" |Cost (''GTA V'') |
| − | !Cost ([[Grand Theft Auto Online|Online]]) |
+ | ! scope="col" |Cost ([[Grand Theft Auto Online|''GTA Online'']]) |
| + | ! scope="col" |Image |
||
| ⚫ | |||
| ⚫ | |||
| + | |No Armor |
||
| ⚫ | |||
| ⚫ | |||
|- |
|- |
||
| ⚫ | |||
|Armor Upgrade 20% |
|Armor Upgrade 20% |
||
| style="text-align: center;" |$1,250 |
| style="text-align: center;" |$1,250 |
||
| − | | style="text-align: center;" |$7,500 |
+ | | colspan="2" style="text-align: center;" |$7,500 |
|- |
|- |
||
|Armor Upgrade 40% |
|Armor Upgrade 40% |
||
| style="text-align: center;" |$3,125 |
| style="text-align: center;" |$3,125 |
||
| − | | style="text-align: center;" |$12,000 |
+ | | colspan="2" style="text-align: center;" |$12,000 |
|- |
|- |
||
|Armor Upgrade 60% |
|Armor Upgrade 60% |
||
| style="text-align: center;" |$5,000 |
| style="text-align: center;" |$5,000 |
||
| − | | style="text-align: center;" |$20,000 |
+ | | colspan="2" style="text-align: center;" |$20,000 |
|- |
|- |
||
|Armor Upgrade 80% |
|Armor Upgrade 80% |
||
| style="text-align: center;" |$8,750 |
| style="text-align: center;" |$8,750 |
||
| − | | style="text-align: center;" |$35,000 |
+ | | colspan="2" style="text-align: center;" |$35,000 |
|- |
|- |
||
|Armor Upgrade 100% |
|Armor Upgrade 100% |
||
| style="text-align: center;" |$12,500 |
| style="text-align: center;" |$12,500 |
||
| − | | style="text-align: center;" |$50,000 |
+ | | colspan="2" style="text-align: center;" |$50,000 |
| + | |- |
||
| ⚫ | |||
| + | |Stock Brakes |
||
| ⚫ | |||
| + | | colspan="2" style="text-align: center;" |$1,000 |
||
|- |
|- |
||
| ⚫ | |||
|Street Brakes |
|Street Brakes |
||
| style="text-align: center;" |$5,000 |
| style="text-align: center;" |$5,000 |
||
| − | | style="text-align: center;" |$20,000 |
+ | | colspan="2" style="text-align: center;" |$20,000 |
|- |
|- |
||
|Sport Brakes |
|Sport Brakes |
||
| style="text-align: center;" |$6,750 |
| style="text-align: center;" |$6,750 |
||
| − | | style="text-align: center;" |$27,000 |
+ | | colspan="2" style="text-align: center;" |$27,000 |
|- |
|- |
||
|Race Brakes |
|Race Brakes |
||
| style="text-align: center;" |$8,750 |
| style="text-align: center;" |$8,750 |
||
| − | | style="text-align: center;" |$35,000 |
+ | | colspan="2" style="text-align: center;" |$35,000 |
| + | |- |
||
| ⚫ | |||
| + | |Stock Front Bumper |
||
| + | | style="text-align: center;" |$750 |
||
| + | | style="text-align: center;" |$2,200 |
||
| + | | |
||
|- |
|- |
||
| ⚫ | |||
|Chrome Bullbar |
|Chrome Bullbar |
||
| style="text-align: center;" |$1,250 |
| style="text-align: center;" |$1,250 |
||
| − | | style="text-align: center;" |$ |
+ | | style="text-align: center;" |$4,600 |
| + | | |
||
|- |
|- |
||
|Bullbar & Winch |
|Bullbar & Winch |
||
| style="text-align: center;" |$1,650 |
| style="text-align: center;" |$1,650 |
||
| − | | style="text-align: center;" |$ |
+ | | style="text-align: center;" |$7,400 |
| + | | |
||
|- |
|- |
||
|Bullbar & Lights |
|Bullbar & Lights |
||
| style="text-align: center;" |$1,950 |
| style="text-align: center;" |$1,950 |
||
| − | | style="text-align: center;" |$ |
+ | | style="text-align: center;" |$11,700 |
| + | | |
||
|- |
|- |
||
|Bullbar with Winch & Lights |
|Bullbar with Winch & Lights |
||
| style="text-align: center;" |$2,350 |
| style="text-align: center;" |$2,350 |
||
| − | | style="text-align: center;" |$ |
+ | | style="text-align: center;" |$14,500 |
| + | | |
||
|- |
|- |
||
|Black Bullbar |
|Black Bullbar |
||
| style="text-align: center;" |$2,450 |
| style="text-align: center;" |$2,450 |
||
| − | | style="text-align: center;" |$ |
+ | | style="text-align: center;" |$14,700 |
| + | | |
||
|- |
|- |
||
|Black Bullbar, Winch & Lights |
|Black Bullbar, Winch & Lights |
||
| style="text-align: center;" |$2,550 |
| style="text-align: center;" |$2,550 |
||
| − | | style="text-align: center;" |$ |
+ | | style="text-align: center;" |$14,900 |
| + | | |
||
| + | |- |
||
| + | |Stock Rear Bumper |
||
| + | | style="text-align: center;" |$750 |
||
| + | | style="text-align: center;" |$2,200 |
||
| + | | |
||
|- |
|- |
||
|Chrome Rear Guard |
|Chrome Rear Guard |
||
| style="text-align: center;" |$1,250 |
| style="text-align: center;" |$1,250 |
||
| − | | style="text-align: center;" |$ |
+ | | style="text-align: center;" |$4,600 |
| + | | |
||
|- |
|- |
||
|Black Rear Guard |
|Black Rear Guard |
||
| style="text-align: center;" |$1,650 |
| style="text-align: center;" |$1,650 |
||
| − | | style="text-align: center;" |$ |
+ | | style="text-align: center;" |$7,400 |
| + | | |
||
|- |
|- |
||
| − | |rowspan="4"|Engine |
+ | | colspan="2" rowspan="4" |Engine |
|EMS Upgrade, Level 1 |
|EMS Upgrade, Level 1 |
||
| style="text-align: center;" |$2,250 |
| style="text-align: center;" |$2,250 |
||
| − | | style="text-align: center;" |$9,000 |
+ | | colspan="2" style="text-align: center;" |$9,000 |
|- |
|- |
||
|EMS Upgrade, Level 2 |
|EMS Upgrade, Level 2 |
||
| style="text-align: center;" |$3,125 |
| style="text-align: center;" |$3,125 |
||
| − | | style="text-align: center;" |$12,500 |
+ | | colspan="2" style="text-align: center;" |$12,500 |
|- |
|- |
||
|EMS Upgrade, Level 3 |
|EMS Upgrade, Level 3 |
||
| style="text-align: center;" |$4,500 |
| style="text-align: center;" |$4,500 |
||
| − | | style="text-align: center;" |$18,000 |
+ | | colspan="2" style="text-align: center;" |$18,000 |
|- |
|- |
||
|EMS Upgrade, Level 4 |
|EMS Upgrade, Level 4 |
||
| style="text-align: center;" |$8,375 |
| style="text-align: center;" |$8,375 |
||
| − | | style="text-align: center;" |$33,500 |
+ | | colspan="2" style="text-align: center;" |$33,500 |
| + | |- |
||
| + | | colspan="2" rowspan="2" |[[Car Bomb|Explosives]] |
||
| + | |Ignition Bomb |
||
| + | | style="text-align: center;" |N/A |
||
| + | | colspan="2" style="text-align: center;" |$5,000 |
||
| + | |- |
||
| + | |Remote Bomb |
||
| + | | style="text-align: center;" |N/A |
||
| + | | colspan="2" style="text-align: center;" |$7,500 |
||
| + | |- |
||
| + | | colspan="2" rowspan="4" |Grilles |
||
| + | |Stock Grille |
||
| + | | style="text-align: center;" |$100 |
||
| + | | style="text-align: center;" |$200 |
||
| + | | |
||
|- |
|- |
||
| ⚫ | |||
|Mesh Grille |
|Mesh Grille |
||
| style="text-align: center;" |$375 |
| style="text-align: center;" |$375 |
||
| − | | style="text-align: center;" |$ |
+ | | style="text-align: center;" |$750 |
| + | | |
||
|- |
|- |
||
|Black Grille |
|Black Grille |
||
| style="text-align: center;" |$670 |
| style="text-align: center;" |$670 |
||
| − | | style="text-align: center;" |$ |
+ | | style="text-align: center;" |$1,340 |
| + | | |
||
|- |
|- |
||
|Chrome Grille |
|Chrome Grille |
||
| style="text-align: center;" |$825 |
| style="text-align: center;" |$825 |
||
| − | | style="text-align: center;" |$ |
+ | | style="text-align: center;" |$1,650 |
| + | | |
||
| + | |- |
||
| + | | colspan="2" rowspan="3" |Hoods |
||
| + | |Stock Hood |
||
| + | | style="text-align: center;" |$450 |
||
| + | | style="text-align: center;" |$1,600 |
||
| + | | |
||
|- |
|- |
||
| ⚫ | |||
|Off-Road Hood |
|Off-Road Hood |
||
| style="text-align: center;" |$850 |
| style="text-align: center;" |$850 |
||
| − | | style="text-align: center;" |$ |
+ | | style="text-align: center;" |$3,000 |
| + | | |
||
|- |
|- |
||
|Off-Road Hood with Spare |
|Off-Road Hood with Spare |
||
| style="text-align: center;" |$1,200 |
| style="text-align: center;" |$1,200 |
||
| − | | style="text-align: center;" |$ |
+ | | style="text-align: center;" |$5,000 |
| + | | |
||
| + | |- |
||
| + | | colspan="2" |Horns |
||
| + | |''Main article: [[Los Santos Customs/Horns]]'' |
||
| + | | style="text-align: center;" | - |
||
| + | | colspan="2" style="text-align: center;" | - |
||
| + | |- |
||
| ⚫ | |||
| ⚫ | |||
| + | |Stock Lights |
||
| + | | style="text-align: center;" |$200 |
||
| + | | colspan="2" style="text-align: center;" |$400 |
||
|- |
|- |
||
| − | |rowspan="2"|Lights |
||
|Xenon Lights |
|Xenon Lights |
||
| style="text-align: center;" |$1,000 |
| style="text-align: center;" |$1,000 |
||
| − | | style="text-align: center;" |$5,000 |
+ | | colspan="2" style="text-align: center;" |$5,000 |
|- |
|- |
||
| + | |Neon Kits |
||
| − | |<div class="mw-collapsible mw-collapsed" style="width:100%"> |
||
| ⚫ | |||
| − | <div class="mw-collapsible-content"> |
||
| ⚫ | |||
| − | </div></div> |
||
| ⚫ | |||
| style="text-align: center;" | - |
| style="text-align: center;" | - |
||
| + | | colspan="2" style="text-align: center;" | - |
||
|- |
|- |
||
| − | |rowspan="2"|Loss/Theft Prevention |
+ | | colspan="2" rowspan="2" |Loss/Theft Prevention |
|Tracker |
|Tracker |
||
| style="text-align: center;" |N/A |
| style="text-align: center;" |N/A |
||
| − | | style="text-align: center;" |$2,000 |
+ | | colspan="2" style="text-align: center;" |$2,000 |
|- |
|- |
||
|Full Coverage |
|Full Coverage |
||
| style="text-align: center;" |N/A |
| style="text-align: center;" |N/A |
||
| − | | style="text-align: center;" |$ |
+ | | colspan="2" style="text-align: center;" |$ |
|- |
|- |
||
| + | | colspan="2" rowspan="5" |Plates |
||
| − | |Respray |
||
| + | |Blue on White 1 |
||
| − | |<div class="mw-collapsible mw-collapsed" style="width:100%"> |
||
| + | | style="text-align: center;" |$50 |
||
| − | <div class="mw-collapsible-content"> |
||
| + | | colspan="2" style="text-align: center;" |$200 |
||
| − | {{ResprayColorsExpand}} |
||
| + | |- |
||
| − | </div></div> |
||
| + | |Blue on White 2 |
||
| ⚫ | |||
| + | | style="text-align: center;" |$50 |
||
| + | | colspan="2" style="text-align: center;" |$200 |
||
| + | |- |
||
| + | |Blue on White 3 |
||
| + | | style="text-align: center;" |$50 |
||
| + | | colspan="2" style="text-align: center;" |$200 |
||
| + | |- |
||
| + | |Yellow on Blue |
||
| + | | style="text-align: center;" |$75 |
||
| + | | colspan="2" style="text-align: center;" |$300 |
||
| + | |- |
||
| + | |Yellow on Black |
||
| + | | style="text-align: center;" |$150 |
||
| + | | colspan="2" style="text-align: center;" |$600 |
||
| + | |- |
||
| + | | colspan="2" |Respray |
||
| + | |''Main article: [[Los Santos Customs/Respray Colors]]'' |
||
| style="text-align: center;" | - |
| style="text-align: center;" | - |
||
| + | | colspan="2" style="text-align: center;" | - |
||
| + | |- |
||
| + | | colspan="2" rowspan="5" |Roofs |
||
| + | |Stock Roof |
||
| + | | style="text-align: center;" |$100 |
||
| + | | style="text-align: center;" |$200 |
||
| + | | |
||
|- |
|- |
||
| − | |rowspan="4"|Roof |
||
|Roof Rack |
|Roof Rack |
||
| style="text-align: center;" |$350 |
| style="text-align: center;" |$350 |
||
| − | | style="text-align: center;" |$ |
+ | | style="text-align: center;" |$700 |
| + | | |
||
|- |
|- |
||
|Roof Rack with Spotlights |
|Roof Rack with Spotlights |
||
| style="text-align: center;" |$575 |
| style="text-align: center;" |$575 |
||
| − | | style="text-align: center;" |$ |
+ | | style="text-align: center;" |$1,150 |
| + | | |
||
|- |
|- |
||
|Black Roof Rack |
|Black Roof Rack |
||
| style="text-align: center;" |$800 |
| style="text-align: center;" |$800 |
||
| − | | style="text-align: center;" |$ |
+ | | style="text-align: center;" |$1,600 |
| + | | |
||
|- |
|- |
||
|Black Rack/Spotlights |
|Black Rack/Spotlights |
||
| style="text-align: center;" |$975 |
| style="text-align: center;" |$975 |
||
| − | | style="text-align: center;" |$ |
+ | | style="text-align: center;" |$1,950 |
| + | | |
||
|- |
|- |
||
| − | |Sell |
+ | | colspan="2" |Sell |
|Sell Vehicle |
|Sell Vehicle |
||
| style="text-align: center;" |N/A |
| style="text-align: center;" |N/A |
||
| − | | style="text-align: center;" |$ |
+ | | colspan="2" style="text-align: center;" |$ |
| + | |- |
||
| ⚫ | |||
| + | |Stock Suspension |
||
| + | | style="text-align: center;" |$100 |
||
| + | | colspan="2" style="text-align: center;" |$200 |
||
|- |
|- |
||
| ⚫ | |||
|Lowered Suspension |
|Lowered Suspension |
||
| style="text-align: center;" |$500 |
| style="text-align: center;" |$500 |
||
| − | | style="text-align: center;" |$1,000 |
+ | | colspan="2" style="text-align: center;" |$1,000 |
|- |
|- |
||
|Street Suspension |
|Street Suspension |
||
| style="text-align: center;" |$1,000 |
| style="text-align: center;" |$1,000 |
||
| − | | style="text-align: center;" |$2,000 |
+ | | colspan="2" style="text-align: center;" |$2,000 |
|- |
|- |
||
|Sport Suspension |
|Sport Suspension |
||
| style="text-align: center;" |$1,700 |
| style="text-align: center;" |$1,700 |
||
| − | | style="text-align: center;" |$3,400 |
+ | | colspan="2" style="text-align: center;" |$3,400 |
|- |
|- |
||
|Competition Suspension |
|Competition Suspension |
||
| style="text-align: center;" |$2,200 |
| style="text-align: center;" |$2,200 |
||
| − | | style="text-align: center;" |$4,400 |
+ | | colspan="2" style="text-align: center;" |$4,400 |
| + | |- |
||
| ⚫ | |||
| + | |Stock Transmission |
||
| + | | style="text-align: center;" |$250 |
||
| + | | colspan="2" style="text-align: center;" |$1,000 |
||
|- |
|- |
||
| ⚫ | |||
|Street Transmission |
|Street Transmission |
||
| style="text-align: center;" |$7,375 |
| style="text-align: center;" |$7,375 |
||
| − | | style="text-align: center;" |$ |
+ | | colspan="2" style="text-align: center;" |$29,500 |
|- |
|- |
||
|Sports Transmission |
|Sports Transmission |
||
| style="text-align: center;" |$8,125 |
| style="text-align: center;" |$8,125 |
||
| − | | style="text-align: center;" |$ |
+ | | colspan="2" style="text-align: center;" |$32,500 |
|- |
|- |
||
|Race Transmission |
|Race Transmission |
||
| style="text-align: center;" |$10,000 |
| style="text-align: center;" |$10,000 |
||
| − | | style="text-align: center;" |$ |
+ | | colspan="2" style="text-align: center;" |$40,000 |
| + | |- |
||
| + | | colspan="2" rowspan="2" |Turbo |
||
| + | |None |
||
| + | | style="text-align: center;" |$1,250 |
||
| + | | colspan="2" style="text-align: center;" |$5,000 |
||
|- |
|- |
||
| − | |Turbo |
||
|Turbo Tuning |
|Turbo Tuning |
||
| style="text-align: center;" |$6,250 |
| style="text-align: center;" |$6,250 |
||
| − | | style="text-align: center;" |$ |
+ | | colspan="2" style="text-align: center;" |$50,000 |
|- |
|- |
||
| − | |Wheels |
+ | | colspan="2" |Wheels |
| + | |''Main article: [[Los Santos Customs/Wheels]]'' |
||
| − | |<div class="mw-collapsible mw-collapsed" style="width:100%"> |
||
| − | <div class="mw-collapsible-content"> |
||
| − | {{WheelsExpand}} |
||
| − | </div></div> |
||
| ⚫ | |||
| style="text-align: center;" | - |
| style="text-align: center;" | - |
||
| + | | colspan="2" style="text-align: center;" | - |
||
| + | |- |
||
| ⚫ | |||
| + | |None |
||
| + | | style="text-align: center;" |$100 |
||
| + | | colspan="2" style="text-align: center;" |$500 |
||
|- |
|- |
||
| ⚫ | |||
|Light Smoke |
|Light Smoke |
||
| style="text-align: center;" |$200 |
| style="text-align: center;" |$200 |
||
| − | | style="text-align: center;" |$1,500 |
+ | | colspan="2" style="text-align: center;" |$1,500 |
|- |
|- |
||
|Dark Smoke |
|Dark Smoke |
||
| style="text-align: center;" |$450 |
| style="text-align: center;" |$450 |
||
| − | | style="text-align: center;" |$3,500 |
+ | | colspan="2" style="text-align: center;" |$3,500 |
|- |
|- |
||
|Limo |
|Limo |
||
| style="text-align: center;" |$700 |
| style="text-align: center;" |$700 |
||
| − | | style="text-align: center;" |$5,000 |
+ | | colspan="2" style="text-align: center;" |$5,000 |
|} |
|} |
||
| − | == |
+ | ==Image Gallery== |
| − | <gallery position="center"> |
+ | <gallery position="center" spacing="small" hideaddbutton="true"> |
| ⚫ | |||
| − | BenefactorDubsta6x6-Front-GTAV.png|Dubsta 6x6 on Xbox 360 and PlayStation 3 versions <small>([[:File:BenefactorDubsta6x6-Rear-GTAV.png|rear quarter view]])</small> |
+ | BenefactorDubsta6x6-Front-GTAV.png|'''Dubsta 6x6''' on Xbox 360 and PlayStation 3 versions <small>([[:File:BenefactorDubsta6x6-Rear-GTAV.png|rear quarter view]])</small> |
| ⚫ | |||
Dubsta6x6-GTAV-front.jpg|The '''Dubsta 6x6''' in GTA V. (<small>[[:Image:Dubsta6x6-GTAV-rear.jpg|Rear quarter view.]]</small>) |
Dubsta6x6-GTAV-front.jpg|The '''Dubsta 6x6''' in GTA V. (<small>[[:Image:Dubsta6x6-GTAV-rear.jpg|Rear quarter view.]]</small>) |
||
| + | Dubsta6x6-GTAV-Warstock.png|The '''Dubsta 6x6''' on [[Warstock Cache & Carry]]. |
||
Dubsta6x6-GTAV-RSC.jpg|The '''Dubsta 6x6''' on the [[Rockstar Games Social Club]]. |
Dubsta6x6-GTAV-RSC.jpg|The '''Dubsta 6x6''' on the [[Rockstar Games Social Club]]. |
||
</gallery> |
</gallery> |
||
| Line 381: | Line 473: | ||
! colspan="3" |''Grand Theft Auto V''<br />[[PlayStation 3]], [[PlayStation 4]], [[Xbox 360]], [[Xbox One]], [[Personal Computer|PC]] |
! colspan="3" |''Grand Theft Auto V''<br />[[PlayStation 3]], [[PlayStation 4]], [[Xbox 360]], [[Xbox One]], [[Personal Computer|PC]] |
||
|- |
|- |
||
| − | | rowspan="1" |[["I'm Not a Hipster" Update]] |
+ | | rowspan="1" |[["I'm Not a Hipster" Update]] |
| + | {{vague|patch number}} |
||
|06/17/2014 |
|06/17/2014 |
||
|Added Dubsta 6x6 |
|Added Dubsta 6x6 |
||
| Line 390: | Line 483: | ||
|03/14/2017 |
|03/14/2017 |
||
|Removed Rank 100 unlock requirement for purchasing. |
|Removed Rank 100 unlock requirement for purchasing. |
||
| ⚫ | |||
|} |
|} |
||
==Trivia== |
==Trivia== |
||
| + | ===''Grand Theft Auto V''=== |
||
| ⚫ | |||
| ⚫ | |||
| − | *The Dubsta 6x6 is the only civilian car to feature a six-wheel-drive system. |
||
| ⚫ | |||
*Before an update, only the rear two wheels would spin upon acceleration, this was fixed later on, however, the patch still only makes it 4-wheel drive, unlike its name suggests. All wheels will spin, if the vehicle is stuck on its bottom. |
*Before an update, only the rear two wheels would spin upon acceleration, this was fixed later on, however, the patch still only makes it 4-wheel drive, unlike its name suggests. All wheels will spin, if the vehicle is stuck on its bottom. |
||
| − | *A minor visual glitch is present on the Dubsta 6x6. If players riding in the bed aim their gun or turn their torsos a certain way, their bodies will clip through the rollbars as if they |
+ | *A minor visual glitch is present on the Dubsta 6x6. If players riding in the bed aim their gun or turn their torsos a certain way, their bodies will clip through the rollbars as if they were not there. |
*The Dubsta 6x6 has similarities to the [[Bravado]] [[Bison]], [[Canis]] [[Bodhi]] and [[Vapid]] [[Guardian]], in that players may ride in the cargo area of the vehicle. |
*The Dubsta 6x6 has similarities to the [[Bravado]] [[Bison]], [[Canis]] [[Bodhi]] and [[Vapid]] [[Guardian]], in that players may ride in the cargo area of the vehicle. |
||
| − | * |
+ | *The lights on the front bullbar and the roof racks are non-functional. |
| − | *Just like the [[Seminole]], [[Habanero]] and [[Huntley S]], the Dubsta 6x6's engine features modeled turbocharger. This is purely cosmetic and does not affect performance, unless the player purchases a Turbo modification at [[Los Santos Customs]]. |
||
*Because of the rank requirement, the vehicle cannot be used in off-road or SUV races unless the player has unlocked the vehicle. |
*Because of the rank requirement, the vehicle cannot be used in off-road or SUV races unless the player has unlocked the vehicle. |
||
**The release of the Gunrunning update now allows the Dubsta 6x6 to be selected in races for both the SUV and Off-road categories if the player does not own one, as the rank requirement has been removed. |
**The release of the Gunrunning update now allows the Dubsta 6x6 to be selected in races for both the SUV and Off-road categories if the player does not own one, as the rank requirement has been removed. |
||
| + | *The default radio stations for the Dubsta 6x6 are [[Radio Los Santos]], [[West Coast Classics]] and [[The Lab]]. |
||
| + | |||
| + | ==References== |
||
| + | {{Reflist}} |
||
==Navigation== |
==Navigation== |
||
| Line 419: | Line 513: | ||
[[Category:Off-Road Vehicles]] |
[[Category:Off-Road Vehicles]] |
||
[[Category:DLC Vehicles in GTA V]] |
[[Category:DLC Vehicles in GTA V]] |
||
| ⚫ | |||
[[Category:Off-Road Vehicle Class]] |
[[Category:Off-Road Vehicle Class]] |
||
[[Category:All wheel drive vehicles]] |
[[Category:All wheel drive vehicles]] |
||
| ⚫ | |||
| + | [[Category:Vehicles in "I'm Not a Hipster" Update]] |
||
| + | [[Category:DLC Vehicles]] |
||
Revision as of 01:24, 17 July 2019
Template:Infobox vehicles
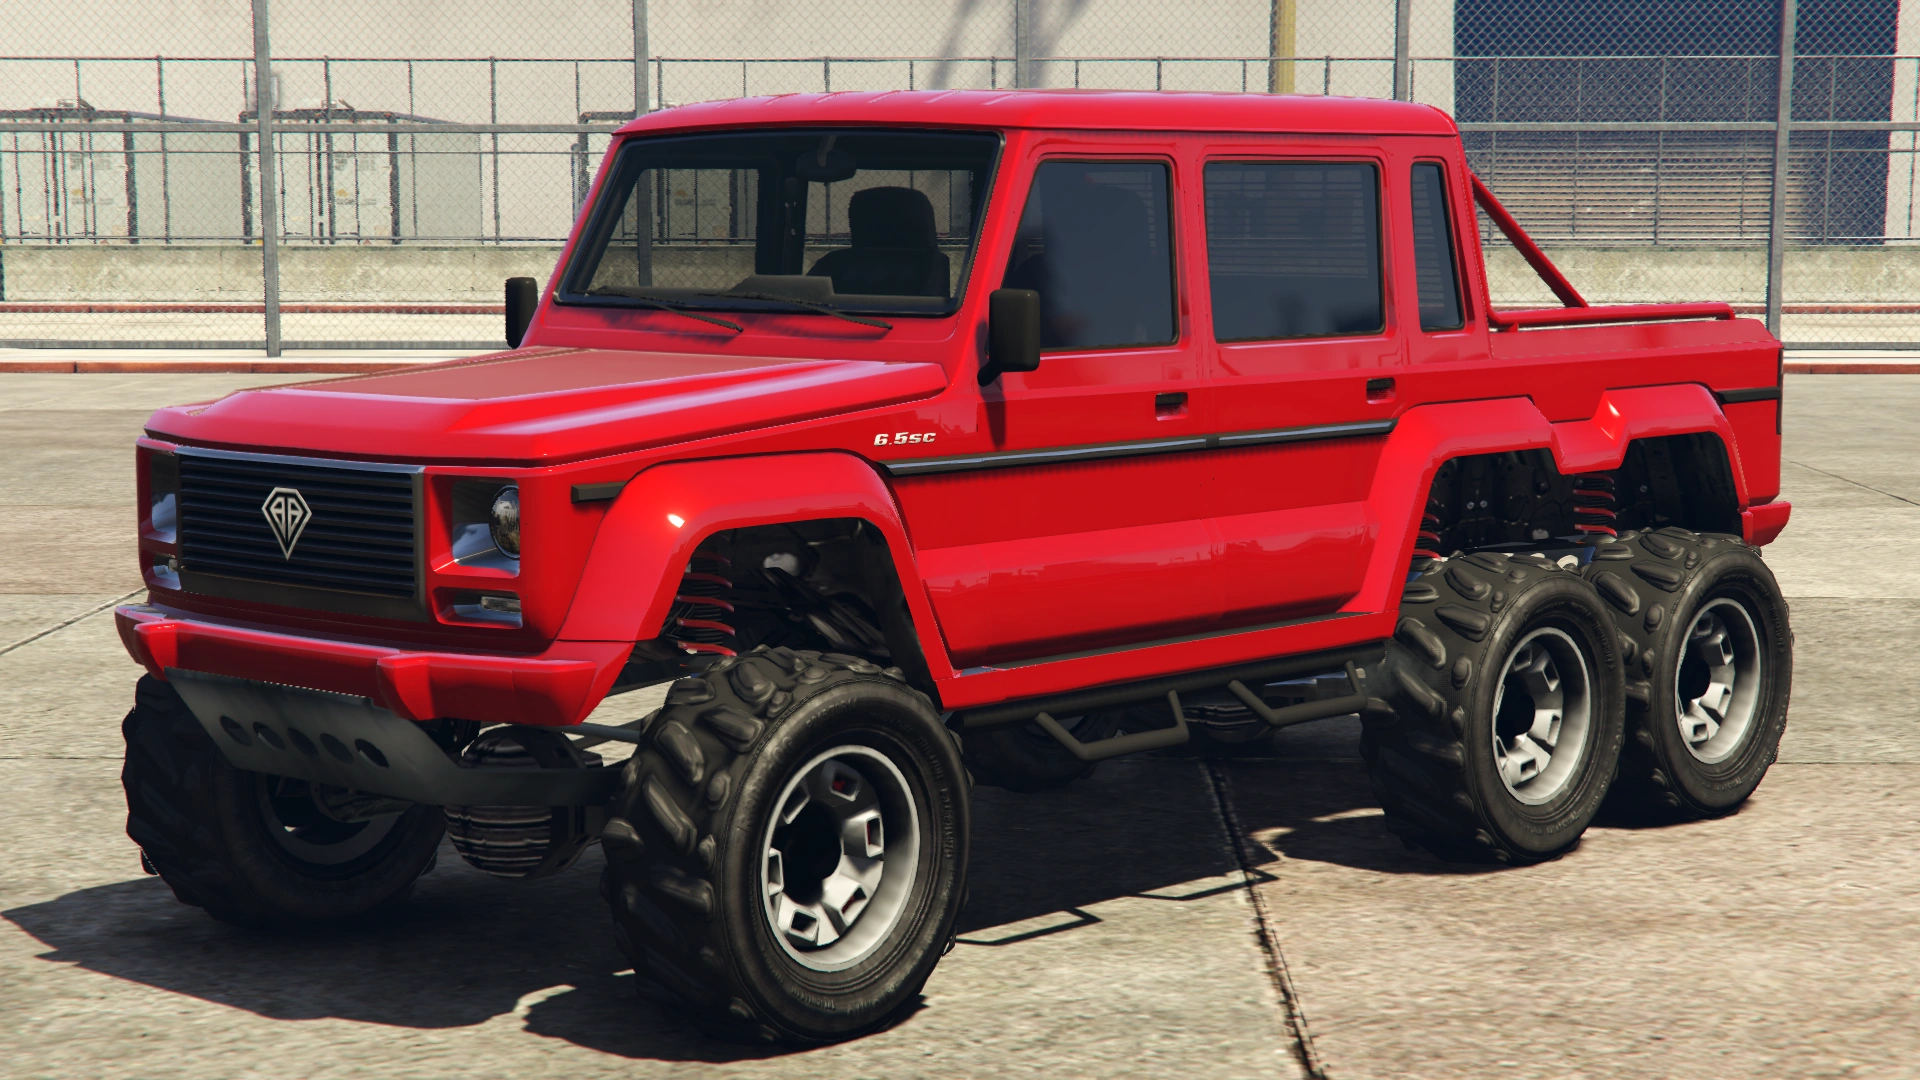
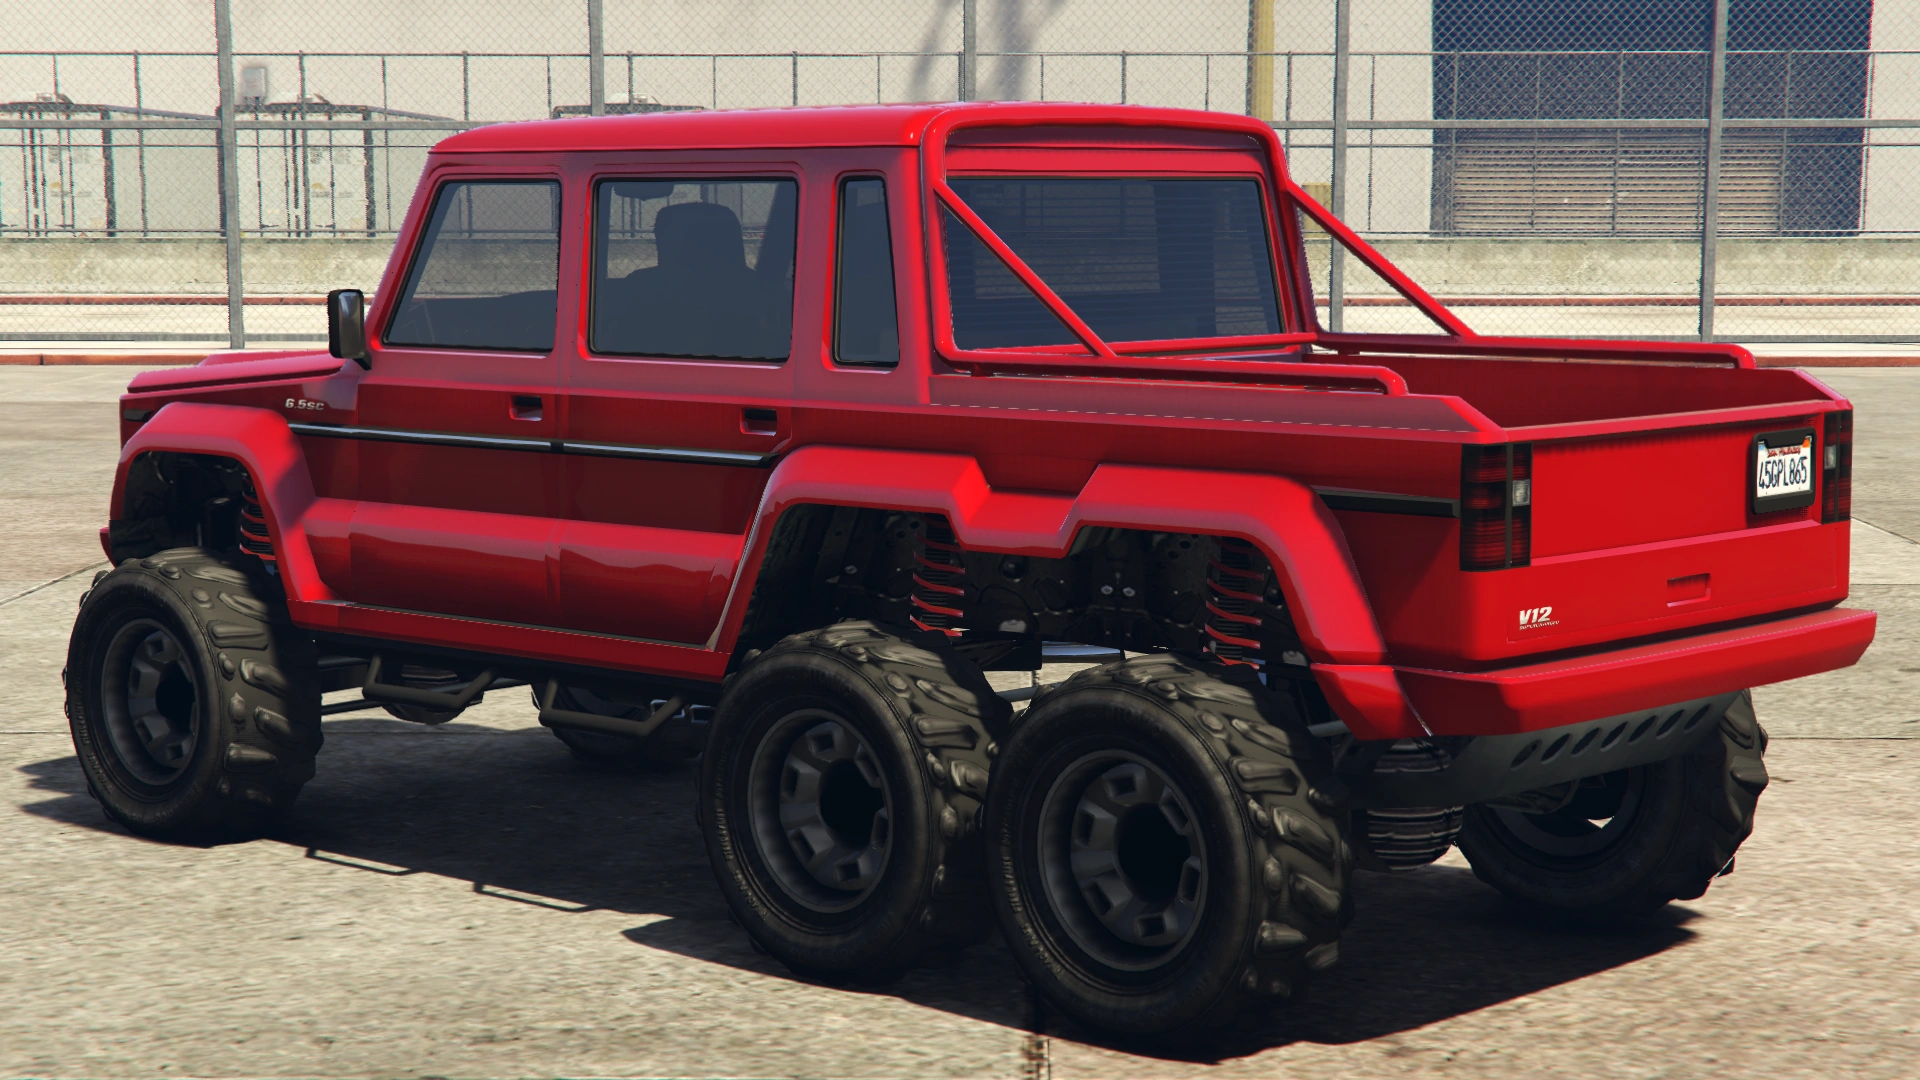
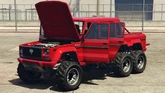
The Benefactor Dubsta 6x6 is an off-road variant of the Dubsta, featured in Grand Theft Auto V and Grand Theft Auto Online as part of the "I'm Not a Hipster" Update.
Design
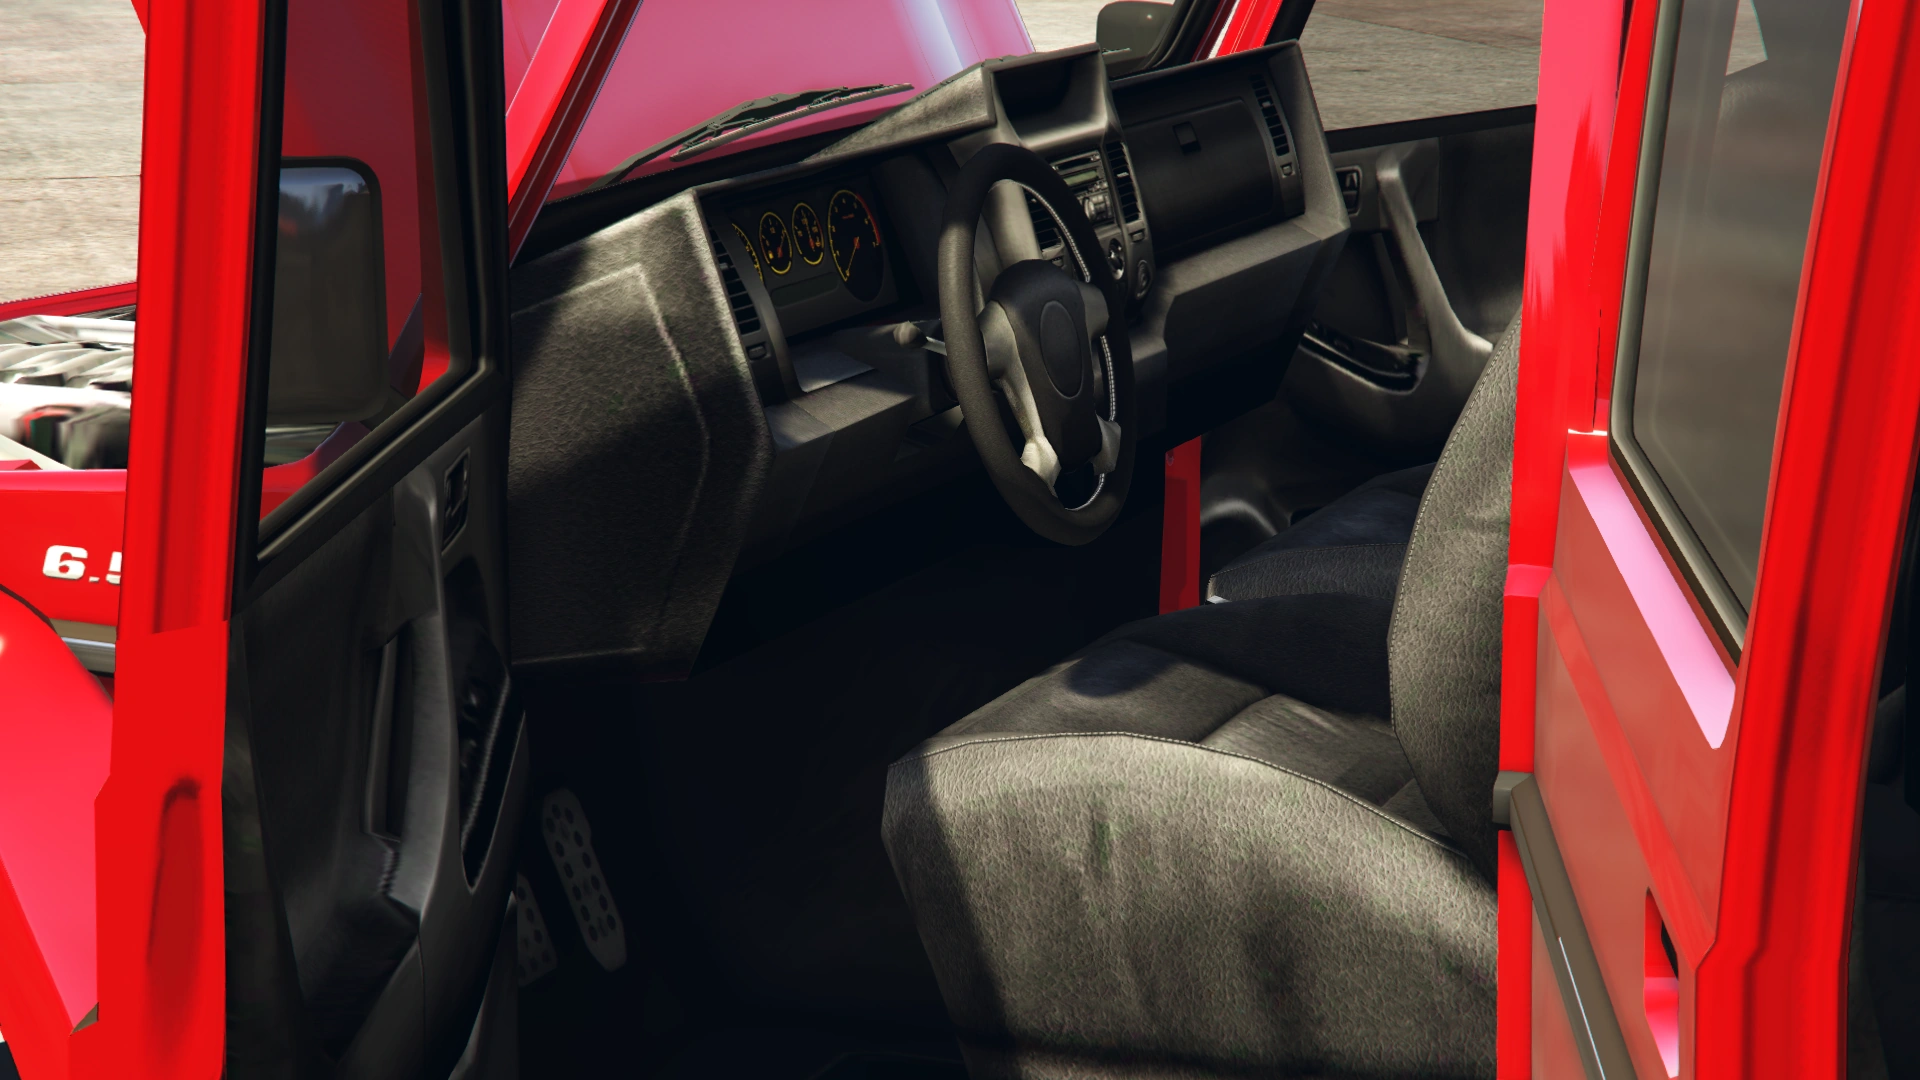
Grand Theft Auto V
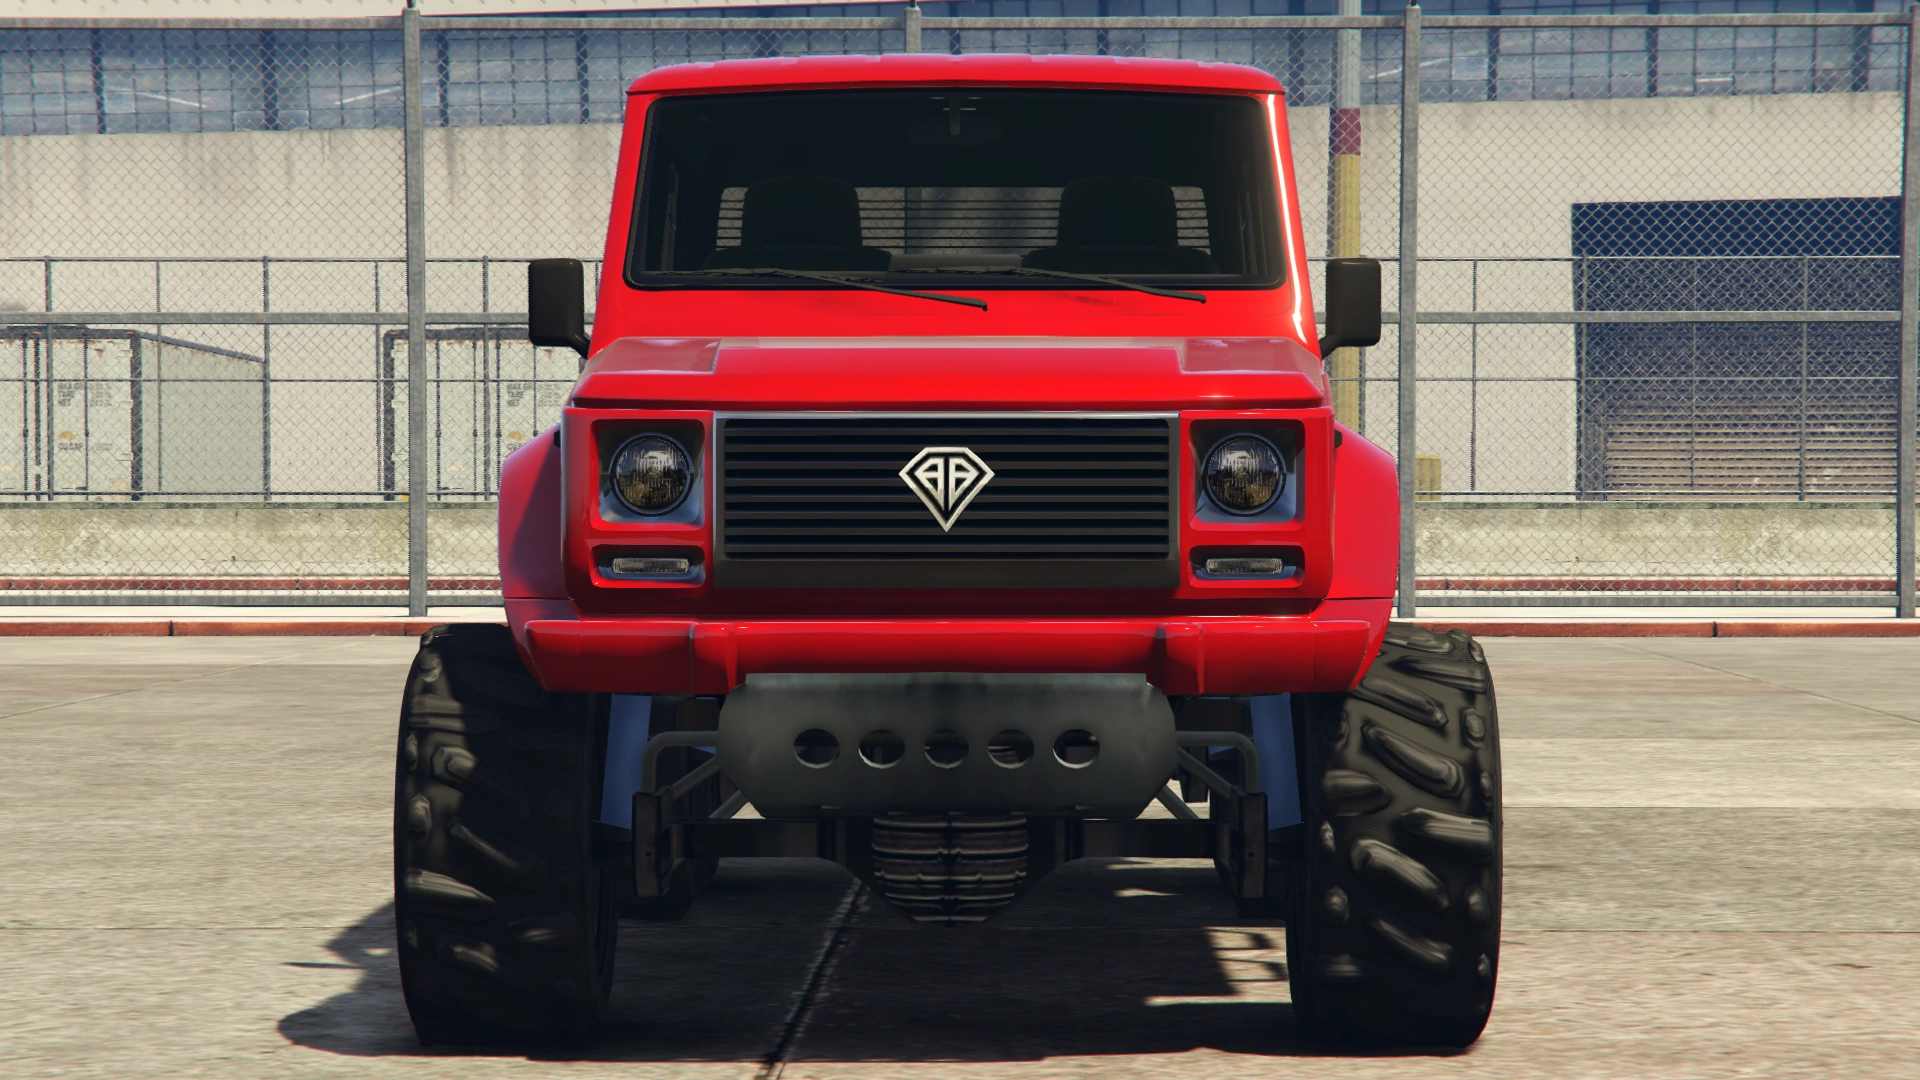
The Dubsta 6x6 closely resembles the Mercedes-Benz G63 AMG 6x6, the 6x6 variant of the Mercedes-Benz G63. The vehicle may also draw some inspirations from the Mercedes-Benz G Class models modified by the aftermarket tuning company Brabus.
In contrast to the stock Dubsta, the 6x6 comes equipped with a large skid plate at the front and rear. The stock wheel design for the 6x6 also differs from that of the standard Dubsta.
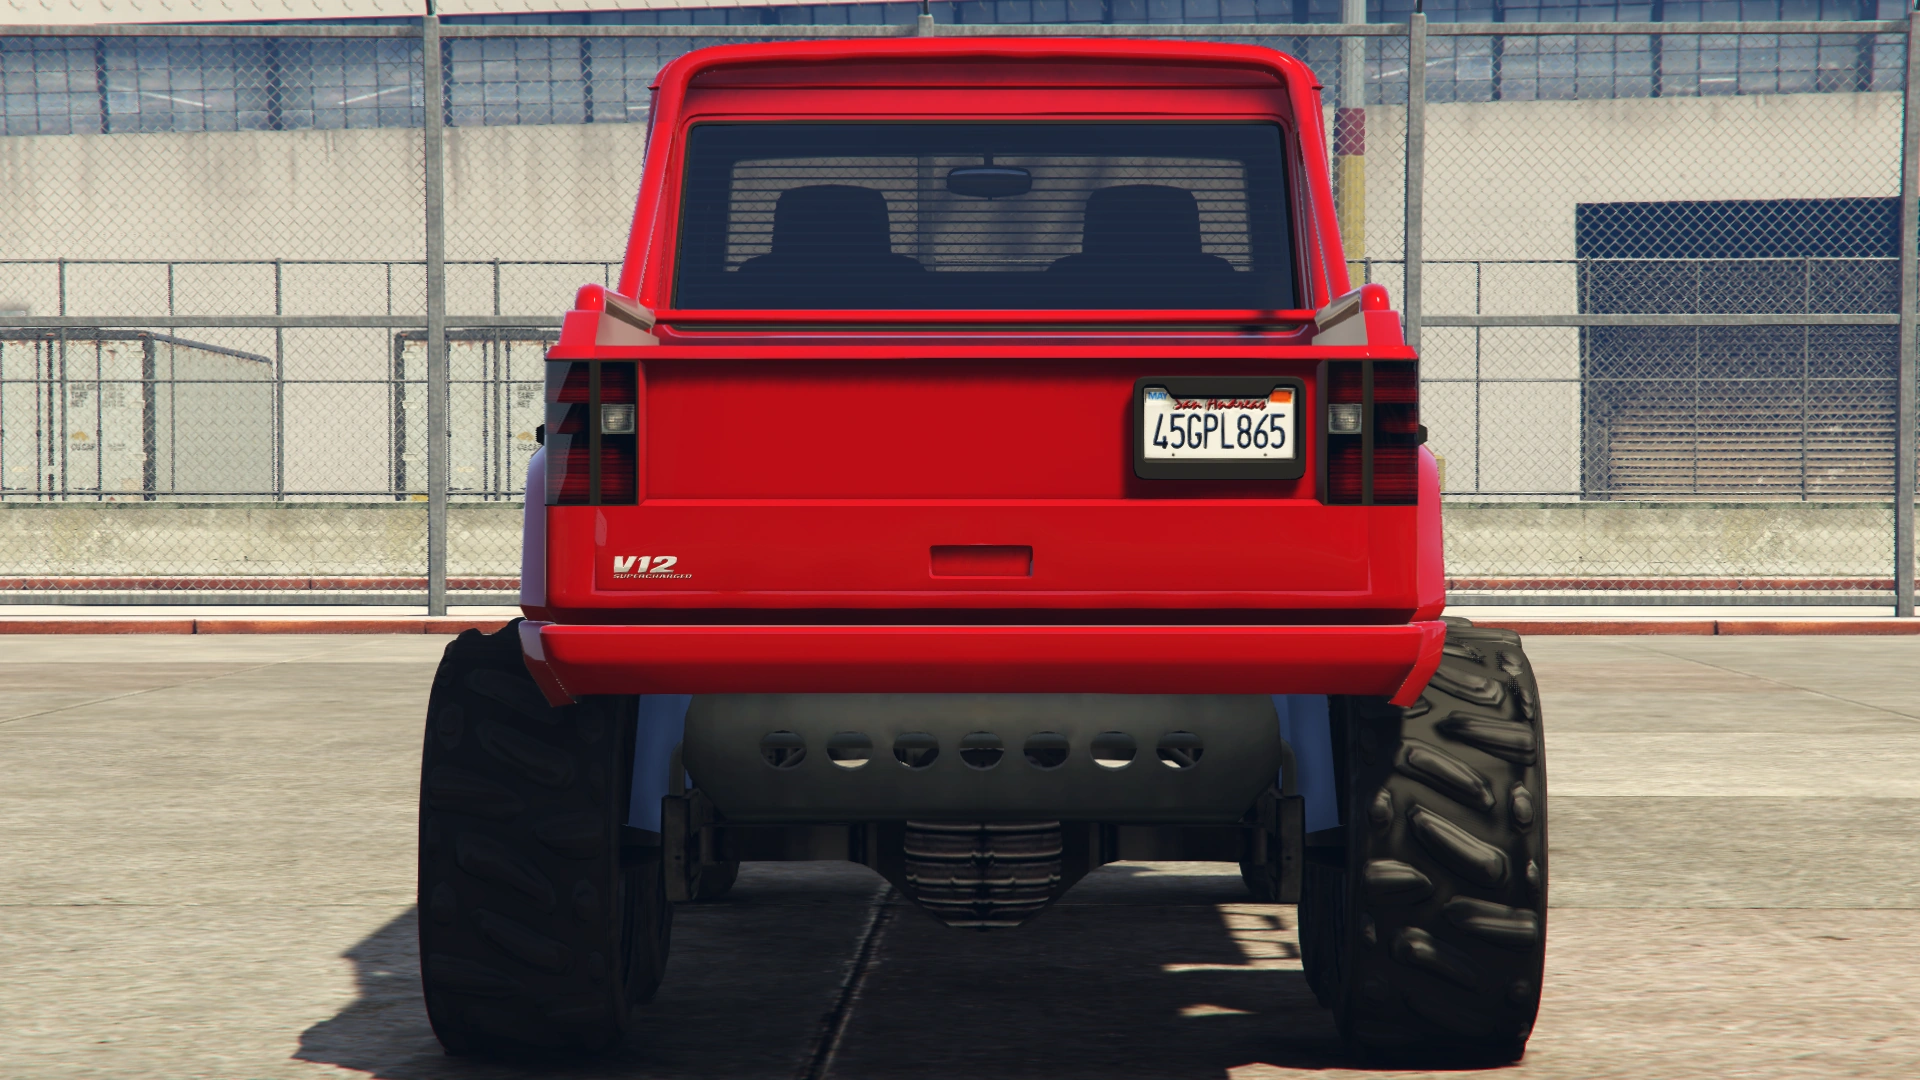
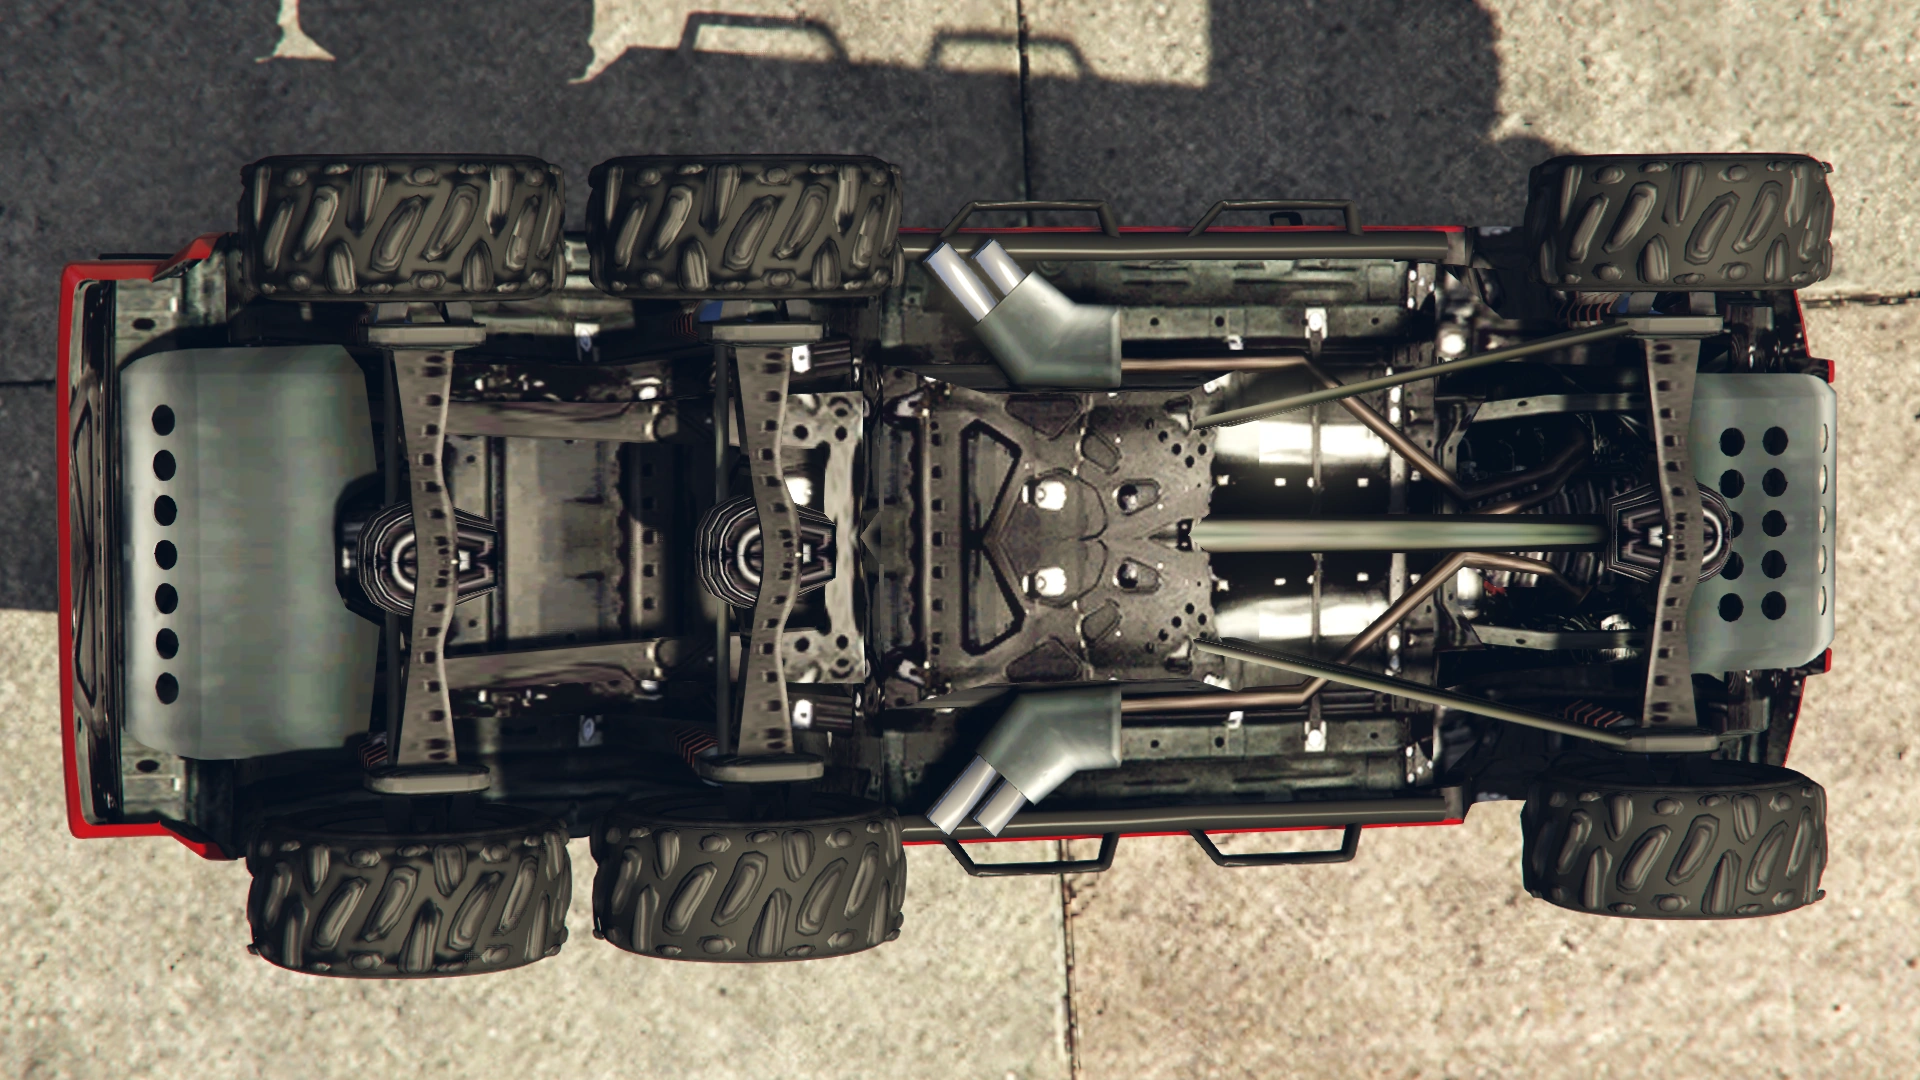
Just like the G63 6x6, the Dubsta 6x6 has a truck bed along with an extended chassis to accommodate the extra rear axle. Like the real-life counterpart, the Dubsta 6x6 comes with load bed roll bars as standard (albeit a smaller group). The truck also has a higher ground clearance to make way for the bigger off-road purpose tires.
It shares the rim design with the Merryweather variant of the Mesa and the Sandking XL.
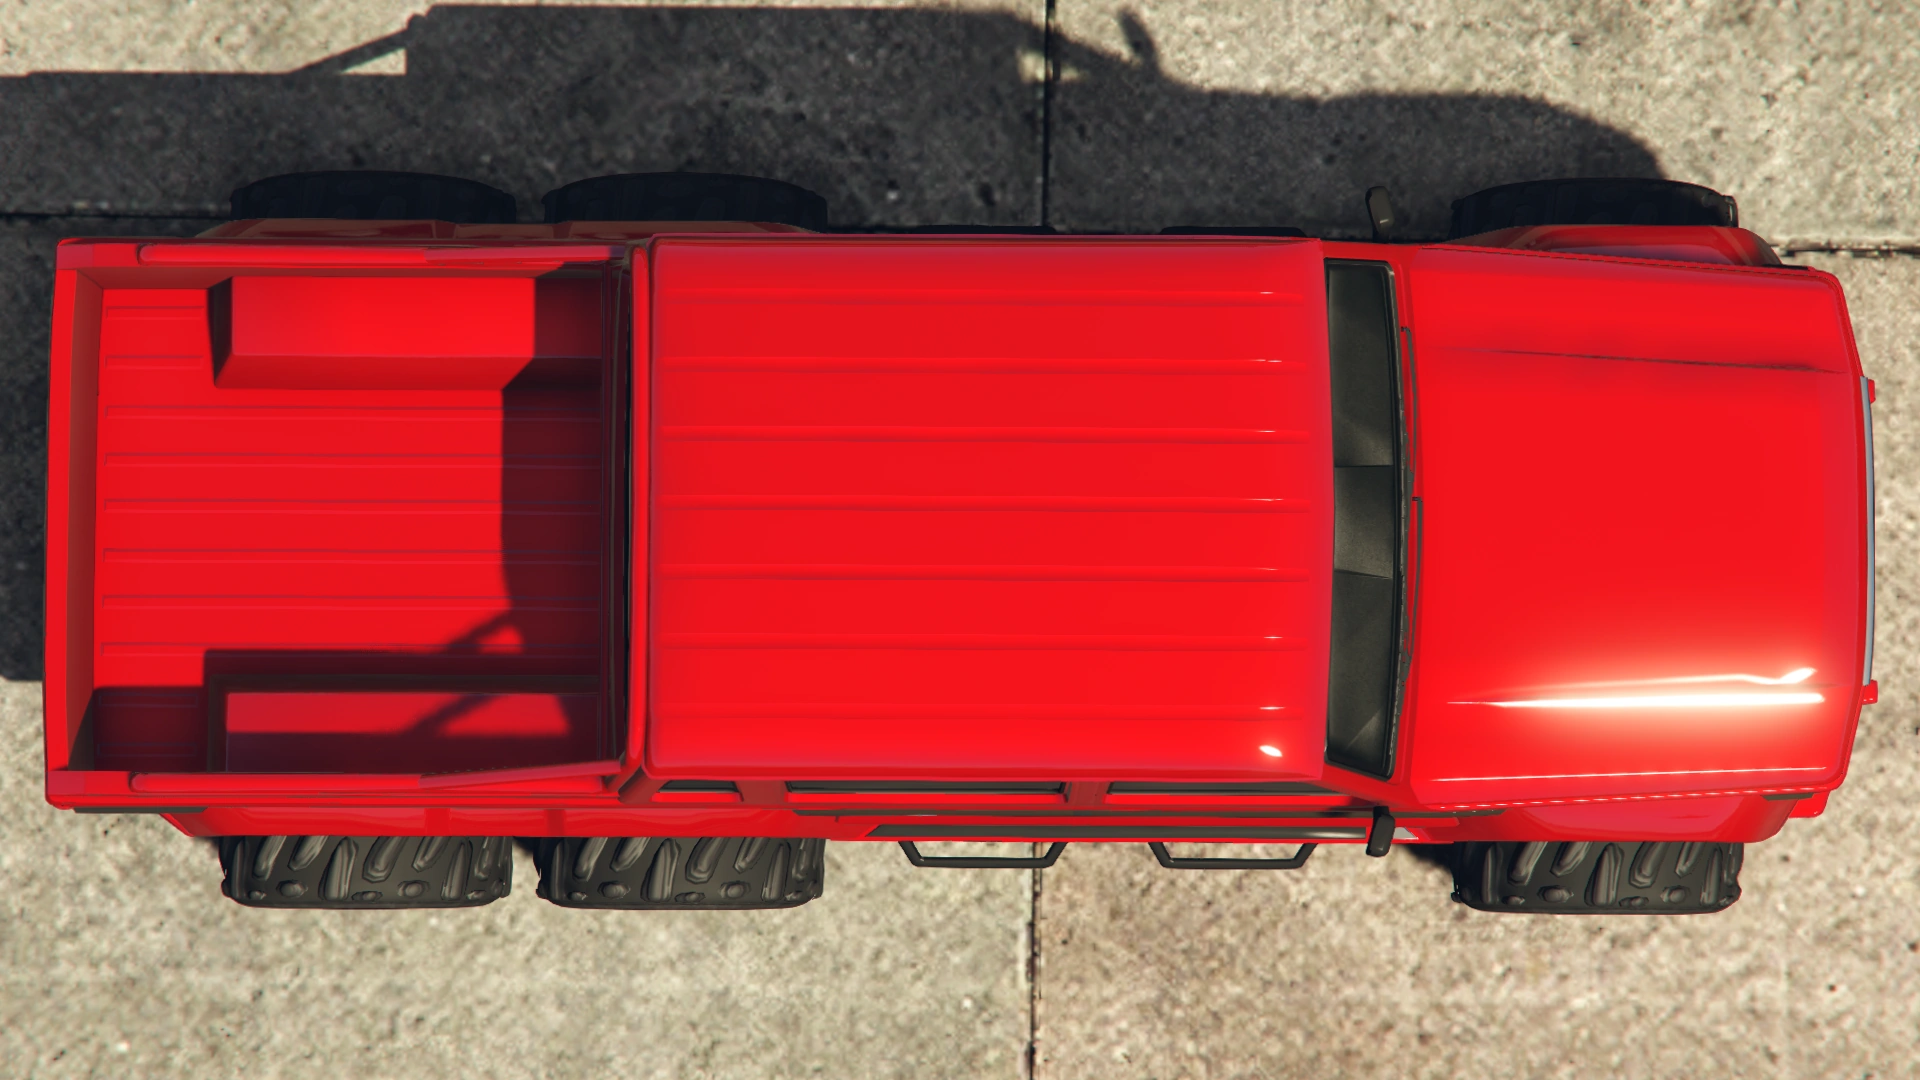
Current Design Gallery


Performance
Grand Theft Auto V
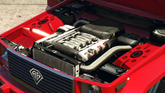
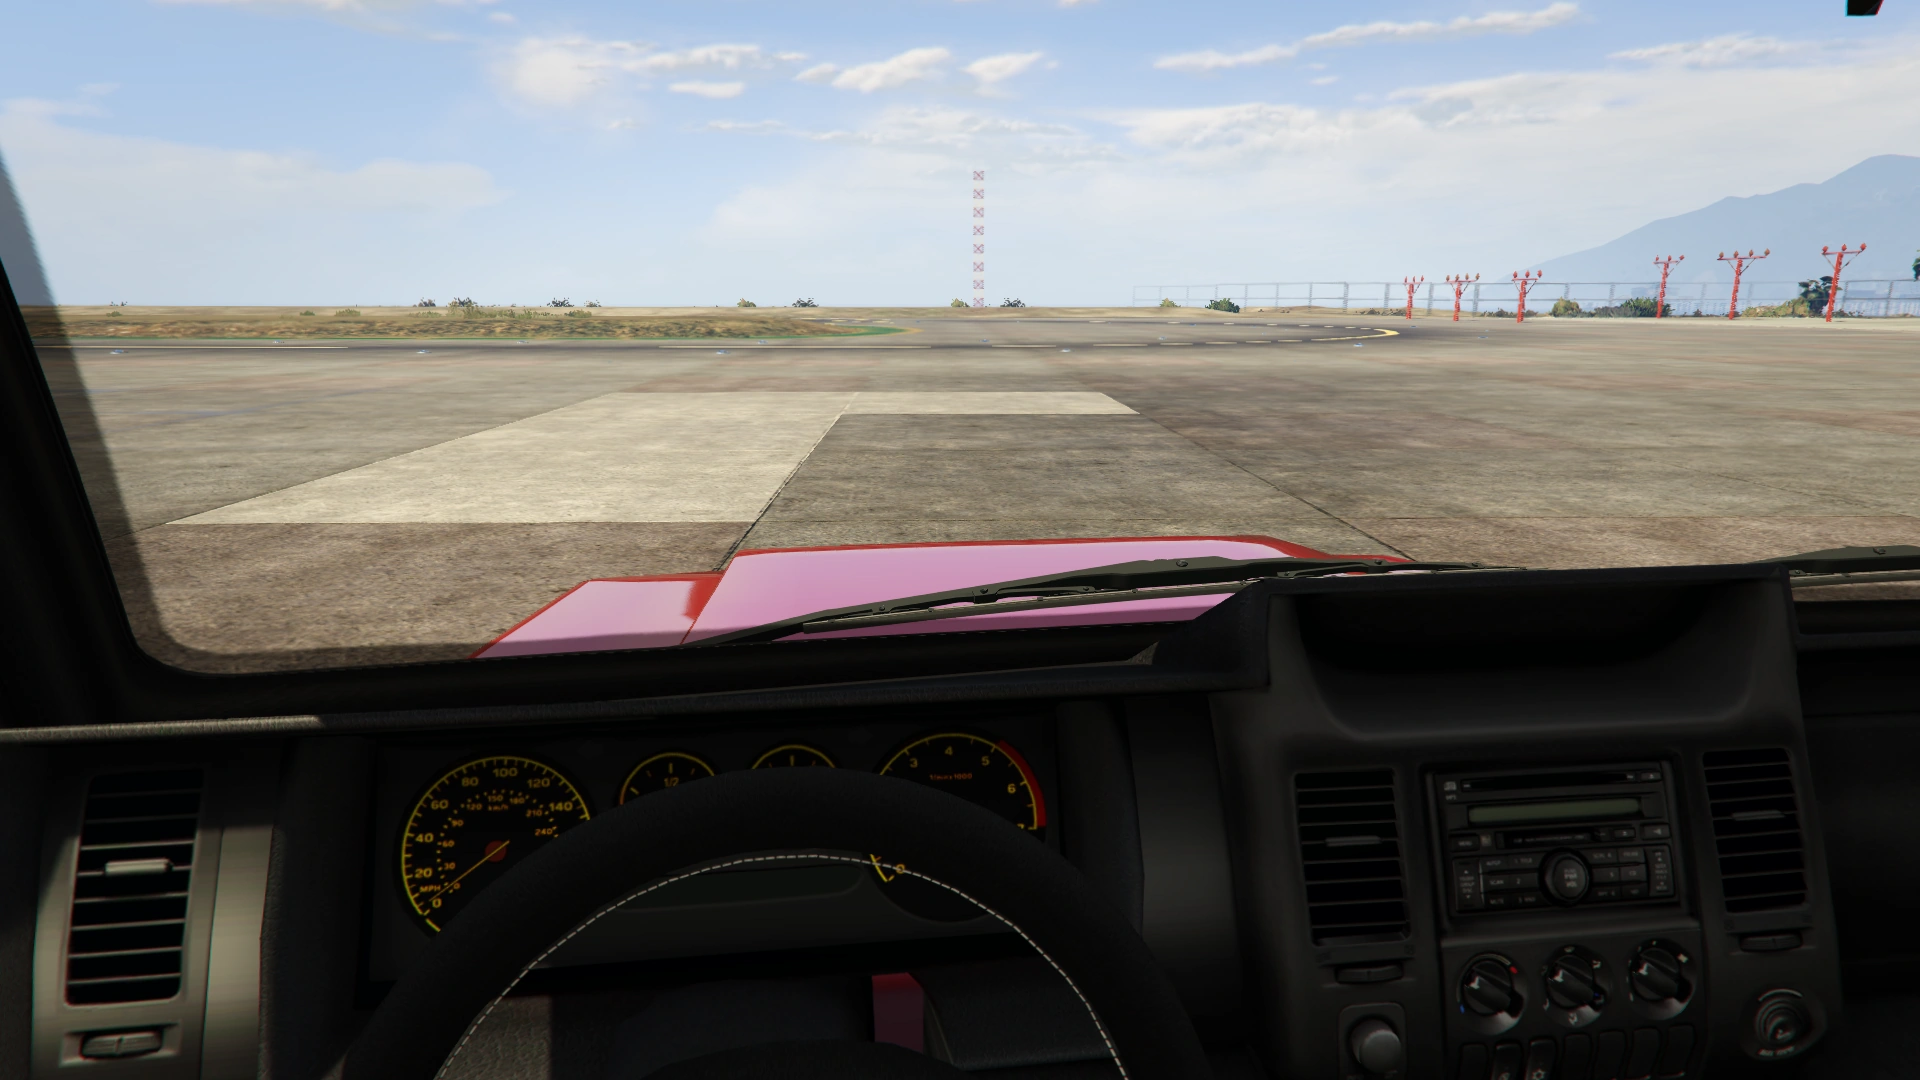
As expected from a large 6-wheeled truck, the Dubsta 6x6 is exceptionally heavy, however it is a very stable vehicle. The Dubsta 6x6 retains the same engine used in the regular Dubsta. It is stated to be powered by a large supercharged V12 engine, however it is fitted with a modelled turbocharged straight-4, coupled to a 6-speed transmission, which is capable of powering the vehicle up steep slopes with relative ease. Just like the Seminole, Habanero and Huntley S, the Dubsta 6x6's engine features a modeled turbocharger. This is purely cosmetic and does not affect performance, unless the player purchases a Turbo modification at Los Santos Customs.
Its top speed and acceleration are quite impressive (being superior to all Off-Road classed vehicles), but handling leaves much to be desired, as it has a large turning radius due to its long wheelbase. It understeers when off-road and/or when at high speed. Braking is also sub par, with upgrades doing little to improve it.
Durability is excellent, as it is able to withstand many head-on collisions before the engine fails. The 6x6 can easily push smaller cars off the road and it can withstand large amounts of gunfire. Bulletproof tyres are highly recommended as for its handling not be hindered by gunfire from its large, exposed tyres. Heavy off-roading (frequent crashing into rocks) causes lots of minor visible damage and eventually the front suspension breaks, causing massive understeer.
The Dubsta 6X6 can withstand a great amount of water depth; it can go as deep as its grille badge before the engine cuts off.
GTA V Overview
| Acceleration (0-60 mph in Seconds) |
Top Speed (mph / kmh) |
Gears | Engine | Drivetrain (FWD / RWD / AWD) |
Mass (kg / lbs) |
Fuel Tank Size (litres) |
|---|---|---|---|---|---|---|
| N/A | 85 / 137 | 6 | N/A | AWD 35% FWD 65% RWD |
3500 / 7716 | 80 |
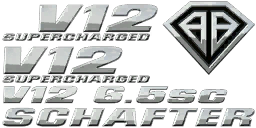
| N/A | N/A | N/A | 6.5L Supercharged V12 (Badging) | 6x6 (AWD) (In-game name) | N/A | N/A |
| N/A | N/A | N/A | F6 DOHC Turbocharged Inline-4 (In-game model) | AWD | Cannot be observed | Cannot be observed |
Modifications
Grand Theft Auto V
| Category | Modification | Cost (GTA V) | Cost (GTA Online) | Image | |
|---|---|---|---|---|---|
| Armor | No Armor | $250 | $1,000 | ||
| Armor Upgrade 20% | $1,250 | $7,500 | |||
| Armor Upgrade 40% | $3,125 | $12,000 | |||
| Armor Upgrade 60% | $5,000 | $20,000 | |||
| Armor Upgrade 80% | $8,750 | $35,000 | |||
| Armor Upgrade 100% | $12,500 | $50,000 | |||
| Brakes | Stock Brakes | $250 | $1,000 | ||
| Street Brakes | $5,000 | $20,000 | |||
| Sport Brakes | $6,750 | $27,000 | |||
| Race Brakes | $8,750 | $35,000 | |||
| Bumpers | Stock Front Bumper | $750 | $2,200 | ||
| Chrome Bullbar | $1,250 | $4,600 | |||
| Bullbar & Winch | $1,650 | $7,400 | |||
| Bullbar & Lights | $1,950 | $11,700 | |||
| Bullbar with Winch & Lights | $2,350 | $14,500 | |||
| Black Bullbar | $2,450 | $14,700 | |||
| Black Bullbar, Winch & Lights | $2,550 | $14,900 | |||
| Stock Rear Bumper | $750 | $2,200 | |||
| Chrome Rear Guard | $1,250 | $4,600 | |||
| Black Rear Guard | $1,650 | $7,400 | |||
| Engine | EMS Upgrade, Level 1 | $2,250 | $9,000 | ||
| EMS Upgrade, Level 2 | $3,125 | $12,500 | |||
| EMS Upgrade, Level 3 | $4,500 | $18,000 | |||
| EMS Upgrade, Level 4 | $8,375 | $33,500 | |||
| Explosives | Ignition Bomb | N/A | $5,000 | ||
| Remote Bomb | N/A | $7,500 | |||
| Grilles | Stock Grille | $100 | $200 | ||
| Mesh Grille | $375 | $750 | |||
| Black Grille | $670 | $1,340 | |||
| Chrome Grille | $825 | $1,650 | |||
| Hoods | Stock Hood | $450 | $1,600 | ||
| Off-Road Hood | $850 | $3,000 | |||
| Off-Road Hood with Spare | $1,200 | $5,000 | |||
| Horns | Main article: Los Santos Customs/Horns | - | - | ||
| Lights | Headlights | Stock Lights | $200 | $400 | |
| Xenon Lights | $1,000 | $5,000 | |||
| Neon Kits | Main article: Los Santos Customs/Lights | - | - | ||
| Loss/Theft Prevention | Tracker | N/A | $2,000 | ||
| Full Coverage | N/A | $ | |||
| Plates | Blue on White 1 | $50 | $200 | ||
| Blue on White 2 | $50 | $200 | |||
| Blue on White 3 | $50 | $200 | |||
| Yellow on Blue | $75 | $300 | |||
| Yellow on Black | $150 | $600 | |||
| Respray | Main article: Los Santos Customs/Respray Colors | - | - | ||
| Roofs | Stock Roof | $100 | $200 | ||
| Roof Rack | $350 | $700 | |||
| Roof Rack with Spotlights | $575 | $1,150 | |||
| Black Roof Rack | $800 | $1,600 | |||
| Black Rack/Spotlights | $975 | $1,950 | |||
| Sell | Sell Vehicle | N/A | $ | ||
| Suspension | Stock Suspension | $100 | $200 | ||
| Lowered Suspension | $500 | $1,000 | |||
| Street Suspension | $1,000 | $2,000 | |||
| Sport Suspension | $1,700 | $3,400 | |||
| Competition Suspension | $2,200 | $4,400 | |||
| Transmission | Stock Transmission | $250 | $1,000 | ||
| Street Transmission | $7,375 | $29,500 | |||
| Sports Transmission | $8,125 | $32,500 | |||
| Race Transmission | $10,000 | $40,000 | |||
| Turbo | None | $1,250 | $5,000 | ||
| Turbo Tuning | $6,250 | $50,000 | |||
| Wheels | Main article: Los Santos Customs/Wheels | - | - | ||
| Windows | None | $100 | $500 | ||
| Light Smoke | $200 | $1,500 | |||
| Dark Smoke | $450 | $3,500 | |||
| Limo | $700 | $5,000 | |||
Image Gallery
")
")
")
")
Prominent Appearances in Missions
Grand Theft Auto Online
- The Dubsta 6x6 is the primary ground support vehicle for Cliffford's clone mercenaries, and is used by them in four of the Doomsday Heist's Act III setup missions: Rescue Agent 14, Escort ULP, Barrage and Khanjali.
Locations
Grand Theft Auto V
- Original version
- Available in every protagonist's garage after installing the I'm Not a Hipster update in single player.
- Enhanced version
- Can be bought from Warstock Cache & Carry for $249,000.
Grand Theft Auto Online
- Once the update is installed it can be purchased for $249,000 from Warstock Cache & Carry.
- Prior to the Cunning Stunts: Special Vehicle Circuit update, the vehicle could only be purchased after reaching rank 100.
Events
Grand Theft Auto Online
- Price reduced to $174,300 (30% off) during Halloween Event 2016 (28 October - 7 November 2016).[1]
Changes
| Update | Change(s) | |
|---|---|---|
| Grand Theft Auto V PlayStation 3, PlayStation 4, Xbox 360, Xbox One, PC | ||
| "I'm Not a Hipster" Update
[vague] |
06/17/2014 | Added Dubsta 6x6 |
| Grand Theft Auto V PlayStation 4, Xbox One, PC | ||
| 1.39 | 03/14/2017 | Removed Rank 100 unlock requirement for purchasing. |
Trivia
Grand Theft Auto V
- For some reason, the Dubsta 6x6 lacks a rear driveshaft.
- Before an update, only the rear two wheels would spin upon acceleration, this was fixed later on, however, the patch still only makes it 4-wheel drive, unlike its name suggests. All wheels will spin, if the vehicle is stuck on its bottom.
- A minor visual glitch is present on the Dubsta 6x6. If players riding in the bed aim their gun or turn their torsos a certain way, their bodies will clip through the rollbars as if they were not there.
- The Dubsta 6x6 has similarities to the Bravado Bison, Canis Bodhi and Vapid Guardian, in that players may ride in the cargo area of the vehicle.
- The lights on the front bullbar and the roof racks are non-functional.
- Because of the rank requirement, the vehicle cannot be used in off-road or SUV races unless the player has unlocked the vehicle.
- The release of the Gunrunning update now allows the Dubsta 6x6 to be selected in races for both the SUV and Off-road categories if the player does not own one, as the rank requirement has been removed.
- The default radio stations for the Dubsta 6x6 are Radio Los Santos, West Coast Classics and The Lab.