Car1234567 (talk | contribs) No edit summary Tag: Visual edit |
Car1234567 (talk | contribs) No edit summary |
||
| (13 intermediate revisions by 10 users not shown) | |||
| Line 66: | Line 66: | ||
As expected, armor can be found lying about in specific points of the city (distinguishable by its red glow) as well as underground weapon dealers in ''GTA IV''. [[Enforcer]] armored vans still provide the player some armor, but only gives the player roughly one third of the maximum amount. |
As expected, armor can be found lying about in specific points of the city (distinguishable by its red glow) as well as underground weapon dealers in ''GTA IV''. [[Enforcer]] armored vans still provide the player some armor, but only gives the player roughly one third of the maximum amount. |
||
| − | When equipped, the [[Heads-Up Display|HUD]] will represent it as a blue half-circle bar located next to the [[radar]], along with the green [[health]] bar. Similarly, when aiming at armored targets, the weapon's reticle will have a smaller, |
+ | When equipped, the [[Heads-Up Display|HUD]] will represent it as a blue half-circle bar located next to the [[radar]], along with the green [[health]] bar. Similarly, when aiming at armored targets, the weapon's reticle will have a smaller, light blue circle next to the health bar, usually seen on [[National Office of Security Enforcement|NOOSE]]/[[Federal Investigation Bureau|FIB]] agents. |
====''Grand Theft Auto: Chinatown Wars''==== |
====''Grand Theft Auto: Chinatown Wars''==== |
||
| Line 82: | Line 82: | ||
! width="12%" |Cost <small>([[Grand Theft Auto Online|Online]])</small> |
! width="12%" |Cost <small>([[Grand Theft Auto Online|Online]])</small> |
||
|- |
|- |
||
| − | |Super Light Armor<br>(20% armor) |
+ | |Super Light Armor<br />(20% armor) |
|''This body armor offers good protection from small-caliber handgun projectiles but is also extremely lightweight and easily concealable.'' |
|''This body armor offers good protection from small-caliber handgun projectiles but is also extremely lightweight and easily concealable.'' |
||
|[[Money|$]]500 |
|[[Money|$]]500 |
||
|$100 <small>([[Rank]] 5)</small> |
|$100 <small>([[Rank]] 5)</small> |
||
|- |
|- |
||
| − | |Light Armor<br>(40% armor) |
+ | |Light Armor<br />(40% armor) |
|''This lightweight body armor combines the comfort and mobility of a soft vest with the option of hard armor inserts for extra protection.'' |
|''This lightweight body armor combines the comfort and mobility of a soft vest with the option of hard armor inserts for extra protection.'' |
||
|$1,000 |
|$1,000 |
||
|$200 <small>(Rank 10)</small> |
|$200 <small>(Rank 10)</small> |
||
|- |
|- |
||
| − | |Standard Armor<br>(60% armor) |
+ | |Standard Armor<br />(60% armor) |
|''Featuring full-size hard armor panels to the front and rear, with the option to fit additional soft side panels, this ballistic vest offers excellent protection from handgun and rifle projectiles.'' |
|''Featuring full-size hard armor panels to the front and rear, with the option to fit additional soft side panels, this ballistic vest offers excellent protection from handgun and rifle projectiles.'' |
||
|$1,500 |
|$1,500 |
||
|$300 <small>(Rank 15)</small> |
|$300 <small>(Rank 15)</small> |
||
|- |
|- |
||
| − | |Heavy Armor<br>(80% armor) |
+ | |Heavy Armor<br />(80% armor) |
|''This heavy-duty ballistic vest comes with full-size front and rear hard armor panels and optional hard armor side inserts for all-round protection.'' |
|''This heavy-duty ballistic vest comes with full-size front and rear hard armor panels and optional hard armor side inserts for all-round protection.'' |
||
|$2,000 |
|$2,000 |
||
|$400 <small>(Rank 20)</small> |
|$400 <small>(Rank 20)</small> |
||
|- |
|- |
||
| − | |Super Heavy Armor<br>(100% armor) |
+ | |Super Heavy Armor<br />(100% armor) |
|''This heavy-duty body armor features full-size high tensile strength ballistic plate to the front, rear and sides for maximum protection against large-caliber firearm projectiles and high-explosive shell fragments.'' |
|''This heavy-duty body armor features full-size high tensile strength ballistic plate to the front, rear and sides for maximum protection against large-caliber firearm projectiles and high-explosive shell fragments.'' |
||
|$2,500 |
|$2,500 |
||
|$500 <small>(Rank 25)</small> |
|$500 <small>(Rank 25)</small> |
||
|} |
|} |
||
| + | |||
{{Verify}} |
{{Verify}} |
||
Armor suits have been reported to be massively weaker in ''[[Grand Theft Auto Online]]'', even at 100%. Probably to compensate for this, players are able to have up to a maximum of ten reserve armor vests (at [[Rank|level]] 135) in their inventories. |
Armor suits have been reported to be massively weaker in ''[[Grand Theft Auto Online]]'', even at 100%. Probably to compensate for this, players are able to have up to a maximum of ten reserve armor vests (at [[Rank|level]] 135) in their inventories. |
||
| Line 162: | Line 163: | ||
*[[Belleville Park]]: |
*[[Belleville Park]]: |
||
**Near the safehouse after collecting 50 hidden packages. |
**Near the safehouse after collecting 50 hidden packages. |
||
| − | **On roof of the destroyed [[Uncle BJ's Deli & Groceries]], near the [[Liberty City Fire Department (3D Universe)|Fire Station]]. Use the [[Shoreside Lift Bridge]] as a ramp to get there. It is also a [[Sniper Rifle|Sniper ]] |
+ | **On roof of the destroyed [[Uncle BJ's Deli & Groceries]], near the [[Liberty City Fire Department (3D Universe)|Fire Station]]. Use the [[Shoreside Lift Bridge]] as a ramp to get there. It is also a [[Sniper Rifle|Sniper location]]. |
*[[Fort Staunton]] - on second floor of the building in [[Panlantic Construction Company|Panlantic Constrution]] site, near a health pickup (take the ramp in the west side, follow it to the end then turn right on the stairs). |
*[[Fort Staunton]] - on second floor of the building in [[Panlantic Construction Company|Panlantic Constrution]] site, near a health pickup (take the ramp in the west side, follow it to the end then turn right on the stairs). |
||
*[[Liberty Campus]] - on porch of the north building. |
*[[Liberty Campus]] - on porch of the north building. |
||
| Line 199: | Line 200: | ||
'''[[Downtown (Vice City)|Downtown]]''' |
'''[[Downtown (Vice City)|Downtown]]''' |
||
| − | *On roof of a building near the test track at the north of the district (use the stairs behind). |
+ | *On roof of a building near the [[Downtown Dirt Track|test track]] at the north of the district (use the stairs behind). |
*On roof of [[Hyman Condo]] (10 [[Hidden Packages]] collected award). |
*On roof of [[Hyman Condo]] (10 [[Hidden Packages]] collected award). |
||
*In a alley at south of The Well Stacked Pizza. |
*In a alley at south of The Well Stacked Pizza. |
||
| Line 213: | Line 214: | ||
'''[[Vercetti Estate]], [[Starfish Island]] (after "[[Rub Out]]")''' |
'''[[Vercetti Estate]], [[Starfish Island]] (after "[[Rub Out]]")''' |
||
*Southeast beside the steps leading to the upper garden (10 [[Hidden Packages]] collected award). |
*Southeast beside the steps leading to the upper garden (10 [[Hidden Packages]] collected award). |
||
| − | *In a small room at bottom of the stairs |
+ | *In a small room at bottom of the stairs. |
| − | *In the lounge North of the main hall central staircase. |
+ | *In the lounge North of the main hall central staircase (after "[[Keep Your Friends Close...]]"). |
'''[[Vice Port]]''' |
'''[[Vice Port]]''' |
||
*In the entrance of a building North across the street from the big ship. |
*In the entrance of a building North across the street from the big ship. |
||
| − | *Between some crates in the parking lot beside Vice City Transport Police (east of [[Escobar International Airport]]). |
+ | *Between some crates in the parking lot beside [[Vice City Transport Police]] (east of [[Escobar International Airport]]). |
'''[[Fort Baxter Air Base|Fort Baxter]]''' |
'''[[Fort Baxter Air Base|Fort Baxter]]''' |
||
| Line 250: | Line 251: | ||
'''[[San Fierro (3D Universe)|San Fierro]]''' |
'''[[San Fierro (3D Universe)|San Fierro]]''' |
||
| − | * |
+ | *[[Doherty]] - At the torn down building at [[The Waste Ground]] behind the [[Doherty Garage]]. |
*[[Easter Basin]] - At the base of the hill under the freeway, at the north end of the large red [[Solarin Industries|brick factory]] due west of the docks. |
*[[Easter Basin]] - At the base of the hill under the freeway, at the north end of the large red [[Solarin Industries|brick factory]] due west of the docks. |
||
| Line 288: | Line 289: | ||
*[[Verdant Meadows]] - In the middle of the wreckage, inside of a fuselage. |
*[[Verdant Meadows]] - In the middle of the wreckage, inside of a fuselage. |
||
'''[[Tierra Robada]]''' |
'''[[Tierra Robada]]''' |
||
| − | * [[Bayside Marina|Bayside]] - At the beach north of Bayside Marina, where a [[Vortex]] also |
+ | * [[Bayside Marina|Bayside]] - At the beach north of Bayside Marina, where a [[Vortex]] also spawns. |
===''Grand Theft Auto: Liberty City Stories''=== |
===''Grand Theft Auto: Liberty City Stories''=== |
||
| Line 335: | Line 336: | ||
'''[[Broker]]''' |
'''[[Broker]]''' |
||
*[[Cerveza Heights]] - On the rooftop of [[Sum Yung Gai]] building, inside the large noodle bowl with chopsticks. Can be accessed with the help of a car to access from the emergency stairs on the south side, or by getting into the [[Subway in GTA IV|subway]] overpass from the [[Huntington Street LTA]] station and jump into the rooftop. |
*[[Cerveza Heights]] - On the rooftop of [[Sum Yung Gai]] building, inside the large noodle bowl with chopsticks. Can be accessed with the help of a car to access from the emergency stairs on the south side, or by getting into the [[Subway in GTA IV|subway]] overpass from the [[Huntington Street LTA]] station and jump into the rooftop. |
||
| − | * |
+ | *[[East Hook]] - In the [[Platypus]] control bridge up top with the steering wheel, but is only accessible via helicopter, as the location is only available in the mission [[A Dish Served Cold]] (Only if choosen Revenge after the mission [[One Last Thing]]). |
| − | * |
+ | *[[Firefly Projects]] - In a junkyard to the right, between the junk and the roofing, in the leftover remains of a pickup. |
| − | * |
+ | *[[Francis Intl. Airport]]: |
| − | ** |
+ | **Northwest of an orange and white box, behind the cement barrier. Careful, as one will get a 4-star [[Wanted Level in GTA IV|wanted level]]. |
| − | ** |
+ | **On some rooftop generators of the FIA area. There is a ladder on the side to access it. |
| − | ** |
+ | **In a small grassy area, near the airport fuel station just off the [[Broker - Dukes Expressway]] |
| − | * |
+ | *[[Hove Beach]] - Across from the first safehouse on the billboard. It is really hard to get it, the player have to jump off the Broker - Dukes Expressway to the north to access the rooftops and them carefully jump to the billboard to get it. |
| − | * |
+ | *[[Meadow Hills]] - Behind a two-car brick garage off [[Stillwater Avenue|Sillwater Ave]]. |
| − | * |
+ | *[[South Slopes]] - On the east side of a steel gated door, in an alley north of [[Sundance Street|Sundance St]]. |
| − | * |
+ | *[[Steinway]] - North [[Dukes Drive]], under the boardwalk on the rocks, as it descends down to the water. |
'''[[Dukes]]''' |
'''[[Dukes]]''' |
||
| Line 350: | Line 351: | ||
'''[[Bohan]]''' |
'''[[Bohan]]''' |
||
| − | * |
+ | *[[Chase Point]] - In the corner of the top floor of the unfinished building on [[Folsom Way]]. |
*[[Fortside]]: |
*[[Fortside]]: |
||
**On the pier, on [[Grand Boulevard]]. |
**On the pier, on [[Grand Boulevard]]. |
||
| Line 357: | Line 358: | ||
'''[[Algonquin]]''' |
'''[[Algonquin]]''' |
||
*[[Castle Gardens]] - In a pipe of the construction area. |
*[[Castle Gardens]] - In a pipe of the construction area. |
||
| − | * |
+ | *[[Charge Island]]: |
| − | ** |
+ | **Near two large spools and the stairs behind the boathouse. The player may see it on the mission "[[Catch The Wave]]", given by [[Phil Bell]]. |
** On an angled catwalk near a large electrical box. The player may see it on the mission "[[Diamonds Are a Girl's Best Friend]]", given by [[Gerald McReary]]. |
** On an angled catwalk near a large electrical box. The player may see it on the mission "[[Diamonds Are a Girl's Best Friend]]", given by [[Gerald McReary]]. |
||
| − | * |
+ | *[[Colony Island]] - In the graveyard behind an Angel Statue marker. |
| − | * |
+ | *[[Hatton Gardens]] - In a construction area, underneath the ramp the player may use to get in it. |
| − | * |
+ | *[[Lancaster]] - In a small alley, north of the [[Skeeza]] shop off [[Albany Avenue|Albany Ave]]. |
| − | * |
+ | *[[Northwood]] - At the junction on the docks between the wood and cement (off [[Grummer Road]]), on the lowest level. |
| − | * |
+ | *Below the [[Northwood Heights Bridge]] support, between the columns. |
| − | * |
+ | *[[Purgatory]] - In the southwest corner of the parking garage on the second level, next to a trash receptacle in Purgatory. |
| − | * |
+ | *[[Star Junction]]: |
**On the rooftop patio near the red and yellow [[Logger Beer]] umbrella in Star Junction, at the [[Majestic Hotel]]. It is only accessible via helicopter, as the area is only accessible in the mission "[[Late Checkout]]", given by [[Ray Boccino]]. |
**On the rooftop patio near the red and yellow [[Logger Beer]] umbrella in Star Junction, at the [[Majestic Hotel]]. It is only accessible via helicopter, as the area is only accessible in the mission "[[Late Checkout]]", given by [[Ray Boccino]]. |
||
| − | ** |
+ | **On a back alley ledge off [[Lorimar Street|Lorimar St]], where it is possible to see some skylights. The player may use the dumpsters to access it. |
| − | * |
+ | *[[The Exchange]]: |
| − | ** |
+ | **Near the stairs behind the Supermarket off [[Borlock Road|Borlock Rd]]. |
| − | * |
+ | *At the northernmost point of the star-shaped base of the [[Statue of Happiness]], on [[Happiness Island]]. |
| − | * |
+ | *[[The Triangle]] - In an alley, on the northwest corner of the block. Its a slim alley to go into. |
'''[[Alderney]]''' |
'''[[Alderney]]''' |
||
| − | * |
+ | *[[Acter]] - In an alley near the corner building off [[Lee Road|Lee Rd]]. To find it, climb the wall on the side, where police cars are usually seen, and finding the way down the alley to the armor. |
| − | * |
+ | *[[Acter Industrial Park]]: |
| − | ** |
+ | **On the western side, near a burning barrel on the railroad tracks. |
| − | ** |
+ | **Inside an old warehouse, just inside the door. The player may see it in the mission "[[Pegorino's Pride]]" given by [[Jimmy Pegorino]]. |
*[[Alderney City]]: |
*[[Alderney City]]: |
||
| − | ** |
+ | **At the end of the easternmost wall at the [[Liberty Ferry Terminal]]. |
| − | ** |
+ | **Near some red and white plastic crates off [[Jonestown Avenue|Jonestown Ave]]. |
| − | * |
+ | *[[Berchem]]: |
| − | ** |
+ | **Next to the west wall of the [[Plumbers Skyway]], on the ground. |
| − | ** |
+ | **Next to the stairs from the building that leads out into the parking lot of [[Babbage Drive]] and [[Fleming Street|Fleming St]]. The player can get there from the east side building entry and walking up the stairs. |
| − | * |
+ | *[[Leftwood]] - North-east from [[Franklin Street (Alderney)|Franklin St]] and [[Rand Avenue|Rand Ave]] junction, in the alleyway on the north side of a chain link fence. |
| − | * |
+ | *[[Tudor]] - Below the Plumbers Skyway bridge on a support beam. The player can hop over from the one next to it. |
| − | * |
+ | *[[Westdyke]] - On a ledge above the door of a building with the [[Sprunk]] sign in the front. The player may need to climb on the dumpster to get it. |
===''Grand Theft Auto: Chinatown Wars''=== |
===''Grand Theft Auto: Chinatown Wars''=== |
||
| − | {{Stub}} |
+ | {{Stub}}'''General''' |
| ⚫ | |||
| − | '''General''' |
||
| ⚫ | |||
| ⚫ | |||
| ⚫ | |||
| ⚫ | |||
| ⚫ | |||
*Awarded to the player by entering a [[National Office of Security Enforcement|NOOSE]] [[Enforcer]]. |
*Awarded to the player by entering a [[National Office of Security Enforcement|NOOSE]] [[Enforcer]]. |
||
| + | *Can be obtained in some storyline missions, such as [[Street of Rage]] and [[Raw Deal]]. |
||
'''[[Broker]], [[Dukes]], [[Bohan]]''' |
'''[[Broker]], [[Dukes]], [[Bohan]]''' |
||
| − | * |
+ | *North of the [[Cerveza Heights]] gas station (Which is featured in the missions [[Natural Burn Killer]], [[Stealing the Show]] and [[Whack the Racers]]). |
| − | * |
+ | *Only spawns in the mission [[Store Wars]], behind a wall near the shops in which they are featured. |
| + | *Behind a building next to the [[Spanish Lords]] [[Warehouse Raiding|warehouse]]. |
||
| + | *Behind the [[Little Bay Safehouse|safehouse]] in [[Little Bay]]. |
||
| + | *At a pier south of [[Hove Beach]]. |
||
'''[[Algonquin]]''' |
'''[[Algonquin]]''' |
||
| − | * |
+ | *Inside an alley behind the [[Westminster Police Station]]. |
| + | *At the [[Columbus Cathedral]] in [[Hatton Gardens]]. |
||
| + | *At the [[Middle Park East Police Station]]. |
||
'''[[Happiness Island]]''' |
'''[[Happiness Island]]''' |
||
| − | * |
+ | *Beside the [[Statue of Happiness]]. |
=== ''Grand Theft Auto V'' === |
=== ''Grand Theft Auto V'' === |
||
| Line 422: | Line 428: | ||
*[[Mission Row]] - [[Sinner Street]], inside the [[Mission Row Police Station|Police Station]], near the seating area. |
*[[Mission Row]] - [[Sinner Street]], inside the [[Mission Row Police Station|Police Station]], near the seating area. |
||
*[[El Burro Heights]] - [[Capital Boulevard]], in the area just behind the [[South Los Santos Fire Station|Fire Station]] and next to [[St. Fiacre Hospital]], at the bottom of a tower. |
*[[El Burro Heights]] - [[Capital Boulevard]], in the area just behind the [[South Los Santos Fire Station|Fire Station]] and next to [[St. Fiacre Hospital]], at the bottom of a tower. |
||
| − | *[[Elysian Island]] - In the area between [[Elysian Fields Freeway]] and [[Chum Street]], in the middle of an unfinished silo near [[Abattoir Avenue]]. |
+ | *[[Elysian Island]] - In the area between [[Elysian Fields Freeway]] and [[Chum Street]], in the middle of an unfinished silo near [[Abattoir Avenue]]. |
*[[Little Seoul]]: |
*[[Little Seoul]]: |
||
**[[STD Contractors|STD]] Construction Site, intersection of [[Calais Avenue]] and [[Adam's Apple Boulevard]] - second floor, lying on a pile of cement bags just north of the access ramp. |
**[[STD Contractors|STD]] Construction Site, intersection of [[Calais Avenue]] and [[Adam's Apple Boulevard]] - second floor, lying on a pile of cement bags just north of the access ramp. |
||
| Line 433: | Line 439: | ||
*[[La Puerta]] - Inside [[Rogers Salvage and Scrap]], under a metal structure next to the eastern entrance on [[Alta Street]]. |
*[[La Puerta]] - Inside [[Rogers Salvage and Scrap]], under a metal structure next to the eastern entrance on [[Alta Street]]. |
||
*[[Los Santos International Airport (HD Universe)|LSIA]] - At the west side of the [[NOOSE]] Building on [[New Empire Way]], next to a pillar and just behind the [[Police Cruiser|Police Car]]. |
*[[Los Santos International Airport (HD Universe)|LSIA]] - At the west side of the [[NOOSE]] Building on [[New Empire Way]], next to a pillar and just behind the [[Police Cruiser|Police Car]]. |
||
| − | *[[West Vinewood]] - Intersection of [[Strangeways Drive]] and [[Spanish Avenue]], near the entrance to the "Parking" building, at north of the [[Epsilon Building]]. |
+ | *[[West Vinewood]] - Intersection of [[Strangeways Drive]] and [[Spanish Avenue]], near the entrance to the "Parking" building, at north of the [[Epsilon Building]]. |
*[[Vinewood Hills]]/[[Banham Canyon]]- On the third floor of a construction site next to the intersection of [[North Rockford Drive]] and [[Ace Jones Drive]], behind the blue tarp. |
*[[Vinewood Hills]]/[[Banham Canyon]]- On the third floor of a construction site next to the intersection of [[North Rockford Drive]] and [[Ace Jones Drive]], behind the blue tarp. |
||
| Line 470: | Line 476: | ||
*Awarded to the player by entering a [[Police Riot]]. |
*Awarded to the player by entering a [[Police Riot]]. |
||
*Can be dropped by an MC Enforcer and a CEO, for $1,000 and $1,500 respectively. |
*Can be dropped by an MC Enforcer and a CEO, for $1,000 and $1,500 respectively. |
||
| + | *MC Presidents and Road Captains can enable Riding Formation, which will allow players to enter a formation with their bikes to gain up to 100% health and 100% armor, as long as the former is filled already. |
||
==Trivia== |
==Trivia== |
||
=== ''Grand Theft Auto IV'' === |
=== ''Grand Theft Auto IV'' === |
||
[[File:Body_Armor_clothing.jpg|border|right|140px]] |
[[File:Body_Armor_clothing.jpg|border|right|140px]] |
||
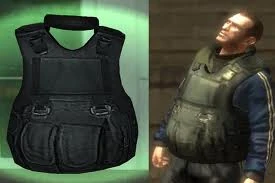
| − | *In the ''[[Grand Theft Auto IV]]'' [[beta]], body armor would be physically represented on one's character model if equipped. As with the fingerless gloves that were also 'cut', this wearable armor still exists in the retail version and can be equipped via a trainer, though without any effect unless the in-game armor is equipped as well. However, body armor is now able to be physically shown on [[GTA Online Protagonist|characters]] in ''[[Grand Theft Auto Online]]''. |
+ | *In the ''[[Grand Theft Auto IV]]'' [[Beta Releases in GTA IV|beta]], body armor would be physically represented on one's character model if equipped. As with the fingerless gloves that were also 'cut', this wearable armor still exists in the retail version and can be equipped via a trainer, though without any effect unless the in-game armor is equipped as well. However, body armor is now able to be physically shown on [[GTA Online Protagonist|characters]] in ''[[Grand Theft Auto Online]]''. |
=== ''Grand Theft Auto V'' === |
=== ''Grand Theft Auto V'' === |
||
*The armor depicted on the ground when picking it up does not match its armor value. Say, the armor pick-up on the ground is a super light $500 body armor bought at Ammu-Nation, even though it gives the armor value of a $2,500 super heavy body armor bought at Ammu-Nation. |
*The armor depicted on the ground when picking it up does not match its armor value. Say, the armor pick-up on the ground is a super light $500 body armor bought at Ammu-Nation, even though it gives the armor value of a $2,500 super heavy body armor bought at Ammu-Nation. |
||
| − | * |
+ | *In GTA V and GTA Online, the super light vest model in Ammu-Nation is actually a plate carrier model, and is used by the military. The model of the in store vest also does not match the actual model used when worn by a character. Its model is still visible when worn by NPCs (professional criminals, and military). |
== See also == |
== See also == |
||
| − | * |
+ | *[[Health]] |
==Navigation== |
==Navigation== |
||
| − | {{Gtav gear}} |
+ | {{Gtav gear}}[[de:Schutzweste]] |
| − | |||
| − | [[de:Schutzweste]] |
||
[[es:Chaleco antibalas]] |
[[es:Chaleco antibalas]] |
||
[[pl:Kamizelka kuloodporna]] |
[[pl:Kamizelka kuloodporna]] |
||
| Line 502: | Line 507: | ||
[[Category:Pickups in GTA IV]] |
[[Category:Pickups in GTA IV]] |
||
[[Category:Pickups in GTA: Chinatown Wars]] |
[[Category:Pickups in GTA: Chinatown Wars]] |
||
| − | [[Category:Pickups in |
+ | [[Category:Pickups in GTA V]] |
[[Category:Beta]] |
[[Category:Beta]] |
||
Revision as of 06:03, 9 March 2020
Body Armor is a pickup and gear featured in the Grand Theft Auto series that serves primarily to protect the player's health from specific forms of damage, most notably gunfire. In most cases, body armor in the games is illustrated as a protective blue vest.
Description
The body armor's primary function is to serve as padding for the player health, in effect extending the player's resilience to damage from gunfire, explosions and fire. The Body armor is a standard-issue item among law enforcement agencies, but also a rare sight among criminals.
2D Universe
In early top-down GTA games, armors in both Grand Theft Auto 1 (as well as Grand Theft Auto: London mission packs) and Grand Theft Auto 2 serve their intended purpose, adding 10 more hit points to the player's existing health, but provides no protection to the player when they fall from great heights, are run over by vehicles, or are beaten up by the police and arrested. Armors are most commonly found spawned in specific locations or crates, and, in the case of GTA 2, can also be acquired by crushing specific cars.
3D Universe
Body armor continued to be featured between Grand Theft Auto III and Grand Theft Auto: Vice City Stories, undergoing several more changes. In all of its appearances, armor now offers nearly the same amount of hit points as the player's full health, doubling the player's resistance to damage. The armor hit points stayed the same until Grand Theft Auto: San Andreas, where the armor is now a bar instead of hit points. In addition, armor can now pad injuries from falls, collisions with vehicles on foot, and even melee attacks; the armor in GTA San Andreas and GTA Vice City Stories is an exception, providing no protection to the player from falls, while the armor in Grand Theft Auto Advance provides no protection to melee attacks.
In addition to spawning in specific locales, body armor can also be purchased at stores that sell weapons, such as Ammu-Nation, as well as entering the Police/SWAT Enforcer trucks. Like the player's health, armor hit points between Grand Theft Auto: Vice City and GTA Vice City Stories (and GTA Advance) can typically be increased easily via side-missions (such as "Vigilante"), as well as 100% completion of the game.
The appearance of armor pickups has also changed significantly after GTA III. When included in GTA III, the pickup assumed the appearance of a shield icon; in games after, however, the pickup is redesigned as a spinning vest, possibly to avoid confusion with the police bribe pickup.
HD Universe
Grand Theft Auto IV
Armor in Grand Theft Auto IV and Episodes from Liberty City has been refashioned slightly out of realism. It no longer offers protection to falls, collisions with vehicles on foot, or melee attacks (including hand-to-hand combat and melee weapons), increasing the player's chances of death from these hazards. However, it may absorb damage when staying inside a broken helicopter on low altitudes (a higher altitude will not be enough to survive).
As expected, armor can be found lying about in specific points of the city (distinguishable by its red glow) as well as underground weapon dealers in GTA IV. Enforcer armored vans still provide the player some armor, but only gives the player roughly one third of the maximum amount.
When equipped, the HUD will represent it as a blue half-circle bar located next to the radar, along with the green health bar. Similarly, when aiming at armored targets, the weapon's reticle will have a smaller, light blue circle next to the health bar, usually seen on NOOSE/FIB agents.
Grand Theft Auto: Chinatown Wars
Armor in Grand Theft Auto: Chinatown Wars appears to revert to pre-GTA IV settings. They can be found on AmmuNation.net or winning it with a scratch card. Unlike GTA IV, entering a NOOSE Enforcer gives the player full armor.
Grand Theft Auto V
Grand Theft Auto V introduced a more complex body armor system, including five tiered armor vests ranging from small arms protection to large caliber weapon and explosive protection. Body armor once again provides protection from falls and impacts. Each next level tier provides an added 20% armor, and the player cannot buy the weaker armor after buying the next tier (buy light, cannot buy super light).
These five armor suits can be bought from Ammu-Nation, apart from the weapons area.
| Armor | Description | Cost (Story Mode) | Cost (Online) |
|---|---|---|---|
| Super Light Armor (20% armor) |
This body armor offers good protection from small-caliber handgun projectiles but is also extremely lightweight and easily concealable. | $500 | $100 (Rank 5) |
| Light Armor (40% armor) |
This lightweight body armor combines the comfort and mobility of a soft vest with the option of hard armor inserts for extra protection. | $1,000 | $200 (Rank 10) |
| Standard Armor (60% armor) |
Featuring full-size hard armor panels to the front and rear, with the option to fit additional soft side panels, this ballistic vest offers excellent protection from handgun and rifle projectiles. | $1,500 | $300 (Rank 15) |
| Heavy Armor (80% armor) |
This heavy-duty ballistic vest comes with full-size front and rear hard armor panels and optional hard armor side inserts for all-round protection. | $2,000 | $400 (Rank 20) |
| Super Heavy Armor (100% armor) |
This heavy-duty body armor features full-size high tensile strength ballistic plate to the front, rear and sides for maximum protection against large-caliber firearm projectiles and high-explosive shell fragments. | $2,500 | $500 (Rank 25) |
Armor suits have been reported to be massively weaker in Grand Theft Auto Online, even at 100%. Probably to compensate for this, players are able to have up to a maximum of ten reserve armor vests (at level 135) in their inventories.
The strength stat, when fully increased does seem to negate this. As it seems the strength stat gives a boost to both armor and health slightly. The armor difference is still very low (around 10-15% depending on the weapon used) but it seems that a super heavy vest (%100), with a character at max strength, can take 2-3 more hits from a carbine rifle or handguns, than a character with a super heavy vest (%100) without a very noticeable strength stat. This is caused by the fact that the strength stat DECREASES overall damage, and not just adds more health. This can be beneficial as it allows much more resilience with armor at range, and thus making armor purchases, and strength enhancing activities a better investment.
Image Gallery
")
")
")
")
")
")
")
")
")
Locations
Grand Theft Auto 2
- Appears as a Crusher reward for the following vehicles in specific districts:
- Romero in Downtown District.
- Big Bug in Residential and Industrial.
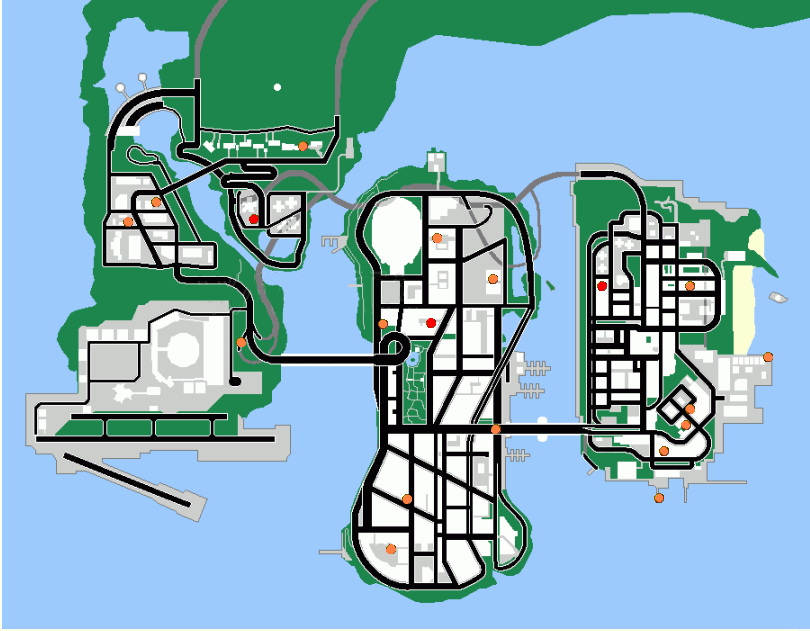
Grand Theft Auto III
General
- Available in Ammu-Nation, for $3,000.
- Awarded to the player by entering an Enforcer.
All body armor locations (GTA III)
- Atlantic Quays:
- On roof of Liberty City Sawmills (near a Micro Uzi). Walk on the low wall near the entrance and jump over the sawmill wall. Then use the pile of sawdust to climb up the rooftop and follow it to the end.
- At south, in the end of the west wooden pier.
- Far northeast Portland Harbor - near Emergency Vehicles Import/Export crane.
- Red Light District - near the safehouse after collecting 50 hidden packages.
- Saint Mark's - in a area behind Momma's Restaurante, where a Mafia Sentinel is parked, follow the edge around the building and down a side ramp. There's also an AK-47 near the armor.
- Trenton:
- On roof of Liberty Pharmaceuticals, across Bitch'n' Dog Food, along with a Hidden Package, an AK-47, an adrenaline and a health pickup. From train tracks, make a running jump onto a black roof beside Mean Street Taxis and follow it to the end to get there.
- Beside a fenced area across from Joey's Garage.
- Cedar Grove - inside the storage garage in the front yard of the Cartel Mansion (use the Cartel Cruiser to enter).
- Francis International Airport - atop the road tunnel entrance next to the Airport.
- Pike Creek:
- In one of the opened garages behind the Police Department.
- Inside a fenced area just north of Liberty Pharmaceuticals and near the Pay 'n' Spray.
- Wichita Gardens - near the safehouse after collecting 50 Hidden Packages.
- Bedford Point:
- In the southeast corner of a large building beside Liberty City Cathedral, next an AK-47 pickup icon.
- At the Liberty Tree parking lot (where the missionKingdom Come takes place), in the walled area behind a parked Moonbeam. Use the van to get there, park it by the lowest part of the wall, climb the car, then jump over the wall. It is also a Carbine Rifle location.
- Belleville Park:
- Near the safehouse after collecting 50 hidden packages.
- On roof of the destroyed Uncle BJ's Deli & Groceries, near the Fire Station. Use the Shoreside Lift Bridge as a ramp to get there. It is also a Sniper location.
- Fort Staunton - on second floor of the building in Panlantic Constrution site, near a health pickup (take the ramp in the west side, follow it to the end then turn right on the stairs).
- Liberty Campus - on porch of the north building.
- Newport:
- Can be bought in the Ammu-Nation for $3000.
- In a small lot underneath Callahan Bridge, between some trailers.
Grand Theft Auto: Vice City
General
- Available in Ammu-Nation, for $200.
- Awarded to the player by entering an Enforcer.
- Ocean Beach Ammu-Nation after completing Jury Fury, can be bought for $200.
- Inside Ocean View Hotel safehouse (10 Hidden Packages collected award).
- Upstairs over the parking lot where a Banshee and a PCJ-600 spawn of the building North of Pay 'n' Spray.
- Northeast behind the landmark tall pink condo building East of Hotel Harrison, by the pool. A Hidden Package pickup appears once and a Micro SMG, which spawns, are nearby.
- At the North corner of the building destroyed in the Demolition Man mission.
- In a sand bunker at the Northwest part of the course.
- East, behind the sign in front of the Standing Vice Point building.
- Near the basketball courts behind some apartments facing East The Well Stacked Pizza.
- Enter the Enforcer which spawns at the Vice Point Vice Point Police Station.
- In a 'tiki' garden pool bar South of El Swanko Casa.
- North Point Mall Ammu-Nation after completing Jury Fury, can be bought for $200.
- Top of the second ramp in the East entrance of the building South of the bridge which leads to Prawn Island.
- Northwest corner up the stairs of the building South of 3321 Vice Point.
Prawn Island
- Northwest in the grassy lot behind the wooden fence South of San Felis Hotel, East across the street from InterGlobal Studios.
- On roof of a building near the test track at the north of the district (use the stairs behind).
- On roof of Hyman Condo (10 Hidden Packages collected award).
- In a alley at south of The Well Stacked Pizza.
- Can be bought for $200 in the Ammu-Nation after Jury Fury.
- Behind a building beside the The Greasy Chopper.
- On roof of Print Works (use stairs).
- In the corner of a blue house just west of the basketball court complex (behind some bushes).
Vercetti Estate, Starfish Island (after "Rub Out")
- Southeast beside the steps leading to the upper garden (10 Hidden Packages collected award).
- In a small room at bottom of the stairs.
- In the lounge North of the main hall central staircase (after "Keep Your Friends Close...").
- In the entrance of a building North across the street from the big ship.
- Between some crates in the parking lot beside Vice City Transport Police (east of Escobar International Airport).
- At top of the east entrance guard tower.
Grand Theft Auto: San Andreas
General
- Available in Ammu-Nation, for $200.
- Awarded to the player by entering an Enforcer.
- Inside all accessible police stations.
- Commerce:
- At the Los Santos Conference Center.
- Inside the Atrium.
- East Beach - At the back of The Golden Palms apartments, near a graffiti tag.
- Ganton - Under a bridge on the Los Santos Storm Drain, northeast of the Johnson House.
- Las Colinas - Near a Dopealicious FM billboard.
- Los Santos International - Next to the road that connects the two levels of the main terminal.
- Mulholland:
- Inside Madd Dogg's Crib.
- On the balcony of the Chateau Marmont Hotel replica, near a sniper rifle.
- Ocean Docks:
- In the office at the back of the warehouse where the mission Gray Imports takes place, east of the airport.
- Inside a railway carriage in a warehouse, near the end of the railway line.
- Pershing Square - In a jail cell and in the locker room in Los Santos Police Headquarters.
- Verdant Bluffs - In a terrace of a bar, just south of the City Hall.
- Willowfield:
- East of Unity Station, next to a container and near the railroad track.
- In an alleyway next to a housing project, northwest of Ammu-Nation.
- Doherty - At the torn down building at The Waste Ground behind the Doherty Garage.
- Easter Basin - At the base of the hill under the freeway, at the north end of the large red brick factory due west of the docks.
- Easter Bay International Airport - Near the main entrance of the airport parking lot, to the right.
- Esplanade East - At the end of a small quay where a Dinghy can be found.
- Garcia - At the alleyway behind a building with red bricks, southwest of Zero RC.
- Juniper Hill - In the alley to the right behind Supa Save.
- Ocean Flats - In the corner behind a tall gray house due north of Avispa Country Club.
- Palisades - Under the edge of a cliff behind some houses, in a grassy area.
- San Fierro Bay - On the Da Nang Boys Freighter ship.
- Blackfield - Beside two green trash cans in the western part of the campus at Greenglass College.
- Come-A-Lot - Under the Come-A-Lot signal tower due east of the Four Dragons Casino.
- Las Venturas International Airport (2x) - One can be found in the north end of the airstrip, and another inside the hangar where the Dodo is located and used by Carl for the mission Freefall.
- Pilgrim - On top of of the conch-shell-shaped lobby at La Conca motel.
- Redsands East - In a building behind the Tattoo shop and Gay Gordo's Bouffant Boutique.
- Roca Escalante - Inside the Las Venturas Police Headquarters.
- Rockshore West - Between the stairs of the dock south of the district.
- The Strip - At the Rockshore Wedding Chapel.
- Blueberry - Spawn around the FleischBerg factory premises.
- Dillimore - One inside the prison cells and another in the locker room in the Dillimore Police Station.
- Hampton Barns - Behind a house at the trailer park.
- Montgomery - In the trailer park.
- Palomino Creek - Between a house and a garage in the northeast part of town.
- Angel Pine - At the side and behind the wall of J & J’s Restaurant.
- Mount Chiliad - At the summit.
- Area 69 - At the underground installations, where the mission Black Project takes place.
- Las Payasadas - On the roof of the building near Pecker's Feed & Seed.
- Valle Ocultado - Near boat station, behind a garage serving as a Unique Stunt Jump.
- Verdant Meadows - In the middle of the wreckage, inside of a fuselage.
Grand Theft Auto: Liberty City Stories
General
- Available in Ammu-Nation, for $240.
- Awarded to the player by entering an Enforcer.
- Callahan Point - On the lower level of the dock.
- Harwood
- On top of the elevated tracks above the southern part of the Harwood Dirt-Track.
- In the gated area on the west side of the main Harwood Ferry terminal building.
- On the roof of the Head Radio building.
- Saint Mark's - On top of one of the garage roofs just east of the Portland Island Safehouse.
- Newport - Can be bought in the Ammu-Nation for $240 after the completion of the mission Driving Mr. Leone
- Next to the firetruck at the airport.
Grand Theft Auto: Vice City Stories
General
- Available in Ammu-Nation, for $240.
- Awarded to the player by entering an Enforcer.
- Can be found on the roof of the The Greasy Chopper.
- In the small alley next to the Farmacia Central pharmacy.
- At the Marina Sands Hotel.
- In front of a wall in the underground carpark.
- Southwest corner on top level of the Ocean Beach Parking Garage.
- At the parking garage near the Ocean Bay Marina piers.
- Grassy area at southeast part of Ocean Beach.
Grand Theft Auto IV and episodes
General
- Can be purchased from the back-alley gun shops, for $500.
- Can be purchased from Little Jacob (GTA IV), Terry Thorpe (TLAD) or Armando Torres (TBOGT) for $300.
- Awarded to the player by entering an Enforcer.
- Cerveza Heights - On the rooftop of Sum Yung Gai building, inside the large noodle bowl with chopsticks. Can be accessed with the help of a car to access from the emergency stairs on the south side, or by getting into the subway overpass from the Huntington Street LTA station and jump into the rooftop.
- East Hook - In the Platypus control bridge up top with the steering wheel, but is only accessible via helicopter, as the location is only available in the mission A Dish Served Cold (Only if choosen Revenge after the mission One Last Thing).
- Firefly Projects - In a junkyard to the right, between the junk and the roofing, in the leftover remains of a pickup.
- Francis Intl. Airport:
- Northwest of an orange and white box, behind the cement barrier. Careful, as one will get a 4-star wanted level.
- On some rooftop generators of the FIA area. There is a ladder on the side to access it.
- In a small grassy area, near the airport fuel station just off the Broker - Dukes Expressway
- Hove Beach - Across from the first safehouse on the billboard. It is really hard to get it, the player have to jump off the Broker - Dukes Expressway to the north to access the rooftops and them carefully jump to the billboard to get it.
- Meadow Hills - Behind a two-car brick garage off Sillwater Ave.
- South Slopes - On the east side of a steel gated door, in an alley north of Sundance St.
- Steinway - North Dukes Drive, under the boardwalk on the rocks, as it descends down to the water.
- Cerveza Heights - Inside the giant bowl structure on the roof of the Sum Yung Gai restaurant.
- Chase Point - In the corner of the top floor of the unfinished building on Folsom Way.
- Fortside:
- On the pier, on Grand Boulevard.
- Behind the green storage unit, behind the ARS building on Folsom Way.
- Castle Gardens - In a pipe of the construction area.
- Charge Island:
- Near two large spools and the stairs behind the boathouse. The player may see it on the mission "Catch The Wave", given by Phil Bell.
- On an angled catwalk near a large electrical box. The player may see it on the mission "Diamonds Are a Girl's Best Friend", given by Gerald McReary.
- Colony Island - In the graveyard behind an Angel Statue marker.
- Hatton Gardens - In a construction area, underneath the ramp the player may use to get in it.
- Lancaster - In a small alley, north of the Skeeza shop off Albany Ave.
- Northwood - At the junction on the docks between the wood and cement (off Grummer Road), on the lowest level.
- Below the Northwood Heights Bridge support, between the columns.
- Purgatory - In the southwest corner of the parking garage on the second level, next to a trash receptacle in Purgatory.
- Star Junction:
- On the rooftop patio near the red and yellow Logger Beer umbrella in Star Junction, at the Majestic Hotel. It is only accessible via helicopter, as the area is only accessible in the mission "Late Checkout", given by Ray Boccino.
- On a back alley ledge off Lorimar St, where it is possible to see some skylights. The player may use the dumpsters to access it.
- The Exchange:
- Near the stairs behind the Supermarket off Borlock Rd.
- At the northernmost point of the star-shaped base of the Statue of Happiness, on Happiness Island.
- The Triangle - In an alley, on the northwest corner of the block. Its a slim alley to go into.
- Acter - In an alley near the corner building off Lee Rd. To find it, climb the wall on the side, where police cars are usually seen, and finding the way down the alley to the armor.
- Acter Industrial Park:
- On the western side, near a burning barrel on the railroad tracks.
- Inside an old warehouse, just inside the door. The player may see it in the mission "Pegorino's Pride" given by Jimmy Pegorino.
- Alderney City:
- At the end of the easternmost wall at the Liberty Ferry Terminal.
- Near some red and white plastic crates off Jonestown Ave.
- Berchem:
- Next to the west wall of the Plumbers Skyway, on the ground.
- Next to the stairs from the building that leads out into the parking lot of Babbage Drive and Fleming St. The player can get there from the east side building entry and walking up the stairs.
- Leftwood - North-east from Franklin St and Rand Ave junction, in the alleyway on the north side of a chain link fence.
- Tudor - Below the Plumbers Skyway bridge on a support beam. The player can hop over from the one next to it.
- Westdyke - On a ledge above the door of a building with the Sprunk sign in the front. The player may need to climb on the dumpster to get it.
Grand Theft Auto: Chinatown Wars
General
- Can occasionally be found in the red dumpsters when checking them.
- Buying an Ammu-Nation scratch card in any of the lottery shops may have a chance of earning Body Armor.
- Can be bought from AmmuNation.net for $500, after completing the mission Carpe Dime.
- Awarded to the player by entering a NOOSE Enforcer.
- Can be obtained in some storyline missions, such as Street of Rage and Raw Deal.
- North of the Cerveza Heights gas station (Which is featured in the missions Natural Burn Killer, Stealing the Show and Whack the Racers).
- Only spawns in the mission Store Wars, behind a wall near the shops in which they are featured.
- Behind a building next to the Spanish Lords warehouse.
- Behind the safehouse in Little Bay.
- At a pier south of Hove Beach.
- Inside an alley behind the Westminster Police Station.
- At the Columbus Cathedral in Hatton Gardens.
- At the Middle Park East Police Station.
- Beside the Statue of Happiness.
Grand Theft Auto V
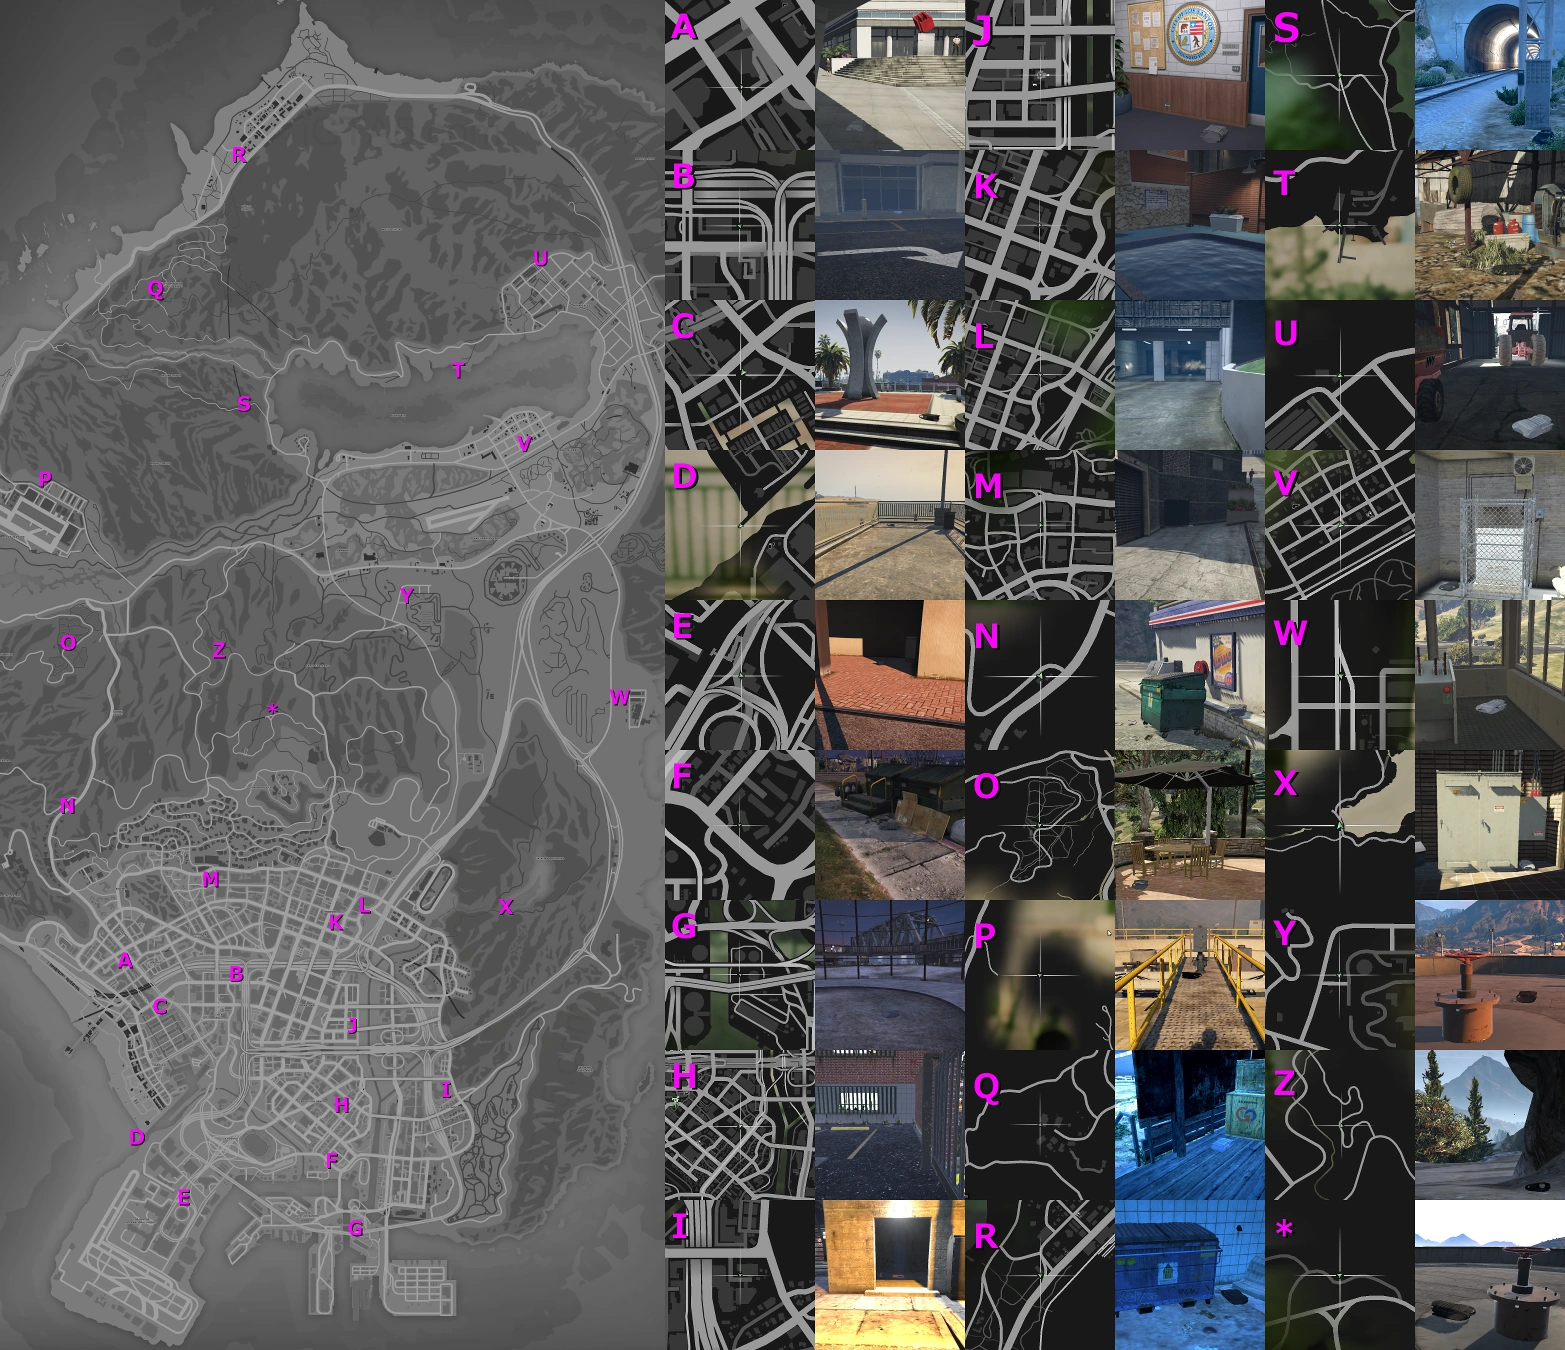
Body armor locations in Grand Theft Auto V.
General
- Available in Ammu-Nation, with a price range between $500 (the lightest) and $2,500 (the heaviest).
- Awarded to the player by entering a Police Riot.
- Davis:
- In the front porch of the blue house on Grove Street, near the intersection with Brouge Avenue.
- Innocence Boulevard, inside Davis Sheriff's Station parking lot.
- Rancho - Rancho Projects, intersection of Dutch London Street and Jamestown Street, south side of the southmost building, near some green dumpsters.
- Strawberry - At the northern side of a homeless camp under Olympic Freeway, lying on a couch. The player can also find a Health Pack nearby.
- Del Perro - Intersection of Prosperity Street and Marathon Avenue, on the sidewalk in front of the Maze Bank, near Del Perro Station.
- Mission Row - Sinner Street, inside the Police Station, near the seating area.
- El Burro Heights - Capital Boulevard, in the area just behind the Fire Station and next to St. Fiacre Hospital, at the bottom of a tower.
- Elysian Island - In the area between Elysian Fields Freeway and Chum Street, in the middle of an unfinished silo near Abattoir Avenue.
- Little Seoul:
- STD Construction Site, intersection of Calais Avenue and Adam's Apple Boulevard - second floor, lying on a pile of cement bags just north of the access ramp.
- Betsy O'Neil Pavilion, San Andreas Avenue - Under a covered area on the east side, near the entry doors.
- Pillbox Hill - at the underground of Union Depository, in a small hole under the floor, along with an Assault Shotgun.
- Vespucci Beach - at very end of the pier walkway, southmost point of the beach.
- Vespucci Police Station, Vespucci Canals - on the garage rooftop patio, next to a metallic statue.
- Hawick/Alta- near the swimming pool inside The Pink Cage Motel.
- Hawick - Elgin Avenue, at the end of a small driveway between the Police Station and a "Parking" building.
- La Puerta - Inside Rogers Salvage and Scrap, under a metal structure next to the eastern entrance on Alta Street.
- LSIA - At the west side of the NOOSE Building on New Empire Way, next to a pillar and just behind the Police Car.
- West Vinewood - Intersection of Strangeways Drive and Spanish Avenue, near the entrance to the "Parking" building, at north of the Epsilon Building.
- Vinewood Hills/Banham Canyon- On the third floor of a construction site next to the intersection of North Rockford Drive and Ace Jones Drive, behind the blue tarp.
- Land Act Dam - In the center, inside the dam building (the building has a small tower on the top), next to a generator box.
- Richman Glen - Intersection of North Rockford Drive and Banham Canyon Drive, at the north side of the LTD Convenience Store, sitting on the wall beside a HOBO dumpster.
- Baytree Canyon - Intersection of Baytree Canyon Road and Marlowe Drive, in a white outhouse shed at the picnic area, next to the end of the bike race against Mary Ann.
- Vinewood Hills:
- Galileo Observatory - Inside the caged electrical area at east of the statue in the front lawn (go downstairs to reach the entrance).
- Northeast of the Galileo Observatory Tunnel - In the middle of the top of the water tank (take the yellow ladder to access).
- Banham Canyon - Ineseno Road, at the bottom of a blue house located just north of No Marks Cleaners, next to some rocks on the beach side.
- Redwood Lights Track - At northwest, on top of a large storage tank (near the letter scrap).
- Great Chaparral - On a dirt road off Galileo Road, just northwest of the starting point of the "Ridge Run" Offroad Truck Race.
- Palmer-Taylor Power Station - at northwest, inside a grey cabin located at the furcation of the train tracks (take the stairs around the cabin to access).
- Altruist Camp, Chiliad Mountain State Wilderness:
- Inside the westmost building, just next to the altar rock, along with an RPG and an Assault Shotgun.
- As soon as the player enters, on the porch to the left of the main entrance, next to some crates.
- Grapeseed - Intersection of Grapeseed Main Street and Union Road, inside a white small shed, near the HVY trailer.
- North Fort Zancudo - At Fort Zancudo Treatment Works just outside the army base, in the middle of the eastmost water processing tank.
- Mount Josiah - In front of the train tunnel over the eastern side of Raton Pass, between a small fenced shack and some generator boxes.
- Paleto Bay:
- In a fenced area at the south side of the Police Station, between some HOBO dumpsters.
- Inside a construction area at the north side of Paleto Boulevard, in front of a supervisors shack by the southwest entrance.
- Sandy Shores:
- Zancudo Avenue, behind the Police Station, in a corner beside the generator gate.
- Algonquin Boulevard, at the rooftop balcony in the back of Liquor Ace, near a destroyed brown couch.
- Stab City - In the covered area beside the northmost trailer, near a Carbine Rifle.
- Galilee:
- South side of Millar's Fishery, next to some red gas tanks.
- Inside the large warehouse on the nothern dirt road off North Calafia Way, lying on a pile of laths next to the boat.
Grand Theft Auto Online
- Available in Ammu-Nation, with a price range between $100 (the lightest) and $500 (the heaviest).
- Awarded to the player by entering a Police Riot.
- Can be dropped by an MC Enforcer and a CEO, for $1,000 and $1,500 respectively.
- MC Presidents and Road Captains can enable Riding Formation, which will allow players to enter a formation with their bikes to gain up to 100% health and 100% armor, as long as the former is filled already.
Trivia
Grand Theft Auto IV
- In the Grand Theft Auto IV beta, body armor would be physically represented on one's character model if equipped. As with the fingerless gloves that were also 'cut', this wearable armor still exists in the retail version and can be equipped via a trainer, though without any effect unless the in-game armor is equipped as well. However, body armor is now able to be physically shown on characters in Grand Theft Auto Online.
Grand Theft Auto V
- The armor depicted on the ground when picking it up does not match its armor value. Say, the armor pick-up on the ground is a super light $500 body armor bought at Ammu-Nation, even though it gives the armor value of a $2,500 super heavy body armor bought at Ammu-Nation.
- In GTA V and GTA Online, the super light vest model in Ammu-Nation is actually a plate carrier model, and is used by the military. The model of the in store vest also does not match the actual model used when worn by a character. Its model is still visible when worn by NPCs (professional criminals, and military).
See also
| Gear and other items in the Grand Theft Auto series | |||||||||||||
|---|---|---|---|---|---|---|---|---|---|---|---|---|---|
| Head/Face | Earpiece | Gas Mask | Night Vision [O] | Rebreather [O] | Thermal Vision | ||||||||||||
| Body | Ballistic Equipment | Body Armor | Parachute | Scuba Suit | ||||||||||||
| Gadgets and Objects | Binoculars [V] | Camera | Detonator [3D] | Digiscanner [V] | Fireworks [O] | Thermite Bomb [O] | Metal Detector [O] | Hacking Device [O] | ||||||||||||
| Thrown | Ball [V] | Flare [O] | Random Pickable Objects [IV] | Snowballs [O] | Jerry Can [V][O] | Hazardous Jerry Can [O] | Fertilizer Can [O] | ||||||||||||
| Environment Objects | Binoculars (Stationary) | Cash Register | Telescope | ||||||||||||
| Attachments |
|
||||||||||||
| Other Items | Backpacks | Health Medikits | ||||||||||||
| [3D] - 3D Universe only | [IV] - Grand Theft Auto IV only | [V] - Grand Theft Auto V only | [O] - Grand Theft Auto Online only
GTA Online Content Updates The Chop Shop | The Contract | The Diamond Casino Heist | The Doomsday Heist | Gunrunning | Further Adventures in Finance and Felony | Heists | Festive Surprise | Independence Day Special | |||||||||||||